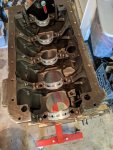
I'm curious why you chose the 200 block to build this engine with. Was it just because your truck is already set up for a 200? Or do you feel like there is really something superior about that block over a 300? Seems like getting away from the blocker stiffener and gaining serpentine belt would be advantages of the 300.Plugged all the block holes, even the tiny 5mm one
You are using an out of date browser. It may not display this or other websites correctly.
You should upgrade or use an alternative browser.
You should upgrade or use an alternative browser.
What have you done to your DEFENDER today?
- Thread starter javelinadave
- Start date
Napalm00
Technical Excellence Contributor
I'm curious why you chose the 200 block to build this engine with. Was it just because your truck is already set up for a 200? Or do you feel like there is really something superior about that block over a 300? Seems like getting away from the blocker stiffener and gaining serpentine belt would be advantages of the 300.
200 has the simpler and more reliable vac pump, I won't be running power steering, my frame is setup for 200, better setup for exhaust/timing belt , I also had two blocks
Mostly personal preference
Clean tho !
yeah, it’s just when there’s a decade between starting it and finishing it, it needs the same stuff that all trucks need after 10 years...
Napalm00
Technical Excellence Contributor
Same same . Parts i put in new 10 years ago are finally wearing out.yeah, it’s just when there’s a decade between starting it and finishing it, it needs the same stuff that all trucks need after 10 years...
I was greatly relieved when the engine mated up to the trans and dropped onto the motor mounts with no fuss no muss. The fan doesn’t even foul the radiator shroud. Kudos to the Rovers North template kit for positioning the mounts perfectly. Thanks to local Roverfriend Adam for assistance and big appreciation to his 14 year old understudy for doing multiple good reps of the bell-housing bench press.
The day prior I replaced the input shaft seal on the R380 because I think it had been leaking. 3 bucks. I fished the harness through the chassis and connected almost everything. I’ve got custom work left to do for the gauges, heated windscreen etc, but this is very close to being a runner. I’m going to do a timing belt service etc before I try to fire her up, might even do the water pump for good measure.
Prior to all this, I installed Brit Rest Mike’s sweet Tdi clutch fork, and a bunch of overbuilt stuff from LOF Clutches. The throw out bearing and operating rod have metal retainer clips that seem like they will be far more effective than the plastic bits, however I do have lingering misgivings about having potentially stray bits of metal flying around in the bell housing if those bits fail...
Rainy day here, so I had to content myself with indoor tasks. This was a good opportunity to convert a zero-mile speedo I have to Mph and make the needles match between my original and VDO gauges. The process is pretty easy if a bit tedious, the worst parts are prying back the crimp on the bezels for disassembly and carefully scraping the paint off the back of the needles. In the end, the shade of red is not a perfect match. It’s not too bad, but if I had to do it all again I think I would either make the VDO gauges white to match the Rover ones, or I would get a can of transparent orange paint as well and use that first and the overcoat it with red. I used 2-3 coats of red and then top-coated it with white, otherwise the translucent needle looks too dark against the gauge face.
While I was at this i also set up my mud pod, what a hassle to cut those 52mm holes. My largest step drill is 45mm and my largest hole punch is 50mm. Came out ok though because the gauges cover the rough edges.


While I was at this i also set up my mud pod, what a hassle to cut those 52mm holes. My largest step drill is 45mm and my largest hole punch is 50mm. Came out ok though because the gauges cover the rough edges.
Last edited:
Tbaumer
Technical Excellence Contributor
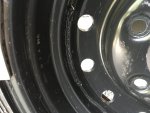
Ensured breather tubes were clear, replaced the hub caps all around, cleaned brake pads/shoes/rotors/drums, cleaned & rotated my wheels. Hope it stops the leaking all over my tires until I can do the next step - replace the oil seals. The surprise was when I noticed the edge of the welds on the inside of my three year old Wolf wheels were starting to rust already! Prep & POR15 to prevent a future problem.


Attachments
broncoduecer
Technical Excellence Contributor
Finally put the Tdi badges on, sometimes it’s the little things!

Napalm00
Technical Excellence Contributor
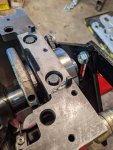
Just a little job today, but I really hate doing this because it’s so fiddly. I installed the o-ring supplied by Dieselgeek into the high pressure end of the 300tdi injection pump. This pump was not leaking, and had very low miles, but was manufactured in 2006 so I figured that the job was cheap insurance against future failure. Plus it really sucks trying to do this with the fenders, air cleaner, coolant bottle etc all in place.
The big suck is that you have to remove four T-30 torx bolts and two 5mm hex cap screws. These are tight and usually frozen but the margin of error for stripping or rounding them out is very small. Last time I did this job in my other tdi, one of the screws started to strip and the only way to prevent a disaster was to remove the pump, install the o ring on the bench and then reinstall everything and re-time the engine.
I stopped taking pictures at the point that my hands became covered in Diesel.
You need a separate thread for this!View attachment 15389View attachment 15390View attachment 15391
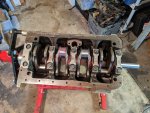
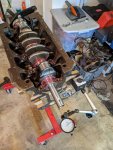
Rechecked weights and balance matching. Installed rings and final clean prior to assembly.
I've been asked by a few people what these big napkins I assemble these things on and clean with. They are kimwipes, a 100% non-linting scientific paper product.
Just a little job today, but I really hate doing this because it’s so fiddly. I installed the o-ring supplied by Dieselgeek into the high pressure end of the 300tdi injection pump. This pump was not leaking, and had very low miles, but was manufactured in 2006 so I figured that the job was cheap insurance against future failure. Plus it really sucks trying to do this with the fenders, air cleaner, coolant bottle etc all in place.
The big suck is that you have to remove four T-30 torx bolts and two 5mm hex cap screws. These are tight and usually frozen but the margin of error for stripping or rounding them out is very small. Last time I did this job in my other tdi, one of the screws started to strip and the only way to prevent a disaster was to remove the pump, install the o ring on the bench and then reinstall everything and re-time the engine.
I stopped taking pictures at the point that my hands became covered in Diesel.
View attachment 15376View attachment 15377View attachment 15378
The back of that pump is rusty. Isn't there some space age coating that should be applied here ?
The back of that pump is rusty. Isn't there some space age coating that should be applied here ?
Oh, heck yes. Unfortunately I ran out of unicorn ball sweat. Actually, I decided that I’m not going to delay further by obsessing over every aesthetic aspect of a low-motor that already runs and functions great.
That being said, I’m looking for a VNT but everyone is sold out of the Turbo Technics model. I’m trying to decide if it’s worth going with the version sold by M&D that involves more, though easy, modifications.