Or a good set for you so you don’t have to hear the complaining as you drive.Get a pair of soft ear plugs, they go a long way..

Or a good set for you so you don’t have to hear the complaining as you drive.Get a pair of soft ear plugs, they go a long way..


Oh man is she going to be pissed at you or she rides that thing after you do all this work that is just as fucking loud lol. No really it'll definitely help cut down on the tininess.
My wife can't stand the noise in my Defender and keeps bugging me to get a 2020 Defender so here I come to resolve this.
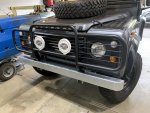
Put on a new galvanized front bumper on my 90 today...the plan is to let it dull out like the chassis. I still need to figure out a decent way to mount a front plate that is secure if anyone has any recommendations for a decent metal license plate bracket?
What kind of gas mileage you getting and at what speedsI started a 7-day road trip from NYC to Arizona in my ‘89 110. The Cummins recently installed by Doug makes a wee bit of a difference on the highway. View attachment 14851
Put on a new galvanized front bumper on my 90 today...the plan is to let it dull out like the chassis. I still need to figure out a decent way to mount a front plate that is secure if anyone has any recommendations for a decent metal license plate bracket?
On long, steady stretches of interstate, at 60-65 mph and with the stock tune, 25-26 mpg. Tuned up and running at 70-75, more like 19. It's a 110 with 235/85 KO2s, a front runner rack and a winch. The cargo area was loaded fairly densely up to the top of the second row seats.What kind of gas mileage you getting and at what speeds
Thx
Put on a new galvanized front bumper on my 90 today...the plan is to let it dull out like the chassis. I still need to figure out a decent way to mount a front plate that is secure if anyone has any recommendations for a decent metal license plate bracket?