vtlandrover
Well-known member
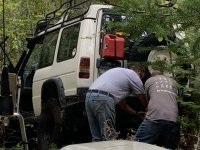
Odd man out today; dollars to donuts the other three are searching defendersource want-ads for something more comfortable, dry, and... diesel.


So QEII v. HMS Hood?Much better than the 285 75 KO2s that were on it for a bit.
So QEII v. HMS Hood?

Are those 255 or 235?Installed the new wheels & tires. Not super happy with the KM3 look, I definitely prefer the KM2, and obviously the XZL trumps them both
View attachment 25422
255 85Are those 255 or 235?
Morimoto LEDs are amazing. I run their Two stroke 2.0 H4 bulbs and it was night and day difference. I wish they came in 3200k color though.Installed LED headlights- like some other guys here I didn’t want something that looked vastly different from stock. So it was the Holley RetroBright for me, which is actually made for Holley by Morimoto. Easy install, use the same mounting ring from your existing ones plug and play.
View attachment 25485
LED on the left stock on the right
View attachment 25486Same but powered on. Makes a huge difference at night for me. I went with the modern white color. Highs are high and quick, lows are low. I bought from Headlight Revolution just because of their thorough reviews of everything, it’s worth it to me so support vendors that do the research.
Do the SM seats ( super coolThen installed the remnants of a 110 Safety Devices padding kit (whoa expensive, but managed to fully protect two Rovers); installed the armrests that showed up; fitted a fire extinguisher (with two 3" pads left over - nice and snug); resurrected the old Rubbermaid box that I kept on the floor of my '95 NAS SW - the lid's fully 'openable' and the reality is, I doubt I'll even have to riders in the other bench; and riveted in the tailgate rubber pad.View attachment 25266View attachment 25267
when I see that mud photo, I’ll I see is wasted hours cleaning up my undercarriage or risk the wrath of rust! on reason I love CO/Utah and why I’m the one going so slow and steady through puddles and not bashing through them. But no avoiding the grime on that one! I wouldn’t pass up being with friends, but I ain’t letting my truck sit for weeks with gunk on it either…. Fixed rust spots too many times in my grumpy old man clothes…Odd man out today; dollars to donuts the other three are searching defendersource want-ads for something more comfortable, dry, and... diesel.
They can be. The basic problem is that the front legs of the hitch have 3-4mm of gap between it and the frame, so tightening the bolts down strong puts a huge amount of tension on the head of the bolt. Even though they're 8.8, it's not ideal. And it's a royal pain in the ass to try to do stacked washers in there.The tie downs are on the outside of the frame though, right?
I have never seen that type of hitch, but I would space it because, if no other reason, you can hose dirt out of the gap.They can be. The basic problem is that the front legs of the hitch have 3-4mm of gap between it and the frame, so tightening the bolts down strong puts a huge amount of tension on the head of the bolt. Even though they're 8.8, it's not ideal. And it's a royal pain in the ass to try to do stacked washers in there.
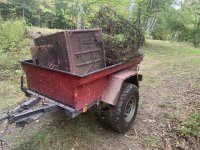
@TheOneTen traiier wiring is a pain in these trucks. I only use a 4way and there’s no natural place for it. For a 7 way can you body mount a plug?
") .... trying some "Superbright" tail lights on the Perentie ...
.... trying some "Superbright" tail lights on the Perentie ...![20220924_150806[1].jpg](/data/attachments/24/24637-63df52ef88fd8b5fb8bf4b565fa31a59.jpg)
![20220925_103501[1].jpg](/data/attachments/24/24638-f08c5b22610715b08a1c8f54551dfc0d.jpg)