thought you had air lockers in those axles we put under it ?
You are using an out of date browser. It may not display this or other websites correctly.
You should upgrade or use an alternative browser.
You should upgrade or use an alternative browser.
What have you done to your DEFENDER today?
- Thread starter javelinadave
- Start date
Z.G
Well-known member
thought you had air lockers in those axles we put under it ?
I did, but I pulled them & sent them to L8 to be resealed and have some 4.11s installed on them. Only to find out that 1 wasn't rebuildable, so had to buy an Ashcroft locker and have that installed. They are supposed to be done today
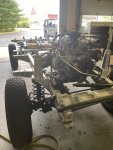
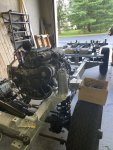
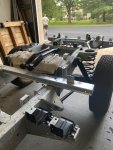
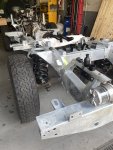
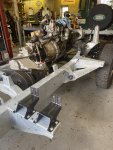
Progress this past weekend ..Cleaned chassis and put a good coat of por15 cut out rusted out upstand and installed new one. Temporarily installed lock and fold seats. Next on the list install 2nd row seats and then remove everything to spray raptor liner on floors tub and seat box....


Jeff B
Well-known member
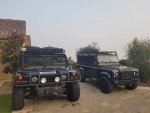
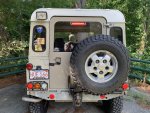
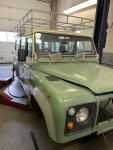
Added some real rubber today. Currently on the fuji white take off wheels, but will eventually be on matching alpine white refinished wheels
Looks great on those tires Zack.
Is that the final door config? I love it.
.
rocky
NAS-ROW Addict
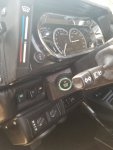
Wired in the high mounted tail light that my truck has never had before. Added some more dynamat. Found a couple more projects to do that weren’t on the list.
Edit to add image. Memo to self, cut about four inches off the tailpipe. You would have thought “genuine” meant it was properly trimmed.
Edit to add image. Memo to self, cut about four inches off the tailpipe. You would have thought “genuine” meant it was properly trimmed.
Attachments
Last edited:
uc4me
Well-known member
Took a negative and reclaimed a small positive. I utilized the rail mount bow sockets I had planned for my boat..which had a slight mishap this past Friday, it sunk.  I ripped some lumber for strapping and fit the bow sockets which attached perfectly to my NAS rack to keep it from becoming a swimming pool when the tarp is affixed.


I ripped some lumber for strapping and fit the bow sockets which attached perfectly to my NAS rack to keep it from becoming a swimming pool when the tarp is affixed.
Last edited:
I just did the best thing for my defenders today. sold my dependable daily driver. back to daily driving defenders. the best way to keep them maintained. when you have to!
4RF RDS
Well-known member
Installed LOF clutch pedal assist spring and a LOF clutch slave as well as a new Delphi master into my 2000MY 110 Td5 CSW. After 170,000 it was dripping. What a difference in effort required to use the clutch pedal. Highly recommend this mod. Much more civilized.


Last edited:
abruzzano
Well-known member
Ordered a backup camera ... backup camera
Napalm00
Technical Excellence Contributor
Installed LOF clutch pedal assist spring and a LOF clutch slave as well as a new Delphi master into my 2000MY 110 Td5 CSW. After 170,000 it was dripping. What a difference in effort required to use the clutch pedal. Highly recommend this mod. Much more civilized.
Love the wrench in action pic !
FLY CUBS
Well-known member
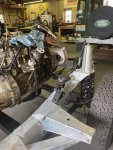
Finally installed the new rear axle on my 90. It's a disco 1 axle I bought from Will Tillery- evaluated the diff, replaced all seals, bearings, shields and added 110 brakes. Also took the opportunity to do all rear bushings, shocks, upper link and hardware. The difference in the drive without the clunk and completely shot bushings is a really nice difference. Old axle and some other random parts about to hit the parts section.


1of40
Well-known member
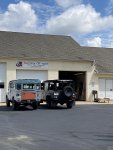
Visited it at Red Door Offroad
Attachments
-
 55837219-00FB-4012-ADDA-630329234169.jpeg219.7 KB · Views: 156
 -
 26588E2F-0E76-4DE1-BFEB-6CAAAD93C805.jpeg252.7 KB · Views: 157
 -
 2A93BF47-C6A7-4DD4-B394-670925063367.jpeg243.3 KB · Views: 154
 -
 E1FBF49E-9D4C-43DD-BE8E-DFD7460C607C.jpeg268.9 KB · Views: 158
 -
 2A9A786B-D8BF-4B78-A373-D5CA9F038F99.jpeg247.7 KB · Views: 156
 -
 7845307E-2A19-4C15-97B2-0D6D36C109D9.jpeg261 KB · Views: 150
 -
 71C21EAE-1132-42C8-82B4-DEA75626EE8E.jpeg258.6 KB · Views: 146
 -
 800C2D9E-03CB-4167-A952-FFB757A27EC1.jpeg279.4 KB · Views: 165
 -
 009B15EB-49EE-4406-B447-126E642F9D02.jpeg212.3 KB · Views: 164
 -
 C1DA1CDC-3A43-4117-8EA1-C5F044E30281.jpeg189 KB · Views: 156
Guess I need to get mine repainted Alpine white as well - looks great ZackAdded some real rubber today. Currently on the fuji white take off wheels, but will eventually be on matching alpine white refinished wheels
View attachment 14022