What have you done to your DEFENDER today?

SARTech

Well-known member
A while back my ignition failed. The switch would turn on the glow plugs but when you rotated it to start nothing happened. This happened while on a road trip,
I rigged up a remote stater button connected to the battery and the starter relay to get me home. I used this for a while until I had time to work on it.
Not wanting to pay for a new ignition switch I bought a push button starter switch. I had planned to install it in the center of the dash in the location of a unknown and unused switch. The rover is somewhat new to me. I have had it for 1 year.
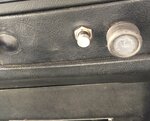
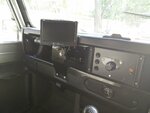
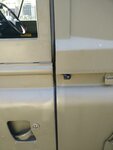
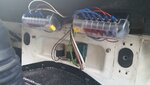
I went to remove the unknown and unused switch (the one in the picture) and found that it still had wires attached to it. I thought I should follow the wires to find out what it was used for. I followed the wires right to the ignition switch??? That is when the light bulb in my head went off. I connected the original wire to the stater solenoid, tried the ignition, no joy, pressed the switch, tried the ignition and the motor cranked over.
Ha, the previous owner had installed a started cutout switch as anti-theft protection I assume.
Somewhere along the line I had pressed the switch and opened the crank circuit. Never take anything for granted.
 

Attachments

  • FullSizeRender 3.jpg
    FullSizeRender 3.jpg
    388.3 KB · Views: 180

xplorutah

Well-known member
My 110 had a remote switch as you describe. It had been to Africa and there was discussion that it was used to rock the vehicle when stuck in the dunes without having to start it.
 

DJOHN

Member
Our rattling exhaust pipe had been getting worse, so I finally decided to do something about it. The source of the noise turned out to be a worn-out rubber bushing. The problematic part didn't look like any of the other exhaust hangers, but I wanted to get the vehicle back on the road, so I put together some galvanized hardware and a few skateboard bushings to support the pipe until I have a chance to figure out what Land Rover intended to be there and then order the correct parts.
 

Attachments

  • exhaust.JPG
    exhaust.JPG
    955.3 KB · Views: 170

DJOHN

Member
I also installed a 5 lb. Amerex Halotron fire extinguisher behind the driver's seat. I'd installed a couple of smaller, conventional dry chemical units on day one, but I wouldn't want to use them on any vehicle that I care about. I had considered a CO2 extinguisher, but the lack of a pressure gauge on those models made me go with the Halotron clean agent.
 

Attachments

  • halotron.jpg
    halotron.jpg
    174.5 KB · Views: 168

Napalm00

Technical Excellence Contributor
I rebuilt my destroyed steering ball joint again. This time I tapped the baseplate for a metric zerk. If you ever noticed the bottom cup already has a hole in it for grease to pass through.
AEU2761-STEERING-DROP-ARM-BALL-JOINT-KIT.jpg


Seen here on the left below the gold plate.

I drilled and tapped for a M6 zerk, even the spring centers over the zerk.

One pump and the boot was full! Hope it will last longer now. If your ball joint and boot is in good shape you could probably do this in situ.
 

Attachments

  • IMG_20170801_111828.jpg
    IMG_20170801_111828.jpg
    326.7 KB · Views: 193

The Dro

Illustrious
Painted the tunnel and floor panels... (this is the first coat) I like the way it came out.
 

Attachments

  • 05.jpg
    05.jpg
    369.4 KB · Views: 203
  • 04.jpg
    04.jpg
    333.1 KB · Views: 201
  • 02.jpg
    02.jpg
    343 KB · Views: 189
  • 03.jpg
    03.jpg
    378.2 KB · Views: 181

FlyersFan76

Well-known member
Painted the tunnel and floor panels... (this is the first coat) I like the way it came out.


Looks nice.

What product did you use?

I only did the underside of the tunnel cover after covering it with dynamat and primer. Want to do the floors and the front tunnel cover/adapter this winter also.

I as planning on don't linex inside in the future but still haven't fully decided yet.
 

rovercolorado

Well-known member
Looks nice.

What product did you use?

I only did the underside of the tunnel cover after covering it with dynamat and primer. Want to do the floors and the front tunnel cover/adapter this winter also.

I as planning on don't linex inside in the future but still haven't fully decided yet.

I noticed what I think is factory sound covering on the bulkhead on the outside (engine side) of my 1991. I was wondering if anyone has applied Dynamat or similar to the floors on the bottom or underside. I have seen multiple installations on the inside of the truck but wondered if it would hold up to the weather under the truck. I want to not install carpet on my floors and use only a rubber mat for easy cleanup. Other than some oil and engine gunk the bulkhead covering doesn't look in bad shape from what I've been able to see up close. The plan in the future is install all of the sound material under the truck and then move inside when I get to the doors, sides and roof. Does this sound like a good plan based on others experience?
 

FlyersFan76

Well-known member
I noticed what I think is factory sound covering on the bulkhead on the outside (engine side) of my 1991. I was wondering if anyone has applied Dynamat or similar to the floors on the bottom or underside. I have seen multiple installations on the inside of the truck but wondered if it would hold up to the weather under the truck. I want to not install carpet on my floors and use only a rubber mat for easy cleanup. Other than some oil and engine gunk the bulkhead covering doesn't look in bad shape from what I've been able to see up close. The plan in the future is install all of the sound material under the truck and then move inside when I get to the doors, sides and roof. Does this sound like a good plan based on others experience?

I had an email exchange with Dynamat and they said applying to the exterior of the truck is fine but it should be painted over since. I figured it was ok since their engine compartment material is outside in the elements.

I thought I had some pictures before I painted the seat box but can't find them.

I will probably do my floors this winter as well.
 

Attachments

  • IMG_20170512_143556_hdr.jpg
    IMG_20170512_143556_hdr.jpg
    336.6 KB · Views: 198
  • IMG_20170511_160815_hdr.jpg
    IMG_20170511_160815_hdr.jpg
    312.6 KB · Views: 208
  • IMG_20170511_123944_hdr.jpg
    IMG_20170511_123944_hdr.jpg
    378.4 KB · Views: 195

uc4me

Well-known member
installed a monitor and a side view camera for the Tithonus blind spot.
 

Attachments

  • IMG_20170822_173135.jpg
    IMG_20170822_173135.jpg
    196.3 KB · Views: 193
  • IMG_20170822_173010.jpg
    IMG_20170822_173010.jpg
    80 KB · Views: 187

javelinadave

Administrator
Staff member
Changed out all the fluids this morning. Red Line MTL sure makes the trans shift smoother. Thanks all for the tip.
Next up is the front caliper rebuild.
 

Napalm00

Technical Excellence Contributor
Changed out all the fluids this morning. Red Line MTL sure makes the trans shift smoother. Thanks all for the tip.
Next up is the front caliper rebuild.

If you rebuilding your calipers two things I say are must. First is the addition of Russell speed bleeders, oh my god do they make it so much easier. Second would be the rebuild of your pwda valve if you have one just a few O-rings
 

javelinadave

Administrator
Staff member
Second would be the rebuild of your pwda valve if you have one just a few O-rings

I was just reading about this wonderful piece of useless engineering. Most people say to just eliminate it all together. As I hate plumbing projects and would rather swap in a few o rings. Did you get them from NAPA or is there a part number for a kit?
 

LostChord

Well-known member
Tiny little pin? broke off from interior passenger front door handle where the spring is. So, could no longer open the door from the inside.

Macguyvered it for now with a picture nail to hold the release arm as a makeshift cotter pin. Couldn't find anything smaller in the garage.

On a positive note, very surprised by the total lack of rust on the door frame once I removed the door card. Only two of the door card screws were difficult, but eventually came out. Behind the door card was the broken pin and a couple small pieces of felt from the window channels. Also had some sort of moisture barrier behind the door card - plastic bag-like material - glued to the top and sides of the door frame and duck-taped to the bottom. Sweet.
 

LostChord

Well-known member
Tiny little pin? broke off from interior passenger front door handle where the spring is. So, could no longer open the door from the inside.

Macguyvered it for now with a picture nail to hold the release arm as a makeshift cotter pin. Couldn't find anything smaller in the garage.

For future reference, the entire latch assembly is PN MUC3656 (# 6 below).

The pin that broke was on the end of the rod that runs through the spring - circled in yellow:

zwj0ps.gif
 

The Dro

Illustrious
Busy weekend... After work yesterday I got cracking with the truck and got the rear tire carrier installed and got the new fuse boxes installed.

It's not what I was looking for... But it sure beats the POS Lucas fuses.
 

Attachments

  • 20170903_212228.jpg
    20170903_212228.jpg
    218.1 KB · Views: 197
  • 20170910_140551.jpg
    20170910_140551.jpg
    188.6 KB · Views: 211
  • 20170910_140625.jpg
    20170910_140625.jpg
    161.1 KB · Views: 203
Top