What have you done to your DEFENDER today?

DJOHN

Member
Not today, but this week:

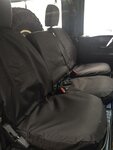
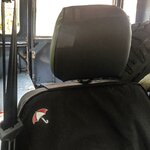
Installed a set of Britpart Fitted Waterproof Seat Covers that I purchased from lrnj_autoparts on eBay. Now that it's monsoon (and SUP) season here in southeast Florida, it seemed like an appropriate addition to our new old Land Rover. Covers are for all three front seats (but not the headrests), and so far I'm favorably impressed with the design, material, construction, and value.

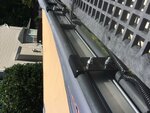
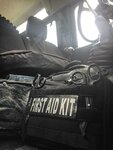
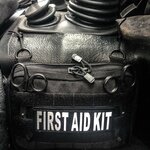
Also, thanks to SARTech's "First Road Trip" discussion thread, I assembled a basic vehicle medical kit and attached it to the right side of the transmission tunnel/hump/whatever. It doesn't intrude into the foot space too much, and the central location makes it accessible to both passenger and driver. Kit contents are similar to current US military IFAK, but I'm still revising.

Looking forward to tackling a few more ambitious projects in the near future, as soon as I've recovered from relatively minor melanoma surgery (32 stitches - don't forget that sunscreen!)
 

Attachments

  • IMG_3752.jpg
    IMG_3752.jpg
    141.9 KB · Views: 191
  • IMG_3749.jpg
    IMG_3749.jpg
    211.5 KB · Views: 185
  • IMG_3751.jpg
    IMG_3751.jpg
    248 KB · Views: 185
  • IMG_3753.jpg
    IMG_3753.jpg
    364.5 KB · Views: 188

uc4me

Well-known member
Rear Worklamp

Installed a Hella rear worklamp.
 

Attachments

  • IMG_20170603_162012.jpg
    IMG_20170603_162012.jpg
    110.7 KB · Views: 171
  • IMG_20170603_161333.jpg
    IMG_20170603_161333.jpg
    134.2 KB · Views: 161
  • IMG_20170603_161244.jpg
    IMG_20170603_161244.jpg
    382.4 KB · Views: 179

The_Vermonster

Well-known member
Parked in the wrong neighborhood and caught someone stealing my wheels.

Actually just selling off the mudding tires that came with it. Anyone interested in some super cheep 15in rims? 3 alloys and 1 steel.
 

Attachments

  • 518571908.jpg
    518571908.jpg
    717.6 KB · Views: 214

DRYANKNPUL

Active member
I removed the steering box. I'm not sure where it was leaking because there was fluid on every steering component except the pump. YouTube can sure make things look easy.
 

FlyersFan76

Well-known member
I attempted to change the shoes but not sure if I should continue.

Going from standard steel (ANR's I believe) to Wolf's. Should I have longer studs when moving to Wolf's?

Third picture is the old rim with 1 of the new bolts. They are a little thicker but still think of the wolf's they wouldn't be correct. Even at 125lbs.

Thoughts?
 

Attachments

  • IMG_20170611_1858434.jpg
    IMG_20170611_1858434.jpg
    519.6 KB · Views: 193
  • IMG_20170611_1858003.jpg
    IMG_20170611_1858003.jpg
    109.6 KB · Views: 196
  • IMG_20170611_1902412.jpg
    IMG_20170611_1902412.jpg
    139.5 KB · Views: 193

xplorutah

Well-known member
I attempted to change the shoes but not sure if I should continue.

Going from standard steel (ANR's I believe) to Wolf's. Should I have longer studs when moving to Wolf's?

Third picture is the old rim with 1 of the new bolts. They are a little thicker but still think of the wolf's they wouldn't be correct. Even at 125lbs.

Thoughts?

Some run them that way. I wouldn't. You need to do a stud conversion to later studs like those found on the NAS's.
 

The_Vermonster

Well-known member
I attempted to change the shoes but not sure if I should continue.

Going from standard steel (ANR's I believe) to Wolf's. Should I have longer studs when moving to Wolf's?

Third picture is the old rim with 1 of the new bolts. They are a little thicker but still think of the wolf's they wouldn't be correct. Even at 125lbs.

Thoughts?

Most of the time you need new studs. Some people have been able to get a little more purchase on the old studs, but I don't think yours are going to be safe.
 

nas90tdi

Well-known member
A lot of the MOD trucks that were swapped to Wolf wheels are this way. All 4 wheels of my current MOD truck are this way. Never had a moments trouble with them and if they were constant problems, the MOD would swap them to the longer studs rather then keep hassling with them. It's not like they are afraid to swap parts.

I intend to swap mine at some point just because it bugs me ,but the specs on nut torque say that the engagement should be equal to the bolt/stud diameter. Which you have in this scenario.

This in no way indicates I actually like looking at a lug nut not fully threaded on the stud, just that the engineering is basically sound though being pushed to its limits.
 

LazyRabbit

Well-known member
Seattle or bust

Slowly driving from Virginia to Seattle.
No major issues so far, slight fuel leak at one point (fitting got loose), some minor overheat (new coolant seemed to fix it), and now i see my steering pump is leaking a tad.

Its amazing how much attention this truck attracts at times.
Currently in Boise Idaho hiding from some cold rainy weather.

IMG_2778.jpg

IMG_2790.jpg

IMG_2800.jpg

IMG_2817.jpg

IMG_2829.jpg
 

SARTech

Well-known member
Built a ghetto air oil separator for the engine breather. Was getting frustrated with the air filter turning into a oil bath filter. I know the motor is old and the blow-by is excessive but there is nothing I can do for that right now. I put together this air oil separator out of some PVC bits. The breather air comes from the mother in into the separator about mid way. The oil saturated breather air goes into the separator, traveled through some course steel wool and then out the top in into the air filter. The steel wool captures some of the oil and it drains down into the bottom of the separator. I have a PVC pipe plug in the bottom that I remove and drain the oil. I have about 500 mile on the separator and drained out about 3 table spoons of oil. Any oil that I catch in the separator is oil that didn't make it into the air filter so I thing it is somewhat a success.
 

Attachments

  • IMG_8536.jpg
    IMG_8536.jpg
    263.5 KB · Views: 198
  • IMG_8537.jpg
    IMG_8537.jpg
    329.2 KB · Views: 195
  • IMG_8538.jpg
    IMG_8538.jpg
    311.3 KB · Views: 193
  • IMG_8539.jpg
    IMG_8539.jpg
    393.5 KB · Views: 181

Roverman2010

Well-known member
Built a ghetto air oil separator for the engine breather. Was getting frustrated with the air filter turning into a oil bath filter. I know the motor is old and the blow-by is excessive but there is nothing I can do for that right now. I put together this air oil separator out of some PVC bits. The breather air comes from the mother in into the separator about mid way. The oil saturated breather air goes into the separator, traveled through some course steel wool and then out the top in into the air filter. The steel wool captures some of the oil and it drains down into the bottom of the separator. I have a PVC pipe plug in the bottom that I remove and drain the oil. I have about 500 mile on the separator and drained out about 3 table spoons of oil. Any oil that I catch in the separator is oil that didn't make it into the air filter so I thing it is somewhat a success.

Good bit of African Enginnering, just a tip if you are going to run like this for a while hoping you used stainless steel wool. The plain stuff will break up and rust with the acids.
 

CDN38

Well-known member
Fitted the chipped ECU I had sitting on my shelf for almost 6 months (yeah, I like to think about things first... for a while..LOL).

HUGE difference in drivability. The turbo boost is much more noticeable, the "bogginess" of low RPM is gone. With the overdrive engaged, I can actually accelerate on the highway on an incline.

Going to install an EGT next, then probably the uprated Allisport manifold and intercooler.
 

javelinadave

Administrator
Staff member
Swapped out my 2nd row door cards that had 4" speaker holes cut in them for unmolested NTO door cards from Safari HP. Anybody need 2nd row door cards in good shape with speaker holes cut in them?
 

Attachments

  • IMG_9077.jpg
    IMG_9077.jpg
    216.5 KB · Views: 169
  • IMG_9078.jpg
    IMG_9078.jpg
    186.9 KB · Views: 180

rovercolorado

Well-known member
Transfer box output flange trouble

So I finally carved out some time this weekend to begin working on my drive train issues and this is what I found.
I have always had a small vibration since I got the truck and after post inspection by my shop we where never able to find anything firm causing the issue. Fast forward and the vibration is WAY worse and so I ordered some parts to prep for replacements. Transfer box output flanges, bearings, seals, U joints, etc. I figured I would tackle the reported hardest replacement the rear output flange. I noticed a little movement but once I got the drive shaft off the brake drum almost fell off!. It was missing the two screws that hold on the drum. Next up was the flange I could see right away that the screws had sheared off at the flange. After pulling the flange out I found the welds holding the bolts to the flange shown in the pictures. I wasn't happy at this point since I ordered everything except bolts. Off to LRDirect to order a large quantity of spare bolts and nuts to match and I put everything back together only tighter this time. At least I got to replace all of my intercooler hoses and few other odds and ends.
 

Attachments

  • Flange front.jpg
    Flange front.jpg
    462.3 KB · Views: 164
  • Flange weld.jpg
    Flange weld.jpg
    325.2 KB · Views: 177

FlyersFan76

Well-known member
I washed the inside of it. Good thing the new seats are G4 and not leather.


Woke up at 3am to a big thunderstorm. Forgot to put the top up the night before.

Woke up again at 9 and saw that my 11 year old pretty much toweled the whole inside of the truck down.
 

Napalm00

Technical Excellence Contributor
Drove most of the fire roads in mendocino national forest upper lake area. Was a good day
 

Attachments

  • IMG_20170722_125954.jpg
    IMG_20170722_125954.jpg
    631.3 KB · Views: 203

Motorradmark

Well-known member
Callsign: KO4FIC
Installed ARB awning. Shade at last.

Installed a 2000x2500 ARB awning today.
Had to manufacture the brackets to fit the brown church roof rack, but some cutting and welding later, all good. If only I could rotate pix.
 

Attachments

  • IMG_4695.jpg
    IMG_4695.jpg
    659.4 KB · Views: 172
  • image.jpg
    image.jpg
    303.8 KB · Views: 162
Top