I drive a 300 Tdi defender that is barely capable of pulling its own weight, I’m definitely not worried about towing capacities. I don’t like the way the NAS style bumper looks. The one on my 110 also has a weld running through the 2” receiver, so you can’t actually use it as no hitch, bike rack, or other accessory will actually slide in. I like the CT look of the 5 ton tow jaw, but also like being able to put my bike rack on there.Why is the JSQ receiver better? Seems like the step bumper would distribute the load while the JSQ is just a plate that hangs down. For strength, the receivers that bolt to the crossmember while also having two tie bars back to the chassis rails should be strongest, though they do make good departure plows.
You are using an out of date browser. It may not display this or other websites correctly.
You should upgrade or use an alternative browser.
You should upgrade or use an alternative browser.
What have you done to your DEFENDER today?
- Thread starter javelinadave
- Start date
Departure plow is accurate
hillstrubl
Founding Member
At the jubilee I just watched the lines of a NAS 110 in front of me to avoid my stupid UK horse trailer hitch, agreed. a 2" receiver that's reasonably strong covers my basis too.I drive a 300 Tdi defender that is barely capable of pulling its own weight, I’m definitely not worried about towing capacities. I don’t like the way the NAS styleba bumper looks. The one on my 110 also has a weld running through the 2” receiver, so you can’t actually use it as no hitch, bike rack, or other accessory will actually slide in. I like the CT look of the 5 ton tow jaw, but also like being able to put my bike rack on there.
4RF RDS
Well-known member
My panhard rod bushes died on a rocky trail last weekend. Used a ratchet strap to tighten it up for the three and a half hour drive home.Hard to say as I haven’t disassembled it yet. There are quite a few aftermarket accessories installed, but the vehicle also had work done by a shop in Florida (mostly poorly done). The circuit for gauge illumination is the wire that melted while I was in Colorado at the start of a trip. Ended up driving it back to VA after that.
I also installed some new pan hard rod bushings and corrected the bolt that was installed backwards and hitting the axle housing View attachment 27932


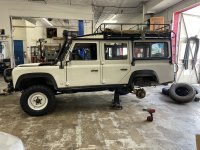
Yesterday I went over to see my friends at Sportscar Workshops to have them mount a fresh set of XZLs for me. Mine weren’t totally worn, but I plan on shipping my 110 out west in the fall and will leave it there for a while, so I decided to get the tires done now.
Yesterday I also finished the install of the RN upgraded turbo kit. This converts the 300 Tdi to the International 2.8 turbo setup. I followed the instructions for tuning the injection pump which resulted in extremely high EGTs and excessive black smoke (rolling coal with moderate throttle). I’ve tuned it back almost all the way to stock and temps are still way higher than stock. I definitely need to spend more time with it.
Yesterday I also finished the install of the RN upgraded turbo kit. This converts the 300 Tdi to the International 2.8 turbo setup. I followed the instructions for tuning the injection pump which resulted in extremely high EGTs and excessive black smoke (rolling coal with moderate throttle). I’ve tuned it back almost all the way to stock and temps are still way higher than stock. I definitely need to spend more time with it.
Attachments
SaintPanzer
Well-known member
It's more of what I didn't do...
On the "plus side", I did wire wheel off rust on the rear crossmember, prime and paint. It looks much better. But really want to do a proper sand blast, then POR, then paint. Someday.
Then, the frustration. I had two goals: replace the fan belt, and align the front wheels after I replaced the track rod with a nice stainless rod from Gwynn Lewis.
The belt: I ordered it a few weeks ago from Rovers North. Nice Proline part, should fit right on, right? Got the old one off fairly easily. Got the new one in place, and struggled for about an hour trying to get it on. I finally compared it to the old one, and noticed the new is just a touch shorter. Maybe by 3/8 of an inch, possibly a bit more. Threw in the towel and put on the old one in about 30 seconds. At least it's in decent shape, I was replacing it as more of a PM type thing.
Question: Obviously, "stretching" it is not feasible. I had the idler twisted against its stop, and the belt was just a hair short. Is there a way to "move things" to give a little more play? It appears the alternator is fixed, but is there a way to get more out of the idler? Other ideas? I'm sure I must be doing something wrong, I just can't figure out what. I looked at the service manual, which advised taking off the fan shroud, which (again according to the manual) requires draining the radiator and removing some hoses. I can't see how either of those steps will give me more belt space. Thoughts?
Frustration number two: Alignment. According to my Gwynn Lewis instructions, once the steering arm is pointed in the right direction, "Now the drop arm is set the steering wheel E should be pointing straight ahead, if it is not you need to remove the steering wheel and turn on the splines." My steering wheel is point to the right. Tried to pull the wheel using a steering wheel puller. No go. Tried adding some penetrating oil. Tried tapping around the hub, hoping to "dislodge" things and maybe get some penetrant down the splines. Still no go. Actually bent the 6mm bolts screwed into the wheel. That wheel is not coming off the shaft. Suggestions? I'm about a step away from buying a new wheel and cutting the old one off, but that seems a bit drastic. Does anyone have any hints or tips? I've tried heat, I've tried tapping. I've left a bit of pressure on it overnight, hoping it loosens up a bit, but I'm out of ideas. Suggestions?
I did notice I was about half a quart low on oil, so I topped that off. I guess that's two successes today. But I'd really like to get that wheel off.
MountainD
Technical Excellence Contributor
I’d also try putting on the center nut but NOT tight— quite loose with a gap. The sit in the seat and try pulling back, with a jolt and big tug. The loose nut keeps the wheel from flying off and smacking you. Might get lucky. Works for some. I suspect that if the puller didn’t work, neither would this, but I’ve seen
that happen before…so there is that…
What engine are you running?
that happen before…so there is that…
What engine are you running?
SaintPanzer
Well-known member
Thanks. Tried the "pull thing". Re-engaged with it today, and only managed to strip the holes. Not the bolts, mind you, but the actual holes in the wheel where the pulling bolts go in. Will wait until I can drill 8mm holes (instead of the 6) and re-tap. Then it's the cut-off wheel.I’d also try putting on the center nut but NOT tight— quite loose with a gap. The sit in the seat and try pulling back, with a jolt and big tug. The loose nut keeps the wheel from flying off and smacking you. Might get lucky. Works for some. I suspect that if the puller didn’t work, neither would this, but I’ve seen
that happen before…so there is that…
What engine are you running?
In the mean time, what I ended up doing is pulling the steering rod and track rod, and centering the wheel. Then I used some 550 cord to align the fronts with the rear. The steering arm was more centered than I wanted it to be, but still generally pointing towards the frame. Locked the wheel centered, then re-attached/adjusted the steering rod. Then checked the front "aim" again. Seemed right. Re-installed the track rod. Did some minor adjustments (per Gwynn Lewis' instructions) to ensure toe-in was near zero. Test drive seemed to go OK. Calling it job done, but will keep an eye on the tires. Did note the steering rack adjustments were almost rusted in place (the reason I replaced the track rod), so that's now on the list for next year, when I'll probably replace the steering damper and shocks too... Always a project, but I'm calling this one job done.
As far as the belt goes, I have an email in to RN, we'll see what they say. I'm hoping there's an adjustment I can make, if not, we'll see. The engine is a 300 Tdi with about 135,000 miles on it.
WreckITFrank
Technical Excellence Contributor
@SaintPanzer recently installed that gywn lewis arm, I def had to remove steering wheel for alignment l. Loosening the nut a few threads from all the way off. Then a few blows from rubber mallet from underside and on top worked. Wedging your legs under then pulling up while a few mallet blows worked on my last truck. bolt needs to stay on if you like your teeth, nose, etc...
Last edited:
madcowdungbeetle
Well-known member
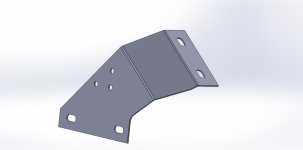
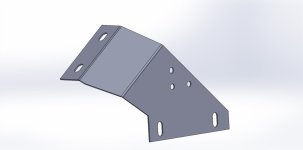
Super jealous of you guys with an actual Defender to work on... anyways got these in CAD for bulkhead fitment. Way more of a PITA than I would have expected.
Now I need to find a bulkhead to model.
Now I need to find a bulkhead to model.
Attachments
UnfrozenCaveman
Well-known member
I fought with this a bit when I had to replace the steering box on the Aussie 110.
Sooo much easier than the rusted up bits on the old Disco that lived in Iowa its entire life.
As re. the steering wheel, I was successful in the loosen the nut and wiggle the wheel top/bottom/right/left until it finally popped loose.
Since then I've not cranked down on that nut but left a pair of M6 allen head bolts in the "puller" holes so the nut can't work loose.
I haven't seen any mention of the drop arm locating slot and the corresponding hole in the steering box ... as far as I know that's the way the straight ahead location of the drop arm - and the steering wheel - are supposed to be determined.
Work from that point to get the drag link / tie rod adjusted.
And a big YES to the 550 cord alignment method...after the local general repair/alignment place couldn't understand why only toe was adjustable, I did it myself.
Took a bit of trial and error, but it goes down the road in a straight line AND the steering wheel is straight too")
Sooo much easier than the rusted up bits on the old Disco that lived in Iowa its entire life.
As re. the steering wheel, I was successful in the loosen the nut and wiggle the wheel top/bottom/right/left until it finally popped loose.
Since then I've not cranked down on that nut but left a pair of M6 allen head bolts in the "puller" holes so the nut can't work loose.
I haven't seen any mention of the drop arm locating slot and the corresponding hole in the steering box ... as far as I know that's the way the straight ahead location of the drop arm - and the steering wheel - are supposed to be determined.
Work from that point to get the drag link / tie rod adjusted.
And a big YES to the 550 cord alignment method...after the local general repair/alignment place couldn't understand why only toe was adjustable, I did it myself.
Took a bit of trial and error, but it goes down the road in a straight line AND the steering wheel is straight too
SaintPanzer
Well-known member
Yes, according to my instructions: "There is a slot in the back of older Drop Arms, this slot lines up with a hole in the bottom of the steering box, newer drop arms don't have this slot. If there is no slot then align the centre of the Ball Joint with the inside of the chassis leg as it looks on the drawing F." Mine is "newer" (i.e. 1998) and I don't have the slot. So I'm basically pointing towards the chassis leg.I haven't seen any mention of the drop arm locating slot and the corresponding hole in the steering box ... as far as I know that's the way the straight ahead location of the drop arm - and the steering wheel - are supposed to be determined.
Work from that point to get the drag link / tie rod adjusted.
I stripped the M6 holes, so that's going to have to wait for future. "Wiggling" did not work, rubber mallet did not work, heat did not work, tapping did not work, two pound lump hammer did not work. It will have to wait.
No luck from RN on why my belt isn't going on. They simply stated "no one else has had that problem." Need to look into it a bit more...
UnfrozenCaveman
Well-known member
Ah .... I've been getting a lot of that "older" stuff recently can't possibly be (my) age related
can't possibly be (my) age related You probably have the wrong belt for your particular alternator pulley. There are at least two belts. Sounds like you have a larger diameter alternator pulley but the smaller length belt. There's some good info here:Yes, according to my instructions: "There is a slot in the back of older Drop Arms, this slot lines up with a hole in the bottom of the steering box, newer drop arms don't have this slot. If there is no slot then align the centre of the Ball Joint with the inside of the chassis leg as it looks on the drawing F." Mine is "newer" (i.e. 1998) and I don't have the slot. So I'm basically pointing towards the chassis leg.
I stripped the M6 holes, so that's going to have to wait for future. "Wiggling" did not work, rubber mallet did not work, heat did not work, tapping did not work, two pound lump hammer did not work. It will have to wait.
No luck from RN on why my belt isn't going on. They simply stated "no one else has had that problem." Need to look into it a bit more...
Serpentine Belts, Long, & short. For 300tdi.
Hi Have been told theirs a long & a short belt for the 300s, whats the difference? and what goes on what? Mine has about as much flex as a lenght of R.S.J. Sooo hard on that little waterpump, with
www.aulro.com
WreckITFrank
Technical Excellence Contributor
Long span, short post. (few weeks)
Got in to drive to @Angus garage, trans said no way.
1. Rear fork grub screw let loose.. cleaned and resealed.


2. Added slickshift and loosely installed seatbox and seat

3. Finally drove to @Angus place to pull xfer case

4. Cleaned up all the south African perma crust that I could. Installed new xfer case from Winchester

5. Added xbrake and new hardware everywhere possible. U-Joints and trans mounts swapped.

6. profit
Thanks for the help Mike.
Got in to drive to @Angus garage, trans said no way.
1. Rear fork grub screw let loose.. cleaned and resealed.
2. Added slickshift and loosely installed seatbox and seat
3. Finally drove to @Angus place to pull xfer case
4. Cleaned up all the south African perma crust that I could. Installed new xfer case from Winchester
5. Added xbrake and new hardware everywhere possible. U-Joints and trans mounts swapped.
6. profit
Thanks for the help Mike.
Topcontender
Member

erover82
Well-known member
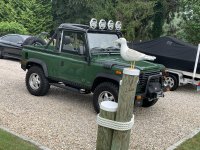
I recently acquired a New to me 1994 D90 NAS w 85k.
Added some Hella Ralleye 3000 Lights to make a clone of the Hella Edition D90’s.
Just curious to your thoughts before I complete the wiring.
Thanks!!
Looks fun as can be. I like old skool halogens on the classics. If you don’t really need all that light, you can swap the bulbs out to 35w to lessen the electrical burden.