More Bumper Problems...

RBBailey

NAS-ROW Addict
Callsign: KF7KFZ
OK, so once I got the A-Bar and stock bumper off the truck a few years back, I realized I would need to get a new set-up.

Initially, I picked up a heavy duty winch bumper made by Shipman here in Portland, it was even galvanized. But the mounting was a bit tight to the frame, and the overall set-up was just a bit different than what I really wanted, so I decided to go a different route.

2 bumpers sitting in garage now.

Then I found the winch bumper that R.N. sells from a UK supplier. This fits my needs in that it has a stock shape to it, is black, galvanized, medium duty weight, and allows the winch to fit with the A/C grill I have. ...but when I try to put the thing on, all hell breaks loose.

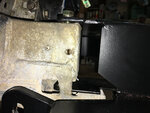
Pic below, but here is what I'm dealing with.
  1. I don't have a tool, and can't think of what tool I need to buy, to get the nut in on the underside of the two main vertical bolts that go through the top of the bumper, through the frame. I think I must have just barely got a spanner in there to take the old ones off, but this bumper blocks access completely. And taking a nut off is much different than putting one on in that space.
  2. The bolts go from top to bottom through the frame. The frame is 4.5 inches or so tall, but the mounting bracket for the bumper is 4.7 inches tall. Hu?
  3. I am having to cut several chunks out of my steering guard, and out of the steering guard mounting brackets to get it to fit with this bumper. Should work, but I'm making it up as I go.
  4. Even with everything lined up as much as I can get it, I swear the rear, horizontal bolts don't really fit right. I could shave off some of the existing hole, but then I'm taking the powder coating and galvanization with it.

So now I have 3 bumpers in my garage that I can do nothing with!

Not really sure how to proceed with any of these issues. The pic is taken from between the frame rails, looking at the bumper as it sits over the frame. You can see the vertical mounting bolt.
 

Attachments

  • 33724368544_6b5a1cef6e_k.jpg
    33724368544_6b5a1cef6e_k.jpg
    961.4 KB · Views: 253

RBBailey

NAS-ROW Addict
Callsign: KF7KFZ
Cool. That would solve the problem of getting nuts in there, it's coming up on TWO YEARS since I pulled the bumper off the first time, maybe I forgot that those existed on my truck. Problem would now be that I would also need the bolts. Hanks for the pointer.
 

Dan kemper

Founding Member
Callsign: KK6ECF
Correct. Use captive nut plates per factory or grind off that vertical piece on the frame to get a wrench in there.
 

RBBailey

NAS-ROW Addict
Callsign: KF7KFZ
Would like to avoid doing anything to the frame since it is galvanized.

Using the captive nuts makes sense for fixing the bolts in place, but it does not solve the issue with the big gap on the underside of the frame between the frame and the bumper mount. And if the captive nut does not allow any adjustment of the bumper forward/back/tilt, then I know for a fact the rear horizontal bolts won't go through.
 

RBBailey

NAS-ROW Addict
Callsign: KF7KFZ
Anyone know what I'm supposed to do with the gap below the frame between the frame and the bumper mount?
 

RBBailey

NAS-ROW Addict
Callsign: KF7KFZ
It's just that the gap is odd. Am I supposed to crank down on the bolts and bend that "tab" up 1/3 of an inch to meet with the frame? Am I supposed to have a spacer that I don't know about? The other two bumpers don't have this type of space.

This is the bumper in question: http://www.roversnorth.com/ProductDesc.aspx?code=RNA2109&type=0&eq=&key=it

Going to be calling RN customer service.... sometime.... I have no clue when I would get a chance to make that happen.
 

UnfrozenCaveman

Well-known member
The LRNA winch bumper is on our '97 D90.

The threaded plates are not "tee" shaped, just little PITA rectangles.

On the passesger side I was able to cram a finger in the hole, hold the plate in place and tighten the bolts up...spent far too long trying to do the same on the drivers side...until I taped the plate in place, plain old masking tape...and guess what was already on it...20 year old masking tape goo.

I saved it in a little jar. I'm sure its unobtainable, special UK only tape goo.

....not really :)
 

The Dro

Illustrious
Leave it? Get a plug for the hole? I'm not sure what you are asking.
This statement is very disturbing... :D

Anywho... I'm having a similar issue with an "ARB" like bumper.

I have to cut/grind/remove the "ears" that hold the captive nuts and I'm not liking the idea.
 

RBBailey

NAS-ROW Addict
Callsign: KF7KFZ
I think I've solved the issue of mounting the skid plate with this bumper. So that problem seems done with.

But I experimented with a piece of cardboard in rough shape as the captive nuts, but with the bumper in place, there is no way to get this piece into place under the bumper. I'm sure I could figure out how to juggle it all and get it into place if I had one or two people to help.
 

RBBailey

NAS-ROW Addict
Callsign: KF7KFZ
I finally got bolts to thread. Tight? Well.... that may prove more difficult... How stupid is it that a simple job like putting a stupid bumper on could be so stupidly stupid? I wish they gave me just 1/16 of an inch more in adjustment space on the rear mounting holes on this bumper. It seems all the space they did give is in all the wrong direction...

Lets just say I learned another use for the hot glue gun.

I'm determined to make this thing work, but it looks like I may have to modify the bumper itself if I'm going to get the skid plate on. And I'm still bothered by the fact that the main mounting brackets don't actually fit the frame. That just seems stupid to me.
 

RBBailey

NAS-ROW Addict
Callsign: KF7KFZ
And now the real issue with the space between the frame and the lower mounting tab is coming into play: even with the bolts tight enough that the brackets are now bent into place (they are now bent up by close to 7 degrees) the bumper can still be sifted up and down and out of place with one hand, and little effort.
 

RBBailey

NAS-ROW Addict
Callsign: KF7KFZ
OK, so I have not tightened down on the four bolts, I've only pulled them down so that the lock washers are compressed. But in this photo you can see how the bottom mounting tab is lower than the bottom of the frame. This causes the tab to bend up. The red line indicates about where it is when there are not bolts in place, parallel to the top tab shown with the upper red line:
https://flic.kr/p/UDZUZm

This photo shows how the rear, horizontal bolts don't line up at all once the bolts are tightened down. If I leave the vertical bolts undone, I can fit the horizontal bolts through these holes. But they are obviously off center:
https://flic.kr/p/UDZUvW

On a good note, I do like the look, and I think it will look even better with the winch, lights, and recovery swivels installed:
https://flic.kr/p/Tu7SXM
 

RBBailey

NAS-ROW Addict
Callsign: KF7KFZ
But that doesn't solve the issue of having that extra space on the bottom end as the first photo shows.
 

Airbalancer

Active member
Can you get all the bolts in loose first than tighten? I would probably bend those bottom tabs with a block of wood and a hammer till the spacing is corrected. Then if the bolt holes don't line up either drill or file them out.
 
Top