Broke Down! Any ideas?

MountainD

Technical Excellence Contributor
Rockers typically survive but check piston tops for damage/cracks for sure. Actually, weak link are rods. Crank should be fine. If I was pulling it, I’d check for wear as unknown. Just plastigauge, easy to do. But depends on how far you want to go. I didn’t and sold every 200tdi I had and went Cummins. Just sick and tired of friggin 20-30 year old unknown shit breaking, leaving me stranded in Desert or forest. My wife freaks and that’s too much of a PITA for me. So for me personally, I’d go through everything. But that’s a PITA. So typically, replace cam, rods, inspect piston tops with fiber cam…. Or do it right with an unknown po built engine…
 

Classic4X4

Well-known member
Alright - Parts Order is in sans a couple things:

1 I couldn't find any stateside supplier for the O ring that fits into the large retaining washer on the camshaft pulley

2 Also couldn't locate the camshaft pulley bolt that started this whole mess - I've read somewhere that people prefer to replace them with longer bolts as the original only has purchase with 3-4 threads.

GASKET SET OVERHAUL 200TDIPLH70310.00$29.50$0.00$29.50
2CAMSHAFT 4CYL 2.5L SERIES & DEFENDER10.00$$0.00$
3WOODRIFF KEY CAMSHAFT 4C23031310.00$$0.00$
4CRANKSHAFT PULLEY -DOUBLE 200TDI10.00$$0.00$
5OIL SEAL CAMSHAFT 2.5L DETC506410.00$$0.00$
6BOLT M10 x 30mm FLANGED HEADFS11030610.00$0.00$
7PULLEY CAMSHAFT 200 TDIERR66610.00$$0.00$
8VIBRATION DAMPER CRANKSHAFT 200TDI10.00$$0.00$
9SEAL VALVE COVER 200 TDI40.00$$0.00$
10PUSH ROD 2.25 D & 2.6L SERIES IIA-III54679980.00$$0.00$
11HEAD GASKET 200 & 300 TDI 3 HOLE 1.50mm10.00$0.00$
12GASKET SET DECARB 200 TDI W/CYL BOLT SET10.00$$0.00$
13SEAL FRONT CRANKSHAFT 4 CYLINDER & V-8ERR649010.00$$0.00$
14O RING CAM SHAFT 2.5DLERC884910.00$$0.00$
15OIL SEAL FRT COVER 2.5 DETC41541
 

Classic4X4

Well-known member
Progress has been slow but steady.

I was able to remove the timing chest, cam followers and lift pump today.

I removed the front plate securing the camshaft but have been unable to slide the shaft out. It feels like it’s hung up on something.

I have a jig to keep it level/balanced while attempting to retract.

Is there anything else that could be blocking the camshaft from sliding out?

Any help would be greatly appreciated.

Thanks gents!
 

Attachments

  • EF00F146-CF0C-4695-991E-D1C8BAE51AFA.jpeg
    EF00F146-CF0C-4695-991E-D1C8BAE51AFA.jpeg
    265.1 KB · Views: 92

Classic4X4

Well-known member
Some good progress,

A2576EB1-2213-4FE5-9D85-B543B9DADFAD.jpeg

6D1F118D-B0E6-43B3-B22A-E3D665854D4D.jpeg

Timing chest cleaned up and new cam sprocket and crank seals pressed in - I like the OEM stuff because it comes greased.

I’ve added a longer camshaft gear bolt - I made sure the bolt was able to screw all the way into the nose of the cam to ensure it wouldn’t “bottom out”.

New retaining plate for the cam as well

0DB3A55E-E619-4192-8125-846A62EF9653.jpeg

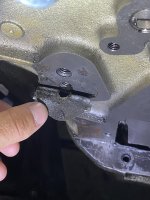
A tip for anyone resealing their timing chest - pay attention to where this circular seal is - mine was on the bottom hole, but should’ve been on the top. Looks like depending on the year/defender or disco, it could be either hole. Apparently this area is a common oil leak culprit and I believe it caused some of the oil seepage I found in the timing belt area.
46BEA01A-5049-424C-A9F9-0502EB59D319.jpeg

New camshaft sprocket/gear - I first ordered one from Turner - it arrived quickly but teeth had been damaged as it wasn’t packed well - so I ordered an OEM one stateside (dumb expensive) and it also arrived damaged/not packed well. I used a jewelers file to clean up the teeth.

I noticed my crank gear also had some damaged teeth which I believe caused the “belt dust” in the timing case and the heavily worn belt at the rear. Check the condition of your teeth in here.

For some reason the OEM cam gear didn’t have the timing indent, so I marked the same tooth as the original in relation to the woodruff key.

FA2321DA-549F-476A-9F33-C0CC8F11CBF6.jpeg

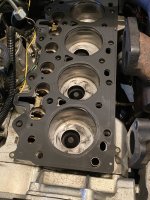
Checked cylinder head with a straight edge and feeler gauge - nice and flat.
3AACF2A8-AD3F-402F-99E3-C91965BF4DE3.jpeg

Cylinder head, block and pistons/combustion chambers very carefully cleaned and decarbonized. (I didn’t take a final picture)

858C9CD3-214D-4BB2-B09D-543B7BC1ECBB.jpeg

Test fitting new metal head gasket (I know many prefer the cheaper/more forgiving fiber - we’ll see)
914C79BF-D8B8-4599-9FB6-054F265794BD.jpeg

New head bolts as I was unsure how many times the previous were used (can only be used up to 3 times) I use a single dot for the initial torque, another dot for the first 60* and then a final line after tightened the second 60* - avoids confusion.

New harmonic balancer and pulley as well.

The only uncertainty I’ve had thus far is the slight play allowed with the injection pump gear - has almost a full tooth of play either way and could easily be advanced or retarded while the timing pin is in. I used the original yellow mark someone had on here.
 

Attachments

  • D5ABFE8E-D7FD-4E7C-9D9C-0B1D6B709BB0.jpeg
    D5ABFE8E-D7FD-4E7C-9D9C-0B1D6B709BB0.jpeg
    248.3 KB · Views: 72
  • 4FBAF6D1-FAA2-4ADF-8B85-E967B60FFF78.jpeg
    4FBAF6D1-FAA2-4ADF-8B85-E967B60FFF78.jpeg
    219.3 KB · Views: 75
Last edited:

Classic4X4

Well-known member
Yes Defender 200tdi and I believe 300tdi intake. I think in another thread I accidentally typed 300 “head” instead of intake.

I noticed as I went to install the rockers that a few of the valve stem seals were off their seats. Currently awaiting delivery of a spring compressor. Luckily I have replacement seals from the RN decarbonizing kit.

Wish I had paid attention while I had the head off - now I’ll do 2 valves at a time while each pair of pistons are at the top of their travel.

In the mean time, a bit of elbow grease with a wire brush and little rust-oleum flame proof paint and the manifold looks very nice. It’s hard to find high temp paint in anything but a spray can, so I just saturate a foam brush and dab it on.
63C905D7-A6BB-47B0-83CC-2008DE33B0AC.jpeg
 

Classic4X4

Well-known member
Long overdue update -

7 of the 8 valve stem seals were removed easily by hand (loose). The new ones were nice snug fits carefully tapped on using a socket.

After a valve adjustment I went to turn the key and NOTHING.

Forgot to plug in fuel shutoff solenoid. BOOM. Fired up and running smoother than it ever has before.

27C26651-4CE9-47A6-83F6-6560F6758ED0.jpeg

So! Happy ending here - immensely grateful for all the incredible help from everyone. Red90 and MountainD - you guys are the man. Couldn’t have done this (or had the clams to) without you guys.
 

erover82

Well-known member
That thing is too damn good looking. Keeping my eye out for one of those early ribbed roofs. It even manages to make Rostyles work on a Defender.
 
Last edited:

MountainD

Technical Excellence Contributor
Great job! And FINE looking truck. I wouldn’t have guessed the color matched top/Rostyles would work…but to me, it absolutely does. Sweetness!
 
Top