You are using an out of date browser. It may not display this or other websites correctly.
You should upgrade or use an alternative browser.
You should upgrade or use an alternative browser.
What have you done today to your LAND ROVER (Non Defender)
- Thread starter Roverman2010
- Start date
El Pinchi
Well-known member
Hey Dan, I need to do the same to my sills. What brand and size spot well drill did you use? Did you end up covering the holes somehow or left them open? Thanks, EddieOrder of the day. Sill repairs, bulkhead footwell prep and repair of surface corrosion internal b hoop feet. The lip on the sills has got to be one of the worst designs. Spot well to sill structure and no paint between panels! Even the rear sills which looked good were hiding tons of surface rust. Spot weld drills are money for this type of work. Finished removing all the stock sill covers, fixed the surface corrosion and etched and put on por15 all parts in need. Tomorrow final sand, etch primer on bare metal and then prime/paint.
The point of the spot weld drill is it only makes a minor impression. You do not drill through the main sill. I flap wheeled all the corrosion and then epoxy primed and sprayed alpine white. On sunday i am respraying my seat box, floor pans and stainless sill covers which will cover the main sill anyhow. This is how ECR has done this repair in the past. Link to the drill bit below. Worked well. I am going with the puma style lower door seals and you will no longer need the sill style. You can also just leave the sill support after painting. My 97 90 is this way. If i were to not cover the sill with covers... i would have filled the holes with weld from the rivets/seal holes and minor filler, grind, sand, refinish etc.
Hey Dan, I need to do the same to my sills. What brand and size spot well drill did you use? Did you end up covering the holes somehow or left them open? Thanks, Eddie
Last edited:
I am going with the puma style lower door seals and you will no longer need the sill style.
Can you use that updated lower door seal on the older doors? I thought you had to have puma doors for that to work
Jimmy i have seen a number of write ups and looks like they work well. I have the traditional seals as well. I'll report back. I'm going to actually follow the water egress to a t and get this rig tight especially as i have some new carpet going in.
Can you use that updated lower door seal on the older doors? I thought you had to have puma doors for that to work
Nice. From what I remember, those seals only work if you have the stamped style doors. The top corners of the older doors are welded where the newer doors are stamped from one piece. I definitely might be wrong about that.
El Pinchi
Well-known member
Thanks Dan! Hope the door seals work well. I bought them a couple years ago and was waiting to do the sills before installing them. Looking forward to your pics and progress.The point of the spot weld drill is it only makes a minor impression. You do not drill through the main sill. I flap wheeled all the corrosion and then epoxy primed and sprayed alpine white. On sunday i am respraying my seat box, floor pans and stainless sill covers which will cover the main sill anyhow. This is how ECR has done this repair in the past. Link to the drill bit below. Worked well. I am going with the puma style lower door seals and you will no longer need the sill style. You can also just leave the sill support after painting. My 97 90 is this way. If i were to not cover the sill with covers... i would have filled the holes with weld from the rivets/seal holes and minor filler, grind, sand, refinish etc.
MountainD
Technical Excellence Contributor
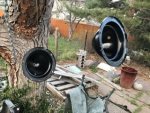
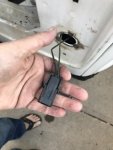
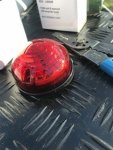
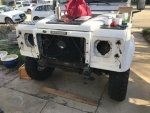
Loads of crap today. Took off front bumper to rebuild the winch, strengthen the bumper And rewire shit. This is literally how they wired the hot for fog lights. stripped insulation from high beam wire, wrap positive wire from accessory light around it, cover with electrical tape. Wtf? Headlight buckets rusted out so blasted em and painters em. wired in new indicator led’s and used weatherpac connectors.
Attachments
-
 CAC53EDA-0E26-4D45-9758-3E5FEDBB09A3.jpeg29.3 KB · Views: 177
 -
 CFFCF4DE-B5D8-434C-BE9A-7D75D900C956.jpeg28.5 KB · Views: 171
 -
 4299991F-AD2A-4F4B-B52D-00E3118A2DAF.jpeg38.3 KB · Views: 183
 -
 42D43552-A66F-4DE2-9694-8425EC54FF66.jpeg37.3 KB · Views: 172
 -
 8A305C24-87D0-4EEA-A6C9-A1B7D7ED7A77.jpeg47.9 KB · Views: 167
 -
 8409F087-2B39-40B0-99EC-90E2E940A014.jpeg26.1 KB · Views: 169
 -
 2AEC1618-7E6C-45D5-A43D-32BE5F647CDF.jpeg32.3 KB · Views: 163
 -
 06A0430B-6F63-4B9A-8411-5421E117AEC3.jpeg34.6 KB · Views: 158
Napalm00
Technical Excellence Contributor
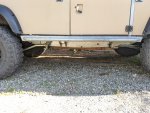
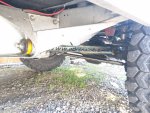
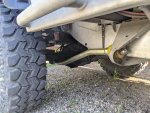
I was tripping over my brand new adrenaline 4x4 3 ° corrected radius arms and double cranked trailing arms in the garage. I then had an epiphany that instead of trying to find a place to store them I should just put them on the truck already!
Attachments
hillstrubl
Founding Member
After 3 months of waiting, I pulled him off the truck today.
View attachment 11620
I’ll get a thread started for Drago over the weekend.
A couple of quick details, Drago is a 1991 200tdi with exactly 60,000 miles on the clock. He lived a good life on the southern coast of Spain before making his move to the PNW. Excited to get into my build this weekend!
Looks great! congrats!
Drago.the.D110
Well-known member
Thanks!Looks great! congrats!
uc4me
Well-known member
Unfortunately, nothing. Feeling like this with the truck at the moment...
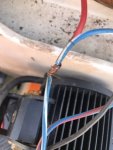
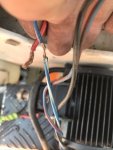
Feeling the same exact way. Started investigation as to why radio install never really worked. Static, speaker inop etc., I found this tie-in mess.
Walked away to research a different wiring method getting little accomplished.
Parrie
Well-known member
Here's an odd one...truck has been pretty much parked since Winter Romp. Noticed a small leak from the virtually new DS swivel ball and seal. Upon closer inspection apparently a chunk of ice got wedged into the swivel ball and bent the seal, actually inverted about 1.5" of the rubber lip seal. The flat metal exposed part of the seal had a severe bend but luckily the lip seal was OK and no damage to the swivel ball. After much effort I was able to reshape the seal back to some what straight w/o having to pull everything apart. Reinstalled the seal w/ the damaged area on top and she works fine. Glad I didn't have to tear down the whole thing.