I recently tweaked the timing on my pump to get rid of the white smoke on cold starts. Pretty happy with the results after 500 miles or so, that fraction of a millimeter of rotation fixed the white smoke, and seems to have had no other appreciable effects. Now I'm almost certain I'm underfueled.
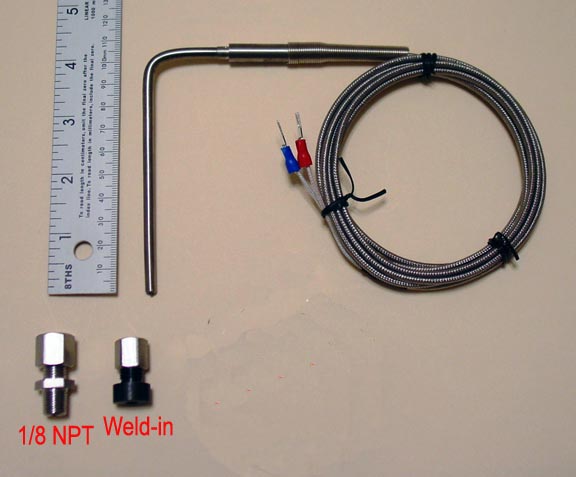
All through the 5000 miles I've owned it, I've only barely been able to produce a dusting of black smoke, and my EGTs have never been over 1200. The other thing I noticed about my EGTs is that they are very slow to respond. I drove a 300Tdi in a RRC and noticed that his EGT gauge was essentially reacting to what I was doing with the pedal. Nothing near as fast as the tach, but I could give it the beans and actually expect the EGT to roll up to 650 or so on in-town, spirited acceleration. Mine only slowly crawls up to temp, about a minute or two at 50-60 mph, then it takes about 4 minutes at idle to cool back down to 450.
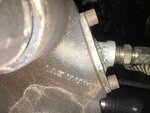
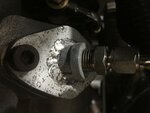
BUT! The simple job of turning the fueling screw is sort of vexing me. When I release the nut (blue arrow) the collar (red) and the screw (yellow) turn all together with the nut. I tried holding the screw with a driver while turning the nut, but it seems to be already at its limit to go clockwise, so it will always rotate counterclockwise with the nut.
Unsure how to proceed. Once again, I was looking to do a tiny 1/8 turn, try it, turn it again, try it, etc... but with the lock nut loosened, the screw seems already at its clockwise limit, and the act of loosening it actually retards the fueling.
<a data-flickr-embed="true" href="https://www.flickr.com/photos/bhcmbailey/41531195311/in/photostream/" title="Untitled"><img src="https://farm1.staticflickr.com/934/41531195311_20613d4f16_z.jpg" width="360" height="640" alt="Untitled"></a><script async src="//embedr.flickr.com/assets/client-code.js" charset="utf-8"></script><script async="" src="https://widgets.flickr.com/embedr/embedr-4110feef4aefd18270192d8aeba3ff41.js"></script><script async="" src="https://widgets.flickr.com/embedr/embedr-4110feef4aefd18270192d8aeba3ff41.js"></script><script async="" src="https://embedr.flickr.com/assets/embedr-loader.js"></script><script async="" src="https://widgets.flickr.com/embedr/embedr-4110feef4aefd18270192d8aeba3ff41.js"></script><script async="" src="https://widgets.flickr.com/embedr/embedr-4110feef4aefd18270192d8aeba3ff41.js"></script><script async="" src="https://widgets.flickr.com/embedr/embedr-4110feef4aefd18270192d8aeba3ff41.js"></script><script async="" src="https://widgets.flickr.com/embedr/embedr-4110feef4aefd18270192d8aeba3ff41.js"></script><script async="" src="https://widgets.flickr.com/embedr/embedr-4110feef4aefd18270192d8aeba3ff41.js"></script><script async="" src="https://embedr.flickr.com/assets/embedr-loader.js"></script><script async="" src="//embedr.flickr.com/assets/client-code.js" charset="utf-8"></script>
<script async="" src="https://widgets.flickr.com/embedr/embedr-4110feef4aefd18270192d8aeba3ff41.js"></script><script async="" src="https://embedr.flickr.com/assets/embedr-loader.js"></script><script async="" src="https://widgets.flickr.com/embedr/embedr-4110feef4aefd18270192d8aeba3ff41.js"></script><script async="" src="https://widgets.flickr.com/embedr/embedr-4110feef4aefd18270192d8aeba3ff41.js"></script><script async="" src="https://embedr.flickr.com/assets/embedr-loader.js"></script><script async="" src="//embedr.flickr.com/assets/client-code.js" charset="utf-8"></script>
All through the 5000 miles I've owned it, I've only barely been able to produce a dusting of black smoke, and my EGTs have never been over 1200. The other thing I noticed about my EGTs is that they are very slow to respond. I drove a 300Tdi in a RRC and noticed that his EGT gauge was essentially reacting to what I was doing with the pedal. Nothing near as fast as the tach, but I could give it the beans and actually expect the EGT to roll up to 650 or so on in-town, spirited acceleration. Mine only slowly crawls up to temp, about a minute or two at 50-60 mph, then it takes about 4 minutes at idle to cool back down to 450.
BUT! The simple job of turning the fueling screw is sort of vexing me. When I release the nut (blue arrow) the collar (red) and the screw (yellow) turn all together with the nut. I tried holding the screw with a driver while turning the nut, but it seems to be already at its limit to go clockwise, so it will always rotate counterclockwise with the nut.
Unsure how to proceed. Once again, I was looking to do a tiny 1/8 turn, try it, turn it again, try it, etc... but with the lock nut loosened, the screw seems already at its clockwise limit, and the act of loosening it actually retards the fueling.
<a data-flickr-embed="true" href="https://www.flickr.com/photos/bhcmbailey/41531195311/in/photostream/" title="Untitled"><img src="https://farm1.staticflickr.com/934/41531195311_20613d4f16_z.jpg" width="360" height="640" alt="Untitled"></a><script async src="//embedr.flickr.com/assets/client-code.js" charset="utf-8"></script><script async="" src="https://widgets.flickr.com/embedr/embedr-4110feef4aefd18270192d8aeba3ff41.js"></script><script async="" src="https://widgets.flickr.com/embedr/embedr-4110feef4aefd18270192d8aeba3ff41.js"></script><script async="" src="https://embedr.flickr.com/assets/embedr-loader.js"></script><script async="" src="https://widgets.flickr.com/embedr/embedr-4110feef4aefd18270192d8aeba3ff41.js"></script><script async="" src="https://widgets.flickr.com/embedr/embedr-4110feef4aefd18270192d8aeba3ff41.js"></script><script async="" src="https://widgets.flickr.com/embedr/embedr-4110feef4aefd18270192d8aeba3ff41.js"></script><script async="" src="https://widgets.flickr.com/embedr/embedr-4110feef4aefd18270192d8aeba3ff41.js"></script><script async="" src="https://widgets.flickr.com/embedr/embedr-4110feef4aefd18270192d8aeba3ff41.js"></script><script async="" src="https://embedr.flickr.com/assets/embedr-loader.js"></script><script async="" src="//embedr.flickr.com/assets/client-code.js" charset="utf-8"></script>
<script async="" src="https://widgets.flickr.com/embedr/embedr-4110feef4aefd18270192d8aeba3ff41.js"></script><script async="" src="https://embedr.flickr.com/assets/embedr-loader.js"></script><script async="" src="https://widgets.flickr.com/embedr/embedr-4110feef4aefd18270192d8aeba3ff41.js"></script><script async="" src="https://widgets.flickr.com/embedr/embedr-4110feef4aefd18270192d8aeba3ff41.js"></script><script async="" src="https://embedr.flickr.com/assets/embedr-loader.js"></script><script async="" src="//embedr.flickr.com/assets/client-code.js" charset="utf-8"></script>