You are using an out of date browser. It may not display this or other websites correctly.
You should upgrade or use an alternative browser.
You should upgrade or use an alternative browser.
What have you done to your DEFENDER today?
- Thread starter javelinadave
- Start date
Had a few spare minutes yesterday, so set the linkage up. Getting closer.
mmm, shiney!
MountainD
Technical Excellence Contributor
I attempted a seal replacement on my alpine windows while headliner is out and I blew it. After over an hour try8ng to get glass to seat in warmed seals, i just couldn’t get top to seat. Glass kept slowly easing out. Could never get the seal to correctly turn over so glass sits in correct position— possibly do to roof being slightly bent or slightly due to britpart seals. Finally used silicone lube instead of dish soap and on first attempt, it slowly popped back out nd boy was it slippery! Vroooooom, right onto the ground in a million pieces. Duct tape now employed while I wait. Yes. I cursed. A lot. When we did Dave’s, this went way easier... Genuine seals ordered as I don’t want to screw around. I’ll also compare seals for everyone. I’m not blaming the seal outright as I don’t have a genuine to compare it to, but I’m not happy. i always hate when I order OEM and it comes in a blue bag... glass and seals both 4mm, as I know there are other sizes. Ordered 2 windows to make sure the match and now I’ll have a spare (hopefully, I won’t need it).
hillstrubl
Founding Member
Finally got around to replacing 2 out of the 3 middle row seats with new exmoor high-backs. I'm going to order a 3rd but the baby seat actually seems to fit better with the original square one for now. Thanks Zack!

I am interested in doing same thing. How was the install? @hillstrubl
Finally got around to replacing 2 out of the 3 middle row seats with new exmoor high-backs. I'm going to order a 3rd but the baby seat actually seems to fit better with the original square one for now. Thanks Zack!
View attachment 12898
hillstrubl
Founding Member
instructions not that clear, first one was ~30 min, 2nd one was like 10 min.I am interested in doing same thing. How was the install? @hillstrubl
My one seat had an issue where the trim's foam had migrated a bit making the identification of where the bolt hole (and where you need to cut a small hole in the outer skin to expose the sunk nut's threads) a bit difficult. I'm ordering a 3rd to replace the middle. The construction is good despite the minor issue I had.
Thanks. Looking to improve the life of my boys in the back. Like the way yours turned out.instructions not that clear, first one was ~30 min, 2nd one was like 10 min.
My one seat had an issue where the trim's foam had migrated a bit making the identification of where the bolt hole (and where you need to cut a small hole in the outer skin to expose the sunk nut's threads) a bit difficult. I'm ordering a 3rd to replace the middle. The construction is good despite the minor issue I had.
hillstrubl
Founding Member
took an inaugural ride today, both kids (5 and 8) reported that they loved the new seats.Thanks. Looking to improve the life of my boys in the back. Like the way yours turned out.
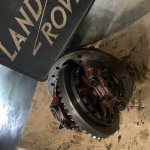
After 1.5 years down, rear main seal, clutch, new transmission, transfercase, turbo, intercooler, p gasket reseal, water pump, interior refurb etc...first attempt to drive today and all is good! New turbo is sweet!
Napalm00
Technical Excellence Contributor
Nice !After 1.5 years down, rear main seal, clutch, new transmission, transfercase, turbo, intercooler, p gasket reseal, water pump, interior refurb etc...first attempt to drive today and all is good! New turbo is sweet!
BarryO
Well-known member
Mike at Brittanica Restorations made a few videos that might helpI attempted a seal replacement on my alpine windows while headliner is out and I blew it. After over an hour try8ng to get glass to seat in warmed seals, i just couldn’t get top to seat. Glass kept slowly easing out. Could never get the seal to correctly turn over so glass sits in correct position— possibly do to roof being slightly bent or slightly due to britpart seals. Finally used silicone lube instead of dish soap and on first attempt, it slowly popped back out nd boy was it slippery! Vroooooom, right onto the ground in a million pieces. Duct tape now employed while I wait. Yes. I cursed. A lot. When we did Dave’s, this went way easier... Genuine seals ordered as I don’t want to screw around. I’ll also compare seals for everyone. I’m not blaming the seal outright as I don’t have a genuine to compare it to, but I’m not happy. i always hate when I order OEM and it comes in a blue bag... glass and seals both 4mm, as I know there are other sizes. Ordered 2 windows to make sure the match and now I’ll have a spare (hopefully, I won’t need it).
I installed alpine windows in a 109 standard roof, and once I had the holes cut to proper size, the glass went fairly quickly. I used dish soap & water, a plastic toothbrush handle to spread the seal, and a homemade locking strip tool. Work slow and steady, have your supplies within arms reach, and don’t let go of that glass.

These simple locking strip tools were made from wooden dowel and cotter pins I had laying around. The two cotter pins are slightly different size, one worked really well, one worked OK.
These simple locking strip tools were made from wooden dowel and cotter pins I had laying around. The two cotter pins are slightly different size, one worked really well, one worked OK.
These simple locking strip tools were made from wooden dowel and cotter pins I had laying around. The two cotter pins are slightly different size, one worked really well, one worked OK.
ok, that’s clever
MountainD
Technical Excellence Contributor
Very good advice. I’ve seen all videos and was prepped with tools. I put myself in the very mechanically inclined category, and I’ll just say glass with soap is very slippery. I never got to the filler strip stage. The glass after seating kept popping back out. It somehow didn’t seat far enough. I’m boiling the seals next time and getting the warm... glass arrives tomorrow...
Angus
Well-known member
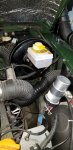
I set out to fix a slow brake fluid leak from the seals under the reservoir. I ordered the reservoir kit from RN (thanks Zack!) and pulled the old reservoir off. To replace the rear seal, you have to pull the master cylinder because there is a vent tube that runs through it. Since I had the master cylinder apart, I decided to rebuild the master cylinder using a kit I had previously ordered. I put it all back together and was bleeding the the brakes when I noticed the front pads were pretty worn, so I then replaced the pads (which I also had on the shelf). Ended up taking 5 hours, but she stops really nice now.
Glad I don't do this for a living anymore, I would starve.
Glad I don't do this for a living anymore, I would starve.
Attachments
Bostondave
Well-known member
Recently installed a rear anti sway bar. What a difference. Should have done it years ago. PO had removed it.