Altering seat box

Tbaumer

Technical Excellence Contributor
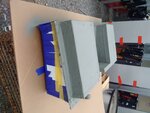
I haven't addressed the radius corner yet, but test fit some galvanized pieces (So I'm not wasting aluminum dialing the measurements in) to see how the fit will go together. I'm leaving the straight back channel, that supports the seat box, uncut for strength & I'll add a plate to fill the raised portion between the seats.

IMG_0567.jpgIMG_1152.jpgIMG_4751 3.jpg
IMG_0503.jpgIMG_7042.jpgIMG_7684.jpg
 

Tbaumer

Technical Excellence Contributor
Progress pics showing comparison between original height and new design. The seat areas will be 2" lower than stock, until I install the MudUK seat rail extensions & then seat height will be within 1/2" of stock (According to my precise calculations :))


IMG_2406.jpgIMG_0316.jpgIMG_2383.jpg
IMG_4338 2.jpgIMG_8230.jpg
 

Tbaumer

Technical Excellence Contributor
Here is what the rear view will look like. Some views with the tunnel in place. Still need to make the top pieces & figure out how deep I can make the battery box + tool box.


IMG_3482.jpgIMG_2476.jpgIMG_7307.jpg
IMG_6354.jpgIMG_2646.jpgIMG_0542.jpg
IMG_0534.jpg
 

Jeff B

Well-known member
Nice job so far.

I hope you're capable of repeating this because I bet your inbox will have a few requests...

Fortunately, I'm only 5-11... :)


.
 

Tbaumer

Technical Excellence Contributor
Thanks for the comments.
It's really all about having the right tools - 10' break, shear, table space & sheet metal fabrication tools. Put me in front of a combustion engine or transmission though & I'm a deer in the headlights.
I tried to retain the Land Rover design as much as possible, avoiding a look that would be too different, even though, in my opinion, it didn't always make the most sense. My biggest problem is finding time to work on it. I have patterns for what you see so far & once I get all the details dialed in (And can ensure a good fit) I'll post measurements & angles that can be copied.
 

Tbaumer

Technical Excellence Contributor
The original battery box & under seat tool box are made out of steel. These same YRM parts are aluminum, so it won't be a strength issue if I use 2mm aluminum & reenforce the bottoms. I plan on making them both deeper. Need to figure these out next, as they make up part of the top of the seat box.


IMG_7422.jpg
 

Tbaumer

Technical Excellence Contributor
I've had this on hold while I wrap up my engine swap. It's going to be a cool seat box (with patterns :)) when complete. More to follow soon.
 

FlyersFan76

Well-known member
Darn it. I almost wish I would have waiting and did this instead of building my own stock sized seat box.

How are you going to finish it? Paint, Line-X, Sound proofing, etc?
 

Tbaumer

Technical Excellence Contributor
I'm not a big fan of Line-X style coatings, except for truck beds (Unless you need to hide something), so paint & sound proofing for sure. Long hours at work (and weekends) are making it hard to make progress on my engine swap. Looking forward to something I'm good at (sheet metal fabrication - not engine work) & finishing this seat box design.
 

FlyersFan76

Well-known member
I'm not a big fan of Line-X style coatings, except for truck beds (Unless you need to hide something), so paint & sound proofing for sure. Long hours at work (and weekends) are making it hard to make progress on my engine swap. Looking forward to something I'm good at (sheet metal fabrication - not engine work) & finishing this seat box design.

Mine is bare aluminum at the moment but did 1-2 layers of Dynamat on the underside and inside the battery box.

When I decide to paint the whole truck is when I'll decide what color, etc I paint the interior of the truck. Probably do another layer of Dynamat then also.
 

Attachments

  • IMG_20170511_123923.jpg
    IMG_20170511_123923.jpg
    292.6 KB · Views: 262
  • IMG_20170512_143325.jpg
    IMG_20170512_143325.jpg
    280.9 KB · Views: 271

Tbaumer

Technical Excellence Contributor
It has been a ridiculous summer, long hours at work, short handed... anyway, I'm making time to get back at this seat box again. Here are a few fitting pics of the frame in place before fabricating the battery box & tool box.


IMG_1209.jpgIMG_1208.jpgIMG_1205.jpg
 

Tbaumer

Technical Excellence Contributor
Patterns, bent up in galvanized. The old battery box & the altered new out of aluminum. There is an overall adjustment to the patterns to accommodate the thickness of the aluminum, so I don't have exact measurements to share yet.

IMG_1219.jpgIMG_5850.jpgIMG_9272.jpg
IMG_7401.jpgIMG_7369.jpgIMG_4382.jpg
 

Tbaumer

Technical Excellence Contributor
Battery box angles match the seat box. Relieved that the hardest part of this fits! Should have the passenger tool box built this weekend.

IMG_6685.jpgIMG_6333 2.jpgIMG_3881.jpg
IMG_2995.jpgIMG_2792.jpgIMG_0377.jpg
IMG_0037.jpg
 
Top