Seat rail extensions

Tbaumer

Technical Excellence Contributor
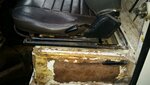
I ordered the MudUK seat rails, but my seats have two self locking bolts in the front of the rail and two in the back - Not just a single bolt front & back.
The original seat rails are wider than the new extensions and I will have to offset the seat by choosing the inside rail holes or outside holes.
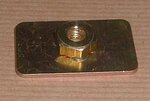
There is a riveted nut plate attached below each end of the seat rails. Do I have another odd ball 1986 110 part?
Do I need to get new seat slides to use these extensions?

IMG_4697.jpgIMG_2643.jpgIMG_2125.jpg
 

javelinadave

Administrator
Staff member
New slide part numbers are:
HHD102290 Left side
HHD102280 Right side

About $130 each plus shipping from LR Direct.
 

Tbaumer

Technical Excellence Contributor
Do all 110's have the double holes or am I going to have to change the double nut plates to singles (or rivnuts) once I get the new sliders and layout?
Do later seat mounts have a plate secured beneath the seat box thicker than just the sheet metal I am seeing?
Seems like I need reinforce the under side.
 

javelinadave

Administrator
Staff member
I'm not sure of when they changed but my 87 had 8 screws holding the seat in and my 89 had 4 bolts. As for the seat box the bolts go into 10mm or 13mm Rivnuts (I don't remember which for sure).
 

LostChord

Well-known member
Subscribed. Have the same set up.

I encountered this when I got new seats to replace the original hardbacks in my 1986. Originals had 8 screws, new seats have four. For now, I just used the innermost holes to mount the seats; the outermost interfered with the doors closing.

The plan was to drill new holes in the middle and addres this, but it's been like a year now :)

I have the Nakatanenga rails still in the boxes waiting for me to deal with this.
 

The Dro

Illustrious
I have the seat rails on mine now... But my truck came with some impressive Italian Engineering design... :eek:

Maybe it's an option for ya'll
 

Attachments

  • 20161125_160005.jpg
    20161125_160005.jpg
    302.5 KB · Views: 211

FlyersFan76

Well-known member
My 87 County 110 had only 2 bolts per rail. So 4 bolts per seat.

Not sure if the County designation makes a difference but judging by your seats you also have one. (I could be wrong)

I have been dragging my feet on ordering extensions until I finished building my box. I figured I would get them if I really needed them as I never had them in my '97 and felt fine. I am one of those odd 6' tall people that found D90 and Hummer seats to be comfortable all the while sitting relatively close to the steering wheel.

I just about finished my seatbox last night and when testing the layout of the seats to make sure seats and center console fit correctly I noticed that the front to back mounting is a little tight. So now I need to order some. Along with other stupid odds and ends. Not sure which brand to get yet though.
 

FlyersFan76

Well-known member
I have the seat rails on mine now... But my truck came with some impressive Italian Engineering design... :eek:

Maybe it's an option for ya'll

1. Nice. Never though of that. I have a ton of spacers that have come with many of my flat panel TV mounts that I never seem to throw out.

2. Every time I see that picture it makes me happy that mother nature has taken its toll on my seatbox covering. Easier to come off.
 

Uncle Douglas

Well-known member
Callsign: delete
The four bolt lower rails will still bolt right up to the seat rail extensions, you just have to decide to inset the seat inward or outward. I'm 6'5 with wide shoulders so I inset my first 110 seats inward by one set of holes towards the cubby box. Everything fit fine and it made it so that my shoulder wasn't into the b pilar or the window glass. For me it was a tremendous improvement.
 

The Dro

Illustrious
1. Nice. Never though of that. I have a ton of spacers that have come with many of my flat panel TV mounts that I never seem to throw out.

2. Every time I see that picture it makes me happy that mother nature has taken its toll on my seatbox covering. Easier to come off.
I thought it was pretty clever and CHEAP. But doesn't look great.

That picture is old... I removed the carpeting and glue with that goo recommend by Doug.
 

Tbaumer

Technical Excellence Contributor
Since I pulled my drivers seat out, I'm going to try the offset Uncle Doug suggested.
It will keep me on the road and let me test the extensions and new seat height.
Don't know if the excess flat mount sticking out beyond the extension width will bug me, but I like the idea of moving the seat away from the door an inch.
 

LostChord

Well-known member
Keep an eye on the seat box lids; after using the inside hole location to install my seats, my lids now require a bit of convincing to remove them. Which is fine, unless you're in a hurry :)
 

Tbaumer

Technical Excellence Contributor
Along with discovering the PO lost one of four nut plates & used random sized bolts, the raised channel that runs in front of my cubby box on my seat box assembly will need to be trimmed 1/2" in order to use the holes away from the door (see where my drift pin is pointing). If I use the holes toward the door for the extensions & the left slider mount holes, I can align the seat as before, but when I upgrade to new sliders or seats it will move my seat closer to the door.
Any reason I shouldn't trim this channel?


IMG_6845.jpgIMG_3315.jpgIMG_2721.jpg
 

FlyersFan76

Well-known member
Along with discovering the PO lost one of four nut plates & used random sized bolts, the raised channel that runs in front of my cubby box on my seat box assembly will need to be trimmed 1/2" in order to use the holes away from the door (see where my drift pin is pointing). If I use the holes toward the door for the extensions & the left slider mount holes, I can align the seat as before, but when I upgrade to new sliders or seats it will move my seat closer to the door.
Any reason I shouldn't trim this channel?


View attachment 2011View attachment 2013View attachment 2014

Yeah it is going to be a pain and messy.

BTW, what is your center console mounted on top of?
 

LostChord

Well-known member
Along with discovering the PO lost one of four nut plates & used random sized bolts, the raised channel that runs in front of my cubby box on my seat box assembly will need to be trimmed 1/2" in order to use the holes away from the door (see where my drift pin is pointing). If I use the holes toward the door for the extensions & the left slider mount holes, I can align the seat as before, but when I upgrade to new sliders or seats it will move my seat closer to the door.
Any reason I shouldn't trim this channel?

I have the same setup, minus random bolts and such :)

I've thought about getting a few of these (MTC3203) and drilling a new hole in the center of the existing holes...

...but then begin to second guess attaching my rails to a swiss cheese seatbox... :eek:

So perhaps trimming that raised channel isn't a such bad idea after all....
 

Attachments

  • MTC3203-CAPTIVE-NUT-PLATE.jpg
    MTC3203-CAPTIVE-NUT-PLATE.jpg
    17.5 KB · Views: 159

Uncle Douglas

Well-known member
Callsign: delete
Since I pulled my drivers seat out, I'm going to try the offset Uncle Doug suggested.
It will keep me on the road and let me test the extensions and new seat height.
Don't know if the excess flat mount sticking out beyond the extension width will bug me, but I like the idea of moving the seat away from the door an inch.

sorry- should have given you more information. I drill out the rivet holding the nut plate, have always hated the seat nut plates and flat head screws used to mount seats the first few years. I plug the two existing holes with black nylon plugs and then drill the rivet hole out to the size of the bolt I want to use to mount the rail. I then offset the seat on the seat extension rail.

I buy the plugs in bulk but you can find them in the specialty fastener section of Lowes etc.

FWIW the military trucks use a bolt up through the seat box and the a large flat and a nut ie the make a seat mounting stud instead of the downward facing bolts. Its a far better setup and one I now use on all trucks.
 

LostChord

Well-known member
sorry- should have given you more information. I drill out the rivet holding the nut plate, have always hated the seat nut plates and flat head screws used to mount seats the first few years. I plug the two existing holes with black nylon plugs and then drill the rivet hole out to the size of the bolt I want to use to mount the rail. I then offset the seat on the seat extension rail.

I buy the plugs in bulk but you can find them in the specialty fastener section of Lowes etc.

FWIW the military trucks use a bolt up through the seat box and the a large flat and a nut ie the make a seat mounting stud instead of the downward facing bolts. Its a far better setup and one I now use on all trucks.

What I was trying to say, only way better.
 

Tbaumer

Technical Excellence Contributor
BTW, what is your center console mounted on top of?

It's a MudUK sliding locker. It raised my cubby box up to a better height and has hidden storage below.
I like it, but I need to change the "locking" mechanism, as it can be unintentionally opened with a weak push.

IMG_9726.jpgIMG_0235.jpg
 

RBBailey

NAS-ROW Addict
Callsign: KF7KFZ
I'm building my own center console, plan to copy the bottom drawer thing, and to make the pad into an actual arm rest.
 

Tbaumer

Technical Excellence Contributor
I like the idea of "Hidden" storage. I haven't looked into a better lock yet. If you are building one, make sure the lock that keeps it from sliding back has a strong latch or your cubby will slide open when you lean on it or use it to shift your weight.
 
Top