You are using an out of date browser. It may not display this or other websites correctly.
You should upgrade or use an alternative browser.
You should upgrade or use an alternative browser.
Heater core
- Thread starter Jeff B
- Start date
Why are you replacing it?
Wrong color.Why are you replacing it?
Jeff B
Well-known member
It leaked all down the passenger floor and fogged up my windshield.Why are you replacing it?
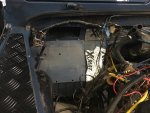
(You can see the drip marks in my picture)
It appears to be 1997 vintage so I can't complain.
I wish the RRC was this easy to replace.
.
It appears to be 1997 vintage so I can't complain.
So you didn't get pro-lined haha
Jeff B
Well-known member
Yo yo yo, I will Pro-Line the D90 heater core all day/ every day.So you didn't get pro-lined haha
Z.G
Well-known member
So you didn't get pro-lined haha
That truck is 90% proline
Jeff B
Well-known member
My foam seals were still pretty good as this was all reassembled just 2 years ago.Highly recommend replacing the foam seals, especially the internal flap/door seal. I’ve got to go in and do the flap seal bc too much fresh air leaks in and mixes with the hot air and blows luke warm at best.
That truck is 90% proline
Let's get real. You know it's more like 93.4%.
")
Honestly this was an easier job than I thought it would be.
On the '97, I had to move the ECU out of the way which took an extra 20 minutes.....
.
Jeff B
Well-known member
I didn't mess with the inner flapper. It was still intact.Jeff what did you use on the flap? I bought some stuff but somewhat second guessing if it’ll work. I don’t want to do this three times if I can avoid it.
I just made a new seal from heater box--->bulkhead
Used some cheap closed cell stuff from Ace hardware.
Oh, and I had already done the bulkhead opening cut. That makes the hole about 30% larger than stock!
Heater core is a pretty simple job on the 90.
My heater box was 100% rust free so the little screws came right out.
The only difficult part is moving the ECU out of the way and fidgeting with the box to get it out, but even that only takes 15-20 minutes.
Loosen your in/out coolant hoses and bungee them up and you dont lose much coolant.
Then, when all reinstalled, just use a funnel and hose to fill the heater core/ reattach hoses.
.
Last edited:
I used this stuff
Amazon.com: Sponge Neoprene with Adhesive 1/8" Thick X 54" Wide X 1': Home Improvement
Buy Sponge Neoprene with Adhesive 1/8" Thick X 54" Wide X 1': Sheets, Rolls & Strips - Amazon.com ✓ FREE DELIVERY possible on eligible purchases
www.amazon.com
Amazon.com: Sponge Neoprene With Adhesive 1/4" Thick X 54" Wide X 1': Home Improvement
Amazon.com: Sponge Neoprene With Adhesive 1/4" Thick X 54" Wide X 1': Home Improvement
www.amazon.com
I purchased this. just alittle bit thicker. i will let you guys know how it fits.
I purchased this. just alittle bit thicker. i will let you guys know how it fits.
For the flaps that is much too thick. 1/8" is about right.
1/8th worked great on the upper flap, I think I went a bit thicker on the lower the (1/4th) since it had more lip... either way there is more than enough material to work with. BTW a Dremel with one of the polishing cloth type bits works well to remove the old glue/gasket residue. I soaked it in 3m adhesive remover for a while then hit it with the Dremel without taking it apart.
WreckITFrank
Technical Excellence Contributor
This is great info for someone who never dove into this before. Thanks for sharing. Which flaps are what is considered upper flap and lower flap? Are you talking about the flaps that are in the lower dash/floor vents? And upper is in the heaterbox? Thanks.
No - I'm talking about the flaps inside the heater box you have 2 cables running to the heater box that control them, these are the seals you will need to redo most likely. Also go ahead and get a heater box to bulkhead seal since they rip when you pull them off. STC953 Expensive for a seal but worth it to replace and only do the job once.
you have 2 cables running to the heater box that control them, these are the seals you will need to redo most likely. Also go ahead and get a heater box to bulkhead seal since they rip when you pull them off. STC953 Expensive for a seal but worth it to replace and only do the job once.MountainD
Technical Excellence Contributor
Worth mentioning that if you have RHD, that seal is STC952. Just for those goofy driversNo - I'm talking about the flaps inside the heater box
1of40
Well-known member
February is threatening to be super cold and snowy so decided to jump back in and redo the seals and gaskets on the heater box. The 1/8 foam mentioned above is ideal. I bought a small can of Gorilla brand spray adhesive. I’m telling you that shit is no joke. I scrapped the old crap off the flaps and hit them with a green pad. The surface was not perfect and it didn’t matter bc the adhesive after a minute gets nice and tacky. I also used it to seal the bulkhead gasket I got from RN to the box.
One thing I haven’t noticed people mentioning that I ended up having to do to the bulkhead gasket is cut an opening at the top where the box bolts to the bulkhead. Had I not the box was not close enough to bolt to the bulkhead.
As usual, 9/10 times when I fix things I break things or I get some other surprise that I wasn’t expecting. Yesterday’s adventure ended with everything going back together as expected but when I went to test the heat and airflow my blower control lever for some reason won’t stay down. It rests at the top fine but when I move the lever down it gets increasingly stiffer and won’t hold. If I force it down the fan turns on but once I let go it moves up and doesn’t hold. It feels like a cable is being restricted. This is a 97NAS which has AC so maybe I bound something up when putting the ac facia back together? I’ll have to take a look when I get back in town early next week.
Thoughts?