El Pinchi
Well-known member
Hey Chris,
Join Date: Jul 2004
Location: San Diego, CA USA
Posts: 289
Registry
Fuel tank bolt questions
Quote:
Originally Posted by chris snell View Post
Finally got this project finished a couple of weekends back. It took quite awhile and there were some setbacks along the way. It started as a project to install a Dixon-Bate tow jaw. I quickly realized that I would have to drop the tank to install the jaw, so I figured that I might as well install a new fuel tank skid while I was at it. Since I was dropping the tank, I also might as well install a new fuel pump, too.
The fuel tank skid came from Stephen Peters (safarirover). It is a great product and a good value. It is made from aluminum; I took mine to the power coaters and had it coated semi-gloss black to match the tire carrier. They did a nice job.
The first complication came when I removed the hex cap screws that hold the skid in place. They were rusty and I had neglected to hose them down with Liquid Wrench in the days leading up to the repair. When I put a wrench on one of them, the head twisted off the body of the bolt. I tried a bolt extractor, only to have that break off in there as well. I ended up grinding the entire square reinforcing plate (including broken bolt) and welding on a new plate that I cut from a piece of steel bar. Once that was welded on, I drilled and tapped it, then painted it to match the crossmember and I was back in business.
Problems continued when I tried to disconnect the fuel lines. The feed line came off without a hitch but the return line had apparently been cross-threaded by the last person to work on them. The threads stripped out and I was left with this mess:
http://www.flickr.com/photos/defende...7624474481858/
After a futile search for a new set of SS fuel lines, I decided to take the "Ron-good" method. I cut the hose and line and used a short piece of flared hard line, along with some fuel-grade tubing and SS hose clamps, and spliced the line.
On a side note, if you are doing this project, you can disconnect the fuel vapor vent line (with the green connector) by bending a section of a wire coat hanger into a "U" and pressing the ends into the fitting. It comes right apart; no special tool needed.
The D-B jaw was also a pain in the ass. A few months back, I estimated the length of the bolts needed to mount the jaw and ordered some from McMaster. Once the fuel tank was out, however, I realized that I had ordered them too long. I re-measured and re-ordered, only to realize that I had neglected to factor in the thickness of my Expeditionware backing plate. Crap. I carefully measured for a third time--the proper length is 100mm, for those that are doing this project--and placed yet another McMaster order and was finally able to install my tow jaw.
For the reinstallation of the skid plate, I sourced some type 316 stainless steel hex cap screws and washers and used a liberal application of anti-seize on these.
Still, the problems continued. Everything was put back together but the truck wouldn't start. I could hear the fuel pump but it wasn't getting fuel. Another de-assembly and re-assembly later, it was determined that the fuel lines were reversed at the fuel pump. Fuck. Lesson learned: don't do these things late at night.
The finished product looks awesome and it was worth the sweat equity.
http://www.flickr.com/photos/defende...7624474481858/
http://www.flickr.com/photos/defende...7624474481858/
http://www.flickr.com/photos/defende...7624474481858/
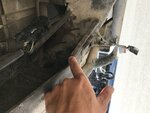
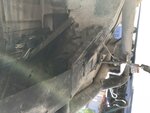
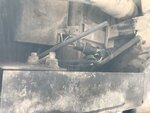
Hey Chris, I need to replace the gas tank on my NAS 110. Got all the parts from Zack at RN. Regarding the bolts that break off are they these in my pics? Any other ones I have to be careful with? I plan to PB blast them for about a week and tap them often too. Do you recall the party number for the as bilts from mcmasters? Do you know if anyone makes an alloy skid for the Nas 110? Thanks for your help, Eddie
Attached Thumbnails
Join Date: Jul 2004
Location: San Diego, CA USA
Posts: 289
Registry
Fuel tank bolt questions
Quote:
Originally Posted by chris snell View Post
Finally got this project finished a couple of weekends back. It took quite awhile and there were some setbacks along the way. It started as a project to install a Dixon-Bate tow jaw. I quickly realized that I would have to drop the tank to install the jaw, so I figured that I might as well install a new fuel tank skid while I was at it. Since I was dropping the tank, I also might as well install a new fuel pump, too.
The fuel tank skid came from Stephen Peters (safarirover). It is a great product and a good value. It is made from aluminum; I took mine to the power coaters and had it coated semi-gloss black to match the tire carrier. They did a nice job.
The first complication came when I removed the hex cap screws that hold the skid in place. They were rusty and I had neglected to hose them down with Liquid Wrench in the days leading up to the repair. When I put a wrench on one of them, the head twisted off the body of the bolt. I tried a bolt extractor, only to have that break off in there as well. I ended up grinding the entire square reinforcing plate (including broken bolt) and welding on a new plate that I cut from a piece of steel bar. Once that was welded on, I drilled and tapped it, then painted it to match the crossmember and I was back in business.
Problems continued when I tried to disconnect the fuel lines. The feed line came off without a hitch but the return line had apparently been cross-threaded by the last person to work on them. The threads stripped out and I was left with this mess:
http://www.flickr.com/photos/defende...7624474481858/
After a futile search for a new set of SS fuel lines, I decided to take the "Ron-good" method. I cut the hose and line and used a short piece of flared hard line, along with some fuel-grade tubing and SS hose clamps, and spliced the line.
On a side note, if you are doing this project, you can disconnect the fuel vapor vent line (with the green connector) by bending a section of a wire coat hanger into a "U" and pressing the ends into the fitting. It comes right apart; no special tool needed.
The D-B jaw was also a pain in the ass. A few months back, I estimated the length of the bolts needed to mount the jaw and ordered some from McMaster. Once the fuel tank was out, however, I realized that I had ordered them too long. I re-measured and re-ordered, only to realize that I had neglected to factor in the thickness of my Expeditionware backing plate. Crap. I carefully measured for a third time--the proper length is 100mm, for those that are doing this project--and placed yet another McMaster order and was finally able to install my tow jaw.
For the reinstallation of the skid plate, I sourced some type 316 stainless steel hex cap screws and washers and used a liberal application of anti-seize on these.
Still, the problems continued. Everything was put back together but the truck wouldn't start. I could hear the fuel pump but it wasn't getting fuel. Another de-assembly and re-assembly later, it was determined that the fuel lines were reversed at the fuel pump. Fuck. Lesson learned: don't do these things late at night.
The finished product looks awesome and it was worth the sweat equity.
http://www.flickr.com/photos/defende...7624474481858/
http://www.flickr.com/photos/defende...7624474481858/
http://www.flickr.com/photos/defende...7624474481858/
Hey Chris, I need to replace the gas tank on my NAS 110. Got all the parts from Zack at RN. Regarding the bolts that break off are they these in my pics? Any other ones I have to be careful with? I plan to PB blast them for about a week and tap them often too. Do you recall the party number for the as bilts from mcmasters? Do you know if anyone makes an alloy skid for the Nas 110? Thanks for your help, Eddie
Attached Thumbnails