In the spirit of trying to get something RR or Disco related into the running for the technical thread competition, I decided to document my recent LR3 compressor dryer refresh. I also, admittedly, desperately want a sticker.
Full disclosure: I'm no mechanic. I like turning wrenches, but my basic theory to maintenance is, "It's already broken, so if I can't fix it, I'm only out the cost of parts. The time with tools in my hand are therapeutic and show my kids you really don't have to call someone else for everything."
So here's the deal. 2007 LR3, and I've done a complete dryer swap before. It fixed my suspension fault issue before. I definitely would like to throw +2 coils under it, but it's still my wife's "vehicle", so until she's done with it I want to keep the fixes cheap. The replacement part number is: VUB504700 however, LR doesn't just sell that part anymore. It was less than $100 when I did it 4 or 5 years ago. Now LR and all the parts dealers make you buy a whole new compressor assembly. For $900 I would just coil it. To keep it cheap, new, and not off ebay, I purchased this kit:
https://www.amazon.com/gp/product/B00SYYUB6C/ for $58.
I sprung for the one with a new lid because I didn't know if I'd bugger the old one. If you have the time, I'm certain you could just put the old beads in a toaster oven for a while and reuse them.
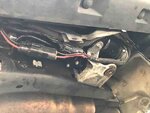
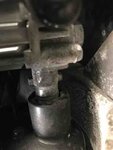
Okay, first things first, I jacked my truck up on the driver's side and put jack stands under it. You probably can do it without it, but I don't trust myself. Identify the plastic cover and pull the 3 screws out that hold it on. They're 10mm.
Now you'll see the whole assembly.
You're going for the black plastic thing with the hex bolts on it. Unclip the 2 electrical connections to get them out of the way and unhook the air tubes from the compression fittings (blue and red). I push in on the hose, you'll feel it free up with a little click, then hold the fitting down with my wrench and pull the hose out and let it hang out of the way.
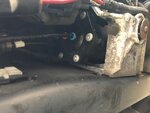
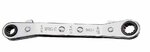
Next, you'll swear you can just pull it out. And you can, AFTER you pull a small Phillips head screw off the outward side. I used a small 1/4" Phillips bit and 1/4" offset wrench like this:
This thing will save you hours and keep you from pulling the whole assembly off. Seriously, buy one of these.
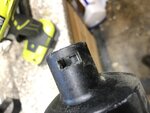
Once the screw came out it's a 90 degree counterclockwise twist and you can pull it out while leaving the whole assembly in there.
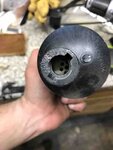
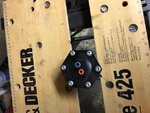
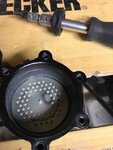
Next take the dryer to a work area. Pull the torx bolts out with a T30 bit to expose the innards.
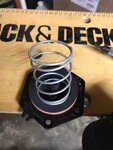
It comes apart like this:
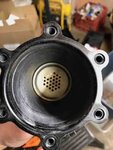
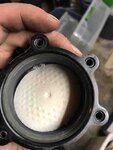
Empty beads and find this:
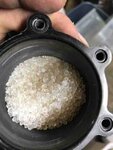
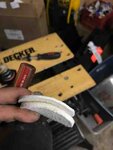
Replace filters and beads from kit. Match the skinny and fat filters to the correct position.
Then reassemble. I didn't mess up the lid so I kept it. The replacement doesn't have them color coded, so I like knowing Red on top, Blue on bottom, ear for the screw on right side as you look at the top.
Go back to the truck, align end on stub as shown, and push then turn clockwise to seat.
Reassemble in reverse.
All told, if you know what you're doing (see above, you're welcome) and have a quick way to get the screw out (bit and wrench) you can do this job in an hour, maybe less. If you don't learn from me you'll be like me and it'll take 3 hours and a bunch of teeny tiny cuts on your hands because you'll have to take your gloves off to try and pry it out.
Hopefully it'll fix your suspension fault, and for $60 and an hour it's tough not to do this first. I'm pretty sure this procedure works for the RRS as well but YMMV.
Full disclosure: I'm no mechanic. I like turning wrenches, but my basic theory to maintenance is, "It's already broken, so if I can't fix it, I'm only out the cost of parts. The time with tools in my hand are therapeutic and show my kids you really don't have to call someone else for everything."
So here's the deal. 2007 LR3, and I've done a complete dryer swap before. It fixed my suspension fault issue before. I definitely would like to throw +2 coils under it, but it's still my wife's "vehicle", so until she's done with it I want to keep the fixes cheap. The replacement part number is: VUB504700 however, LR doesn't just sell that part anymore. It was less than $100 when I did it 4 or 5 years ago. Now LR and all the parts dealers make you buy a whole new compressor assembly. For $900 I would just coil it. To keep it cheap, new, and not off ebay, I purchased this kit:
https://www.amazon.com/gp/product/B00SYYUB6C/ for $58.
I sprung for the one with a new lid because I didn't know if I'd bugger the old one. If you have the time, I'm certain you could just put the old beads in a toaster oven for a while and reuse them.
Okay, first things first, I jacked my truck up on the driver's side and put jack stands under it. You probably can do it without it, but I don't trust myself. Identify the plastic cover and pull the 3 screws out that hold it on. They're 10mm.
Now you'll see the whole assembly.
You're going for the black plastic thing with the hex bolts on it. Unclip the 2 electrical connections to get them out of the way and unhook the air tubes from the compression fittings (blue and red). I push in on the hose, you'll feel it free up with a little click, then hold the fitting down with my wrench and pull the hose out and let it hang out of the way.
Next, you'll swear you can just pull it out. And you can, AFTER you pull a small Phillips head screw off the outward side. I used a small 1/4" Phillips bit and 1/4" offset wrench like this:
This thing will save you hours and keep you from pulling the whole assembly off. Seriously, buy one of these.
Once the screw came out it's a 90 degree counterclockwise twist and you can pull it out while leaving the whole assembly in there.
Next take the dryer to a work area. Pull the torx bolts out with a T30 bit to expose the innards.
It comes apart like this:
Empty beads and find this:
Replace filters and beads from kit. Match the skinny and fat filters to the correct position.
Then reassemble. I didn't mess up the lid so I kept it. The replacement doesn't have them color coded, so I like knowing Red on top, Blue on bottom, ear for the screw on right side as you look at the top.
Go back to the truck, align end on stub as shown, and push then turn clockwise to seat.
Reassemble in reverse.
All told, if you know what you're doing (see above, you're welcome) and have a quick way to get the screw out (bit and wrench) you can do this job in an hour, maybe less. If you don't learn from me you'll be like me and it'll take 3 hours and a bunch of teeny tiny cuts on your hands because you'll have to take your gloves off to try and pry it out.
Hopefully it'll fix your suspension fault, and for $60 and an hour it's tough not to do this first. I'm pretty sure this procedure works for the RRS as well but YMMV.