RamblerRob
Well-known member
Thought I'd start a build thread to chronical my stumblings through this project.
My initial scope was to build up a similar (but worse off) truck on a fresh designa chassis but I was able to nab the current truck having already been converted to run on the rrc LWB chassis and equipped with some nice upgrades for less than the chassis alone would have cost me let alone the massive project of getting the skeleton of my old truck in decent shape to even start the project.
PO of my current rig had her converted to a NA diesel /lt77 / lt230 so the main part of my project hot narrowed down to just an engine swap from a full on frame off restoration, Making me very happy indeed!
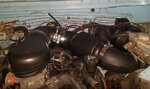
Engine/ transmission /Tcase mounting & position
My drivetrain selection I had been working on already and consisted of a Chev 4.3 v6 out of a 2006 silverado, mated to 4hp22 and lt230 via the kit from Mark's 4wd.
Having already shelled out for the engine and the kit I didn't want to switch gears again. The truck came to me without engine or transmission anyway.
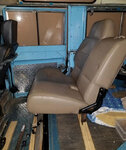
Fitment wise it's snug but comfortable in the engine compartment and I didn't need to modify the bulkhead at all. I did need to shift the transfer case mounts rear ward about 5".
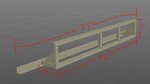
The marks 4wd kit came with engine brackets that are a bolt on job for chev 350 replacing rover v8 but my truck no longer had the v8 brackets, so I opted to get some adjustable weld in brackets from advance adapters.
http://www.advanceadapters.com/products/713001-s--chevy-v8--43l-v6-engine-mount-kit/
Nice brackets that let you adjust for placement and bolt in temporarily but require welding before actual use.
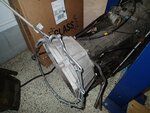
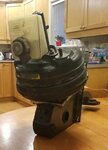
Power steering box/pump
The power steering pump really wanted to occupy the same space as the power steering box and was super tight against the steering shafts so I removed the gm pump and downgraded to the pump from my '95 disco (parts truck) two of the holes in the block for the AC/PS bracket match up exactly to the holes in the land rover pump housing/bracket so I fabbed up a small bracket to get my third bolt hole and shaved down the back of the Rover bracket to bring the pulley into line with the rest of the GM belt drive pulleys
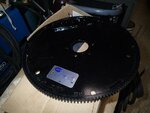
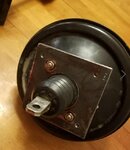
Mating the 4.3 to zf4hp22
This part took a fair bit of head scratching even with the kit from marks. The kit consists of a bellhousing adapter plate and a crank adapter that has the gm crank pattern on one side and the Rover crank pattern on the other. You fit a GM 153t flywheel to your crank and couple it to the Rover torque converter via a land rover flexible drive plate. This is where the fun began!
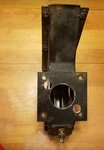
So gm doesn't use 153t flywheels on any of their Kate model v6 engines and no longer drill their blocks with the bolt pattern for that flywheel. I was only able to find one starter that mounted to the staggered bolt pattern and allowed for the 153t flywheel.
https://m.summitracing.com/parts/csi-100sbp
This kit comes with a little bracket that bolts into the staggered bolt holes with one starter bolt and a socket head cap screw and has an extra hole for your straight across pattern bolt to mount into.
I ran into a few issues with this set up. Firstly the aluminum oil pan on the engine has to be trimmed back significantly to make room. Secondly all the included bolts are standard and my starter bolts are metric. They did thread but I was concerned about how loose the fit was. I ended up getting the starter mounting block cur down and bored out to accept my stock starter bolts... Better safe than sorry.
The other issues I had were that the newer engines used a dished flex plate so I had to add a crank spacer to bring my flat flywheel out 5mm to get my ring gear teeth in the correct location.
Another as yet untested possible problem is that there is very little room to access the flex plate to torque converter bolts and I'm not sure how I will be able to torque them correctly. I may widen the inspection cover on the bottom of the Rover bellhousing to give me more access but I still won't be able to get a torque wrench between the flywheel and flex plate.
My initial scope was to build up a similar (but worse off) truck on a fresh designa chassis but I was able to nab the current truck having already been converted to run on the rrc LWB chassis and equipped with some nice upgrades for less than the chassis alone would have cost me let alone the massive project of getting the skeleton of my old truck in decent shape to even start the project.
PO of my current rig had her converted to a NA diesel /lt77 / lt230 so the main part of my project hot narrowed down to just an engine swap from a full on frame off restoration, Making me very happy indeed!
Engine/ transmission /Tcase mounting & position
My drivetrain selection I had been working on already and consisted of a Chev 4.3 v6 out of a 2006 silverado, mated to 4hp22 and lt230 via the kit from Mark's 4wd.
Having already shelled out for the engine and the kit I didn't want to switch gears again. The truck came to me without engine or transmission anyway.
Fitment wise it's snug but comfortable in the engine compartment and I didn't need to modify the bulkhead at all. I did need to shift the transfer case mounts rear ward about 5".
The marks 4wd kit came with engine brackets that are a bolt on job for chev 350 replacing rover v8 but my truck no longer had the v8 brackets, so I opted to get some adjustable weld in brackets from advance adapters.
http://www.advanceadapters.com/products/713001-s--chevy-v8--43l-v6-engine-mount-kit/
Nice brackets that let you adjust for placement and bolt in temporarily but require welding before actual use.
Power steering box/pump
The power steering pump really wanted to occupy the same space as the power steering box and was super tight against the steering shafts so I removed the gm pump and downgraded to the pump from my '95 disco (parts truck) two of the holes in the block for the AC/PS bracket match up exactly to the holes in the land rover pump housing/bracket so I fabbed up a small bracket to get my third bolt hole and shaved down the back of the Rover bracket to bring the pulley into line with the rest of the GM belt drive pulleys
Mating the 4.3 to zf4hp22
This part took a fair bit of head scratching even with the kit from marks. The kit consists of a bellhousing adapter plate and a crank adapter that has the gm crank pattern on one side and the Rover crank pattern on the other. You fit a GM 153t flywheel to your crank and couple it to the Rover torque converter via a land rover flexible drive plate. This is where the fun began!
So gm doesn't use 153t flywheels on any of their Kate model v6 engines and no longer drill their blocks with the bolt pattern for that flywheel. I was only able to find one starter that mounted to the staggered bolt pattern and allowed for the 153t flywheel.
https://m.summitracing.com/parts/csi-100sbp
This kit comes with a little bracket that bolts into the staggered bolt holes with one starter bolt and a socket head cap screw and has an extra hole for your straight across pattern bolt to mount into.
I ran into a few issues with this set up. Firstly the aluminum oil pan on the engine has to be trimmed back significantly to make room. Secondly all the included bolts are standard and my starter bolts are metric. They did thread but I was concerned about how loose the fit was. I ended up getting the starter mounting block cur down and bored out to accept my stock starter bolts... Better safe than sorry.
The other issues I had were that the newer engines used a dished flex plate so I had to add a crank spacer to bring my flat flywheel out 5mm to get my ring gear teeth in the correct location.
Another as yet untested possible problem is that there is very little room to access the flex plate to torque converter bolts and I'm not sure how I will be able to torque them correctly. I may widen the inspection cover on the bottom of the Rover bellhousing to give me more access but I still won't be able to get a torque wrench between the flywheel and flex plate.