You are using an out of date browser. It may not display this or other websites correctly.
You should upgrade or use an alternative browser.
You should upgrade or use an alternative browser.
GM 292 Straight 6 - Yet another conversion
- Thread starter RDavisinVA
- Start date
 getting there, Robert!
Congratulations. Betting dual carbs on a big 6cyl is a blast.
RDavisinVA
Technical Excellence Contributor
It was fun to drive with the dual carbs making it quite responsive.
PS pump is noise free and makes for easy turns.
Overall very fun to drive with a semi-sports car feel.
Managed to even peel-out!
Lots of work left to accomplish, but it was together enough for last night's test.
One thing is for sure, it needs to have good brakes.
Before it becomes a daily driver, am going to add a rear disk conversion thanks to some early 110 front hubs that Uncle Douglas was kind enough to let me have.
Need to order the EFI after it gets driven a little more...
Last edited:
RDavisinVA
Technical Excellence Contributor
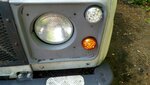
The PO, a "Land Rover Speciality Shop" in Switzerland, had done some really stupid things to the headlamp wiring.
One low beam worked and one high beam worked.
They eliminated the fuse box and put these individual fuse connectors in all the wires and hooked up all the headlamp wires incorrectly.
Luckily the wires themselves had not been tampered with.
I disconnected the (+) battery post and connected 1 wire with a male spade on the end separately to the 4 positive leads 2 for the low beams and 2 for the high beams.
Once these were identified, the (+) battery post was reconnected to establish which headlamp leads came on with the low beams and went out with the high beams and then which headlamp leads came on with the high beams and went out with the low beams.
Now we have working headlamps.
All the tail, parking, flashers, plate lamps were replaced with LED units.
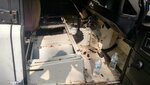
The only chores left are connecting the hand brake, finishing up the seat base install and seatbelt anchors, installing new oil pressure, temp, and Tach gauges, connecting the dash charging light to work with the alternator diversion switching, install the alternator diversion switch, and install the auxiliary battery bank and the various 12V auxiliary sockets.
Am not going to install the inverter and Dormobile top as have too many other projects that went on hold while I devoted 3 months to this project.
One low beam worked and one high beam worked.
They eliminated the fuse box and put these individual fuse connectors in all the wires and hooked up all the headlamp wires incorrectly.
Luckily the wires themselves had not been tampered with.
I disconnected the (+) battery post and connected 1 wire with a male spade on the end separately to the 4 positive leads 2 for the low beams and 2 for the high beams.
Once these were identified, the (+) battery post was reconnected to establish which headlamp leads came on with the low beams and went out with the high beams and then which headlamp leads came on with the high beams and went out with the low beams.
Now we have working headlamps.
All the tail, parking, flashers, plate lamps were replaced with LED units.
The only chores left are connecting the hand brake, finishing up the seat base install and seatbelt anchors, installing new oil pressure, temp, and Tach gauges, connecting the dash charging light to work with the alternator diversion switching, install the alternator diversion switch, and install the auxiliary battery bank and the various 12V auxiliary sockets.
Am not going to install the inverter and Dormobile top as have too many other projects that went on hold while I devoted 3 months to this project.
Attachments

RDavisinVA
Technical Excellence Contributor
RDavisinVA
Technical Excellence Contributor
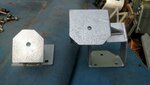
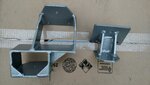
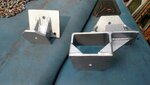
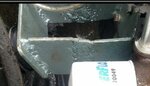
The 4 cylinder 292 mounts are looking professional.
These bolt right to the pre-300TDI 4 cylinder frame mounts.
This eliminates the need for any cutting or welding.
Note one staggered mount to accommodate the 292.
The mounts for the 230 and 250 are and will be available in the near future.
Have no idea of the cost of the kits yet because I have to ship the pattern to the foundry, get the castings and have them machined.
Attachments
Last edited:
RDavisinVA
Technical Excellence Contributor
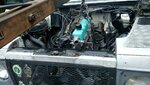
Installed L to R oil pressure, coolant temp, tach, next spedo on the gauge cluster.
In the dash center We have L to R Fuel, 12V plug, volt meter.
Hooked up the hand brake.
Test drive resulted in fast fast fast.
So use to slow diesels waiting to spool-up, it's scary fast.
In the dash center We have L to R Fuel, 12V plug, volt meter.
Hooked up the hand brake.
Test drive resulted in fast fast fast.
So use to slow diesels waiting to spool-up, it's scary fast.
Attachments

The Dro
Illustrious
this is great news.Installed L to R oil pressure, coolant temp, tach, next spedo on the gauge cluster.
In the dash center We have L to R Fuel, 12V plug, volt meter.
Hooked up the hand brake.
Test drive resulted in fast fast fast.
So use to slow diesels waiting to spool-up, it's scary fast.
RDavisinVA
Technical Excellence Contributor
Much faster than our V8 Discovery.
RDavisinVA
Technical Excellence Contributor
Much faster than our V8 Discovery.
A V8 Discovery isn't fast.....it just gains momentum......
Key word is much.
RDavisinVA
Technical Excellence Contributor
Drove up to the "filling station" tonight and was very very impressed by the speed and quick response.
Was surprised that Diesel was $2.89 and regular gas was $2.62.
That's only a 27 cents difference.
I paid 60 cents more per gallon for diesel about 4 or 5 months ago.
The very nice thing is the petal is very responsive and when you are up to speed the RPM is very low and petal pressure is minimum at high speed.
Last edited:
RDavisinVA
Technical Excellence Contributor
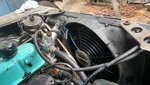
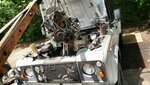
Removed the prototype engine and installed the rebuilt engine.
Total time to remove including radiator, floorboards, tunnel cover, carbs, manifolds, alternator, PS pump, and starter - 1hr 45min.
Time to reinstall the engine and have it bolted to the short belhousing 4 cylinder 5 speed: 22min.
Estimate it will take another 2.5hrs to have it driving.
Everything is just so accessible it makes maintenance very very very easy.
Ordering the EFI later today.
Attachments
RDavisinVA
Technical Excellence Contributor
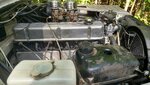
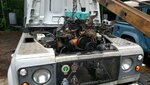
After 2 hrs 10min installed:
Motor Mounts
Crank and water Pump Pulleys
Alternator & PS Pump Mounting Plate with Alternator & PS Pump
Temp Gauge Sender
Down pipe
Starter
Dust shield
Accelerator return spring
New oil filter & filled engine with oil
Hooked up distributor, tach, oil pressure warning light, oil pressure gauge connection, temp gauge connection.
Everything is so easy to access it makes for quick work.
In 20 to 30 minutes will have the radiator installed and filled then time for another drive!
Attachments

RDavisinVA
Technical Excellence Contributor
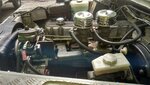
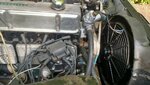
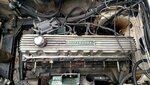
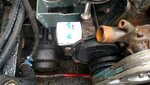
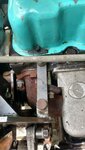
Those are prototype metal motor mounts that use the Land Rover "hockey pucks" that mate up to the mounts on the Land Rover V8 frame.
The reason they are cobbled together is that I was experimenting with engine angles to allow the cast iron headers to clear the left bulkhead foot well.
In the end, the header came too close for comfort, so ended up using a stock manifold with a larger 2.25" down pipe and mounted the engine perfectly straight. Needless to say the mounts were "adjusted" a few times.
When I was swapping from the prototype engine to the rebuilt engine, took the V8 mounts in the picture in post 75 down to the metal shop and had them make 2 fixtures to reproduce them. The production mounts will look similar to the pre-300TDI 4 cylinder mounts pictured in post 66. As soon as the shop gets a chance to make a production run, I'll swap these prototype mounts out for some better looking production mounts.
The production mounts will be built like those in post 66, but for now the prototype mounts are functional.
RDavisinVA
Technical Excellence Contributor
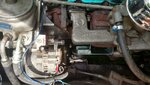
The last of the install is done.
We've had 6 days of rain, so today was my first chance to weld on the last support brace for the prototype alternator PS pump mounting plate.
We've had 6 days of rain, so today was my first chance to weld on the last support brace for the prototype alternator PS pump mounting plate.
Attachments
Last edited: