GM 292 Straight 6 - Yet another conversion

RDavisinVA

Technical Excellence Contributor
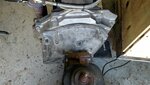
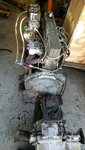
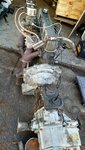
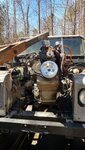
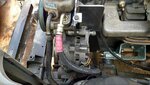
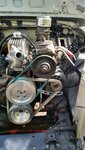
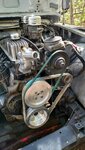
Transmission is bolted up.
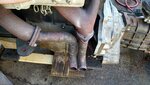
We use 6 long bolts to line everything up and then turn the crank while pushing the engine and transmission together.
Once the first motion shaft splines line up with the clutch plate, the 2 slide home.
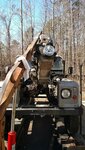
Next we remove the long bolts one at a time and replace them with the short ones that will remain.
 

Attachments

  • IMG_20180318_110812776 (1).jpg
    IMG_20180318_110812776 (1).jpg
    344.7 KB · Views: 312
  • IMG_20180318_112113651.jpg
    IMG_20180318_112113651.jpg
    240.4 KB · Views: 321
  • IMG_20180318_113025981_HDR.jpg
    IMG_20180318_113025981_HDR.jpg
    271.4 KB · Views: 313

RDavisinVA

Technical Excellence Contributor
Don't thing the twin pipe headers are worth the extra trouble and will come close to the bulkhead if my measurements are accurate, but will find out soon enough
 

Attachments

  • IMG_20180318_113033186_HDR (1).jpg
    IMG_20180318_113033186_HDR (1).jpg
    403.9 KB · Views: 312
Last edited:

RDavisinVA

Technical Excellence Contributor
We are doing an install today in our Swiss 110 V8 that started very early, so took a break for another update.

If your Defender Style 90/110/130 started life with a pre-300 TDI 4 cylinder (2,5 petrol, 2,5 NA Diesel, 2.5 TD, or 200TDI), the Chevy inline 6 bolts right in with our conversion kit that is currently set up to be manufactured in 2019.

In order to use the short belhousing transmission, in a vehicle that left the factory with a Rover V8, the floors and transmission tunnel need to be changed.
Also the seat base tunnel portion needs to be modified or the seat base swapped out to one from a 4 cylinder pre-300TDI.
In the future, plan to offer the sheet metal portion so you can mod your existing V8 seat base.
Note: this is the opposite of what UD offers for people going the other way, so the pieces should be relatively east to locate.
 

Attachments

  • IMG_20180323_131827523_HDR.jpg
    IMG_20180323_131827523_HDR.jpg
    297.6 KB · Views: 311
  • IMG_20180323_131437968.jpg
    IMG_20180323_131437968.jpg
    346.4 KB · Views: 304
  • IMG_20180323_131423236.jpg
    IMG_20180323_131423236.jpg
    481 KB · Views: 303
Last edited:

RDavisinVA

Technical Excellence Contributor
On Saturday got the engine installed and finished welding the motor mounts.
It was a long 15 hour day.
Engine clears both RHD and LHD steering boxes, even that big 6 bolt Power steering unit that Land Rover had made in France.
Next steps are finishing the mounting brackets for the ancillaries: alternator, PS pump, and AC compressor.
The top bracket for the ancillaries comes across the area for the thermostat housing, so that and the usual wrap up chores (wiring, drive shafts, power steering hoses, and exhaust) is all that's left at this juncture.
The coolant outlet elbow is being fitted with a thermal switch to control the electric fan based on coolant temp.
Coming together!
The production kits with EFI will easily fit under the standard hood.
Since our engine came with 2 tall carbs, and we already have a puma hood that is surplus to our current projects, we'll see if our taller prototype will fit under the Puma Hood.
 

Attachments

  • IMG_20180325_114936851_HDR.jpg
    IMG_20180325_114936851_HDR.jpg
    193.7 KB · Views: 308
  • IMG_20180325_114925884_HDR.jpg
    IMG_20180325_114925884_HDR.jpg
    207.3 KB · Views: 325
  • IMG_20180325_114955503_HDR.jpg
    IMG_20180325_114955503_HDR.jpg
    347.3 KB · Views: 321
  • IMG_20180325_123737303_HDR.jpg
    IMG_20180325_123737303_HDR.jpg
    340.4 KB · Views: 348
  • IMG_20180325_115018150_HDR.jpg
    IMG_20180325_115018150_HDR.jpg
    423.9 KB · Views: 311
  • IMG_20180325_120103737_HDR.jpg
    IMG_20180325_120103737_HDR.jpg
    368.6 KB · Views: 313
  • IMG_20180325_120128459_HDR.jpg
    IMG_20180325_120128459_HDR.jpg
    403.1 KB · Views: 328
  • IMG_20180325_120116446_HDR.jpg
    IMG_20180325_120116446_HDR.jpg
    348.5 KB · Views: 320
Last edited:

RDavisinVA

Technical Excellence Contributor
In the near future will be running EFI, which will easily fit under a standard pre-puma hood, but decided to see if the Puma Hood would fit.
The Puma Hood actually clears those tall carbs and air cleaners.
 

Attachments

  • IMG_20180325_125326635.jpg
    IMG_20180325_125326635.jpg
    343.7 KB · Views: 319
  • IMG_20180325_125317475_HDR.jpg
    IMG_20180325_125317475_HDR.jpg
    330.9 KB · Views: 334
Last edited:

ezzzzzzz

Well-known member
EFI is a no brainer compared to carbs. That said, the present arrangement on Robert's project will probably be used for a while before the transformation to injection. This engine came out of a fully functional street rod for a V8 transplant by the owner.
 

RDavisinVA

Technical Excellence Contributor
The prototype mount for the alternator and PS pump was installed.
The production kits will use the standard Delco alternator and Saginaw power steering that come with most of the Chevy engines, so there is no need to source a hodge podge of parts like I used for the very first prototype.

We lucked out because the PS lines are off the shelf Land Rover parts, so nothing custom (note the red Allmakes label)...
Next step is to hook up the fuel lines that we ran when the new tank was installed, make the engine harness, and start the engine.
Since we intend to try the FI-Tech EFI, the carbs will be replaced after a few test drives.

We also mocked up both the 4 cylinder non-TDI radiator and the V8 radiator.
Both will fit, with an electric cooling fan.
Note the thermo-switch that screws into the coolant outlet of the thermostat hosing, both are off the shelf parts and fit together without any custom work.

The punch list is shorter, but for now will hold off on the the AC compressor bracket.
 

Attachments

  • IMG_20180421_162014397_HDR.jpg
    IMG_20180421_162014397_HDR.jpg
    361 KB · Views: 340
  • IMG_20180421_161949769_HDR.jpg
    IMG_20180421_161949769_HDR.jpg
    230.8 KB · Views: 354
  • IMG_20180421_161958206_HDR.jpg
    IMG_20180421_161958206_HDR.jpg
    246.1 KB · Views: 361
Last edited:

RDavisinVA

Technical Excellence Contributor
Another picture of the stock Land Rover PS hose fiting this conversion.
 

Attachments

  • IMG_20180421_183837522.jpg
    IMG_20180421_183837522.jpg
    241.3 KB · Views: 289

RDavisinVA

Technical Excellence Contributor
Radiator hoses are in.
More good fortune...
The upper radiator hose from a 109 6 cylinder fits this application perfectly.
Another case of an off the shelf Land Rover part fitting.
 

Attachments

  • IMG_20180421_183824968.jpg
    IMG_20180421_183824968.jpg
    337.2 KB · Views: 311
  • IMG_20180421_183919040.jpg
    IMG_20180421_183919040.jpg
    170.5 KB · Views: 311

RDavisinVA

Technical Excellence Contributor
Spending lots of time to finish up the Swiss 110 and thus have it drivable.
Ran the 292 engine over the weekend.
No vibration and very very very smooth, so the prototype motor mounts are a success.
Now have to install the seat base, clutch petal, fabricate the accelerator linkage, and do all the wiring work.
A note on the wiring: am installing a heavy duty relays to be able to select the alternator output to charge the "car battery" only or also charge the auxiliary battery bank.
This eliminates the need to haul a generator around to charge the auxiliary battery bank and/or run 120 volt appliances, but that's a whole different discusion.
 
Last edited:
Top