Ontheway
Active member
After six years of ownership my 1986 110 SW finally has a stereo system. I'm posting as a separate installation thread here because I think the system I installed is about as simple as they come and is worth repeating for others with ROW trucks who are looking for an affordable, reliable, simple stereo setup. I found very few 'from scratch' install walkthroughs on the web.
I decided early-on that I didn't want or need a full-on head unit in my truck. I don't care for the MUDUK dashes, raptor dashes, etc. Moreover, I just don't need much more than ipod/bluetooth. I chose the Kenwood compact amp with bluetooth for my install. It is quite small, comes with a full and foolproof wiring harness, and comes with a wired remote and bluetooth connectivity. There are cheaper options (and more expensive options), but I thought this product had the best blend of size, price, power output, etc.

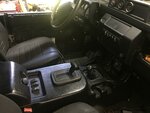
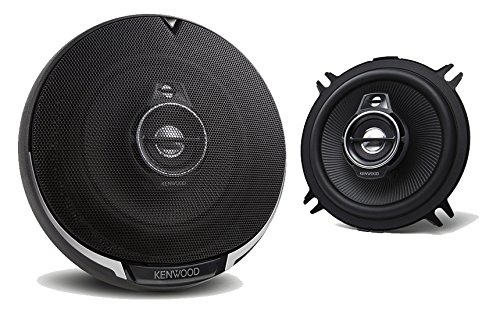
I also went with Kenwood for the speakers. For the front, I bought the Kenwood KFC-1395PS. It is a 5.5" speaker with a relatively shallow mounting depth. To mount these, I also purchased a 5" hole saw and a hole-saw mandrel. I liked these speakers because they had a 'plain jane' mesh grill, weren't too flashy, and were full-range.
I started by using Kenwood's included template which I found very helpful for marking drill locations. I mocked up about 100 times before making the first cuts. I found that 'scoring' the steel sheet behind the dash padding helped to make a better cut - basically just applying light pressure at high RPM for a bit before bearing down on the drill. I had the dash panel removed for this so I could clear any wires and ensure the place I was drilling was free. I removed the wiper motor cover and drilled the hole on that piece while it was out of the truck.
To install the left speaker you'll need a 1" spacer.. If I were to do it again I'd try and find a 1.25" spacer if they are out there. Even at 1" the speaker magnet is making contact with the wiper motor. Overall though, the 1" spacer provides a pretty clean install. BEWARE: this is a common water drain point. This is a good time to get some silicon or other sealant and work on sealing off this area so you don't get water damage on your newly installed speakers.
<a data-flickr-embed="true" href="https://www.flickr.com/photos/davidgraymclean/27442090277/in/datetaken/" title="8"><img src="https://farm1.staticflickr.com/898/27442090277_47876a4158_z.jpg" width="640" height="480" alt="8"></a><script async src="//embedr.flickr.com/assets/client-code.js" charset="utf-8"></script>
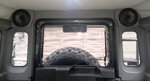
Pulling speaker wire was a pretty harmless affair that needs little explanation. I utilized the left-most bulkhead grommet and routed all wires behind the dash panel. Coming out of the bulkhead, I bundled and wrapped the speaker wires and routed them along the left side of the bell housing and into the battery box. I don't love pulling the whole dash apart, so I routed the left front speaker behind by center gauges tucked out of sight. Make sure to label the terminal ends of each wire so as to make your final connection easier... the Kenwood amp has a front/rear fade and is stereo sound so the wiring does matter.
I ended up mounting the amp itself closest to the door in the battery box. I utilized industrial velcro so I could access it easier for trouble-shooting, remote removal, fade adjustment, etc.
<a data-flickr-embed="true" href="https://www.flickr.com/photos/davidgraymclean/41409484345/in/datetaken/" title="29"><img src="https://farm1.staticflickr.com/885/41409484345_01e2a10d28_z.jpg" width="640" height="636" alt="29"></a><script async src="//embedr.flickr.com/assets/client-code.js" charset="utf-8"></script>
I chose to do a full twist-and-solder connection from the speaker cables to the Amp wiring harness. I tried to keep excess to a minimum; ultimately bundling the joints and routing the whole package in front of the battery out of sight.
The wiring of the amp itself is very easy. I've set up my battery box with a fused bus for 'direct' access to battery power, as well as a non-fused low amperage bus for keyed access to 12V. For this install, I wired the yellow wire to the fused bus (at 15A) and the blue switching wire to the keyed bus. I may eventually add a carling switch for the radio itself so I can listen without the key turned... but I considered the stereo an easy thing to forget about which would result in a dead battery.
<a data-flickr-embed="true" href="https://www.flickr.com/photos/davidgraymclean/40504842790/in/datetaken/" title="30"><img src="https://farm1.staticflickr.com/969/40504842790_1dd02e49d2_z.jpg" width="640" height="542" alt="30"></a><script async src="//embedr.flickr.com/assets/client-code.js" charset="utf-8"></script>
I also purchased the 6.5" Kenwood's but haven't added them yet. After an initial test drive today I don't think you need them... but they would be nice to have. The 5.5" speakers don't have much depth to work against the deep drone of the rover's tires and engine noise. You can crank them up... but then they just sound like cranked up 5.5" speakers.
The bluetooth pairing is very, very easy. I'm most pleased with this as I'd read that some of the cheaper setups were glitchy. This one seems very professional. So far, the amp finds my phone automatically each time I turn on the car. Beware: it is like many bluetooth systems in that it 'presses play' on whatever you had on last when it activates. In other words, music starts right away. One more reason to consider adding a switch the blue wire instead making it keyed.
I'm still working on modifying my tuffy box to accept the new remote. In the meantime, it sits next to me and that works just fine. It is a very nice rubberized unit.
Done right, this was a half-day job with a total cost of $281.49. Having music to listen to in at each of NOVA's 1000 stop lights and standstill beltway traffic = priceless! I should have spent the money elsewhere... but I'm very happy to have this done.
Overall Shopping list below:
I decided early-on that I didn't want or need a full-on head unit in my truck. I don't care for the MUDUK dashes, raptor dashes, etc. Moreover, I just don't need much more than ipod/bluetooth. I chose the Kenwood compact amp with bluetooth for my install. It is quite small, comes with a full and foolproof wiring harness, and comes with a wired remote and bluetooth connectivity. There are cheaper options (and more expensive options), but I thought this product had the best blend of size, price, power output, etc.
I also went with Kenwood for the speakers. For the front, I bought the Kenwood KFC-1395PS. It is a 5.5" speaker with a relatively shallow mounting depth. To mount these, I also purchased a 5" hole saw and a hole-saw mandrel. I liked these speakers because they had a 'plain jane' mesh grill, weren't too flashy, and were full-range.
I started by using Kenwood's included template which I found very helpful for marking drill locations. I mocked up about 100 times before making the first cuts. I found that 'scoring' the steel sheet behind the dash padding helped to make a better cut - basically just applying light pressure at high RPM for a bit before bearing down on the drill. I had the dash panel removed for this so I could clear any wires and ensure the place I was drilling was free. I removed the wiper motor cover and drilled the hole on that piece while it was out of the truck.
<a data-flickr-embed="true" href="https://www.flickr.com/photos/davidgraymclean/41409489425/in/datetaken/" title="3"><img src="https://farm1.staticflickr.com/981/41409489425_f7f287d4be_z.jpg" width="480" height="640" alt="3"></a><script async src="//embedr.flickr.com/assets/client-code.js" charset="utf-8"></script>
To install the left speaker you'll need a 1" spacer.. If I were to do it again I'd try and find a 1.25" spacer if they are out there. Even at 1" the speaker magnet is making contact with the wiper motor. Overall though, the 1" spacer provides a pretty clean install. BEWARE: this is a common water drain point. This is a good time to get some silicon or other sealant and work on sealing off this area so you don't get water damage on your newly installed speakers.
<a data-flickr-embed="true" href="https://www.flickr.com/photos/davidgraymclean/27442090277/in/datetaken/" title="8"><img src="https://farm1.staticflickr.com/898/27442090277_47876a4158_z.jpg" width="640" height="480" alt="8"></a><script async src="//embedr.flickr.com/assets/client-code.js" charset="utf-8"></script>
Pulling speaker wire was a pretty harmless affair that needs little explanation. I utilized the left-most bulkhead grommet and routed all wires behind the dash panel. Coming out of the bulkhead, I bundled and wrapped the speaker wires and routed them along the left side of the bell housing and into the battery box. I don't love pulling the whole dash apart, so I routed the left front speaker behind by center gauges tucked out of sight. Make sure to label the terminal ends of each wire so as to make your final connection easier... the Kenwood amp has a front/rear fade and is stereo sound so the wiring does matter.
I ended up mounting the amp itself closest to the door in the battery box. I utilized industrial velcro so I could access it easier for trouble-shooting, remote removal, fade adjustment, etc.
<a data-flickr-embed="true" href="https://www.flickr.com/photos/davidgraymclean/41409484345/in/datetaken/" title="29"><img src="https://farm1.staticflickr.com/885/41409484345_01e2a10d28_z.jpg" width="640" height="636" alt="29"></a><script async src="//embedr.flickr.com/assets/client-code.js" charset="utf-8"></script>
I chose to do a full twist-and-solder connection from the speaker cables to the Amp wiring harness. I tried to keep excess to a minimum; ultimately bundling the joints and routing the whole package in front of the battery out of sight.
<a data-flickr-embed="true" href="https://www.flickr.com/photos/davidgraymclean/40504844890/in/datetaken/" title="18"><img src="https://farm1.staticflickr.com/952/40504844890_7a702a78e1_z.jpg" width="640" height="480" alt="18"></a><script async src="//embedr.flickr.com/assets/client-code.js" charset="utf-8"></script>
<a data-flickr-embed="true" href="https://www.flickr.com/photos/davidgraymclean/40504844670/in/datetaken/" title="20"><img src="https://farm1.staticflickr.com/885/40504844670_10da2e1f31_z.jpg" width="480" height="640" alt="20"></a><script async src="//embedr.flickr.com/assets/client-code.js" charset="utf-8"></script>
<a data-flickr-embed="true" href="https://www.flickr.com/photos/davidgraymclean/40504844670/in/datetaken/" title="20"><img src="https://farm1.staticflickr.com/885/40504844670_10da2e1f31_z.jpg" width="480" height="640" alt="20"></a><script async src="//embedr.flickr.com/assets/client-code.js" charset="utf-8"></script>
The wiring of the amp itself is very easy. I've set up my battery box with a fused bus for 'direct' access to battery power, as well as a non-fused low amperage bus for keyed access to 12V. For this install, I wired the yellow wire to the fused bus (at 15A) and the blue switching wire to the keyed bus. I may eventually add a carling switch for the radio itself so I can listen without the key turned... but I considered the stereo an easy thing to forget about which would result in a dead battery.
<a data-flickr-embed="true" href="https://www.flickr.com/photos/davidgraymclean/40504842790/in/datetaken/" title="30"><img src="https://farm1.staticflickr.com/969/40504842790_1dd02e49d2_z.jpg" width="640" height="542" alt="30"></a><script async src="//embedr.flickr.com/assets/client-code.js" charset="utf-8"></script>
The bluetooth pairing is very, very easy. I'm most pleased with this as I'd read that some of the cheaper setups were glitchy. This one seems very professional. So far, the amp finds my phone automatically each time I turn on the car. Beware: it is like many bluetooth systems in that it 'presses play' on whatever you had on last when it activates. In other words, music starts right away. One more reason to consider adding a switch the blue wire instead making it keyed.
I'm still working on modifying my tuffy box to accept the new remote. In the meantime, it sits next to me and that works just fine. It is a very nice rubberized unit.
Done right, this was a half-day job with a total cost of $281.49. Having music to listen to in at each of NOVA's 1000 stop lights and standstill beltway traffic = priceless! I should have spent the money elsewhere... but I'm very happy to have this done.
<a data-flickr-embed="true" href="https://www.flickr.com/photos/davidgraymclean/41589450714/in/datetaken/" title="17"><img src="https://farm1.staticflickr.com/974/41589450714_e2df37142d_z.jpg" width="640" height="640" alt="17"></a><script async src="//embedr.flickr.com/assets/client-code.js" charset="utf-8"></script>
Overall Shopping list below:
- Kenwood compact amp
- Kenwood KFC-1395PS
- Kenwood KFC-1695PS (Pair)
- 5" hole saw
- hole-saw mandrel
- 1" spacer.
- Speaker Wire