I'm interested in your thoughts if you have field-tested the X-Brake transmission brake. I've just about had it with the crappy Land Rover trans brake drum. Mine keeps slacking. I don't know if it's a failing cable or maybe worn-out adjuster snails but I'd like something that's easier to adjust and that is more secure and fails less often.
You are using an out of date browser. It may not display this or other websites correctly.
You should upgrade or use an alternative browser.
You should upgrade or use an alternative browser.
X-Brake
- Thread starter chris snell
- Start date
Ash
Active member
The rattle is just poor retention of the brake pad. A little bit of RTV or some type of epoxy to keep it from bouncing around in its pocket and all of the noise goes away.
I'm a fan of them. Less rotational mass to rob what little power these trucks have, really simple adjustment, and one less place for mud and dirt to get caked inside of.
I'm a fan of them. Less rotational mass to rob what little power these trucks have, really simple adjustment, and one less place for mud and dirt to get caked inside of.
Napalm00
Technical Excellence Contributor
I fucking love mine. It's been on there for about 10 years.
Glue the pads with silicone and they dont rattle. It's a massive upgrade, makes servicing easier .
Paddocks has a great price on them
Edit: forgot to mention it saved my life last year! Hit some garbage in the road and the driver side Hardline to the caliper was cut on the highway.
When coming down the extra ramp (this was prior to all the brake conversions I did ) the pedal was useless , I was still doing about 65mph.
Code brown.
I slowly pulled up on the xbrake and the truck shuddered to a halt in the shoulder.
Myself and the cars infront of me would have been dust otherwise.
A month later I converted to Chevy master, booster, removed the pwda and I'd the rear disc conversion.
Last edited:
Napalm00
Technical Excellence Contributor
Has anybody done an install recently? Got my brake from Paddock last week and it looks a lot different from the brake shown in the instructions. I'm wondering if anyone has made sense of this apparently newer style.

Here's what the instructions show:

As you see, the bracket on the right in my pic is completely different than the one in their pic.
Here's what the instructions show:
As you see, the bracket on the right in my pic is completely different than the one in their pic.
Chris the different brackets likely have to do whether it is on 110 vs rrc etc as they sell different models. The instructions likely just show a random version. Someone correct me if I am off
Well, the instructions say "X-Brake - Defender models" and my bracket is exactly like the Defender brake that they're showing on their site. I suspect that they may have updated their design but not updated their instructions.

On Defenders? It actually looked like the stock cable might be too long. How did they extend the cable? Is there a safe way to even do that?
Has anybody with the new style brake successfully moved the lever arm to a different spline to adjust the position of the arm?
Like @Napalm00 mentioned, the cable is indeed too short but the instructions mention rotating the lever arm on the splines to account for this. It's fairly straightforward in the old style: you flatten the lock tab and back the screw off about 5mm and pull the lever arm off the splines, rotate, and re-seat.
On the new style brake, however, it uses a Torx bolt and there is no lock tab. I'm wondering if it's safe to back that off and do the spline trick on the new style.
I fucking hate these companies that sell a product with shitty, inadequate instructions. Is it that fucking hard to update a Word doc?
WreckITFrank
Technical Excellence Contributor
hoping to go down this path soon. even though it says post 200rdi, would this solve it?
 foundry4x4.co.uk
X Cable for Land Rover Defender, Discovery, Range Rover Classic
X Cable for Land Rover Defender, Discovery, Range Rover Classic
foundry4x4.co.uk
Napalm00
Technical Excellence Contributor
The cable wont do it , local guy made clevis extension.
I was unaware you could move the arm, personally that's what I would try. Here is what happened locally after trying 3 different cables
Edit:: this wasn't an issue on the old xbrake before they got bought out, bummer
I was unaware you could move the arm, personally that's what I would try. Here is what happened locally after trying 3 different cables
Edit:: this wasn't an issue on the old xbrake before they got bought out, bummer
Attachments
Last edited:
Good news, I finished my X-Brake install tonight. I got sick of waiting for the X-Brake people to respond and just went for it.
The bumper sticker version: yes, you can definitely loosen the Torx bolt on the lever arm and rotate the arm about the splines to adjust the start-of-throw position. I moved it one spline counter-clockwise and the clevis fits like a glove. No hacky adapter necessary. Takes less than 5 minutes.
Since the instructions on their website are for the old brake and super confusing, I will give you some hints here.
First off, to install, just pull everything off first. Pull the t-case side of the rear driveshaft, remove the brake drum, remove the shoes and springs, and the backing plate from the back of the t-case. Remove the linkage and the linkage bracket from the side of the t-case. You only need to save the clevis pin and its split pin.
If working from a creeper under the truck (feet towards front of vehicle), you'll find it helpful to put your right arm over the passenger-side frame rail to get at hard-to-reach fasteners.
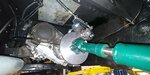
When you fit the brake and bracket, have a look at my photo here to see how everything is supposed to look. The instructions mention a technique where you bolt one side up and rotate the brake caliper around the disc. I didn't have to do this. I basically just put the caliper around the disc and bolted everything up and it was fine.
Chances are good that the cable--I replaced w/ the one they sent--is much too short to attach the clevis pin with the caliper arm in the stock throw position. To remedy this, you will need to loosen the T45 Torx bolt securing the arm and rotate it counter-clockwise one spline. Put some good work gloves on and hold the arm so that you're fighting the spring slightly and loosen the Torx bolt slowly until you can unset the arm from the spline. Your caliper assembly will look different from the one in the instructions but the 5mm of loosening is about right. The arm will wiggle free and you can carefully rotate it counter-clockwise to the next spline....maybe 15-20 degrees? While continuing to hold the arm, re-tighten the bolt. You should feel the arm bed down nicely on the splines if you have it right. Once this is done, the clevis should fit perfectly. I attached mine to the middle hole of the lever arm using the clevis pin from the old brake assembly.
Once the arm is re-tightened and clevis installed, make sure that the big bracket bolts/nylocs (22mm... 3/4"?) are tightened and the bracket is secure.
Next, you'll need to adjust the two 19mm nuts on the end of the cable to get the throw just where you want it. I started out with mine in the center of the adjustment range and ended up tightening it a little bit from there. The way I adjusted mine was to put the rear axle on jack stands and put the t-case in neutral. I laid on a creeper with my foot against the rear tire, which I used to spin the driveshaft. I would adjust the throw a little and then spin the tire with my foot to see if the X-Brake was dragging. It did make a faint dragging sound even when disconnected from the clevis. Basically, I got it to the point where it was almost braking and then slacked off a little from there. I did some tests in my driveway. 5-6 clicks of the brake lever to get to fully secure is where I am now. I might tighten a little more after some road miles.

This next photo shows you the barely-visible splines on the caliper shaft. They are just barely peeking out behind the rightmost coil of the spring.

The bumper sticker version: yes, you can definitely loosen the Torx bolt on the lever arm and rotate the arm about the splines to adjust the start-of-throw position. I moved it one spline counter-clockwise and the clevis fits like a glove. No hacky adapter necessary. Takes less than 5 minutes.
Since the instructions on their website are for the old brake and super confusing, I will give you some hints here.
First off, to install, just pull everything off first. Pull the t-case side of the rear driveshaft, remove the brake drum, remove the shoes and springs, and the backing plate from the back of the t-case. Remove the linkage and the linkage bracket from the side of the t-case. You only need to save the clevis pin and its split pin.
If working from a creeper under the truck (feet towards front of vehicle), you'll find it helpful to put your right arm over the passenger-side frame rail to get at hard-to-reach fasteners.
When you fit the brake and bracket, have a look at my photo here to see how everything is supposed to look. The instructions mention a technique where you bolt one side up and rotate the brake caliper around the disc. I didn't have to do this. I basically just put the caliper around the disc and bolted everything up and it was fine.
Chances are good that the cable--I replaced w/ the one they sent--is much too short to attach the clevis pin with the caliper arm in the stock throw position. To remedy this, you will need to loosen the T45 Torx bolt securing the arm and rotate it counter-clockwise one spline. Put some good work gloves on and hold the arm so that you're fighting the spring slightly and loosen the Torx bolt slowly until you can unset the arm from the spline. Your caliper assembly will look different from the one in the instructions but the 5mm of loosening is about right. The arm will wiggle free and you can carefully rotate it counter-clockwise to the next spline....maybe 15-20 degrees? While continuing to hold the arm, re-tighten the bolt. You should feel the arm bed down nicely on the splines if you have it right. Once this is done, the clevis should fit perfectly. I attached mine to the middle hole of the lever arm using the clevis pin from the old brake assembly.
Once the arm is re-tightened and clevis installed, make sure that the big bracket bolts/nylocs (22mm... 3/4"?) are tightened and the bracket is secure.
Next, you'll need to adjust the two 19mm nuts on the end of the cable to get the throw just where you want it. I started out with mine in the center of the adjustment range and ended up tightening it a little bit from there. The way I adjusted mine was to put the rear axle on jack stands and put the t-case in neutral. I laid on a creeper with my foot against the rear tire, which I used to spin the driveshaft. I would adjust the throw a little and then spin the tire with my foot to see if the X-Brake was dragging. It did make a faint dragging sound even when disconnected from the clevis. Basically, I got it to the point where it was almost braking and then slacked off a little from there. I did some tests in my driveway. 5-6 clicks of the brake lever to get to fully secure is where I am now. I might tighten a little more after some road miles.
This next photo shows you the barely-visible splines on the caliper shaft. They are just barely peeking out behind the rightmost coil of the spring.
Last edited: