You are using an out of date browser. It may not display this or other websites correctly.
You should upgrade or use an alternative browser.
You should upgrade or use an alternative browser.
What have you done today to your LAND ROVER (Non Defender)
- Thread starter Roverman2010
- Start date

broncoduecer
Technical Excellence Contributor
Glad to heard I wasn’t the only one.Definitely replace the stock boost hose , it's 100% garbage. Had two locally blow /melt
Which hose are we referencing to be sure i swap it out? Are we talking about the hose that was depicted in my photo? I have replaced all the other hoses with silicone but still have this stock hose attached to the top of the turbo. Suitable replacement options? Cheers guys
Glad to heard I wasn’t the only one.
Attachments

Napalm00
Technical Excellence Contributor
The black hose with the yellow stripe leading from the compressor housing to the boost actuator can.
You can replace it with standard rubber vacuum hose with the same ID. Don't use otiker clamps like they did, small worm or a fuel injection clamp or just a zip tie on both sides works fine
You can replace it with standard rubber vacuum hose with the same ID. Don't use otiker clamps like they did, small worm or a fuel injection clamp or just a zip tie on both sides works fine
Matthew. 
The black hose with the yellow stripe leading from the compressor housing to the boost actuator can.
You can replace it with standard rubber vacuum hose with the same ID. Don't use otiker clamps like they did, small worm or a fuel injection clamp or just a zip tie on both sides works fine
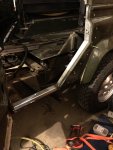
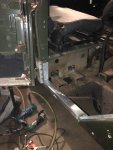
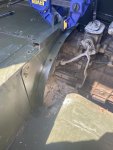
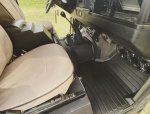
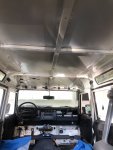
My truck has been drawing air through the seatbox, tunnel, and floorboards ever since the rebuild. The trans tunnel adapter that we made to convert the LT77 seatbox into a R380 seatbox was more of a quick-fix thing to get the truck back on the road than it was a solution. Nothing quite lined up and the air leaks made the cab hot in the summer and frigid in the winter.
I bought a proper adapter plate from RN and painted it up with my new matched color rattlecans and riveted it in place. I re-sealed all of the seatbox cubby lids and floorboards where they meat the trans tunnel. I bought a new trans tunnel (my old one was a take-off and broken) and moved the foam insulation over to the new tunnel and mounted it up.
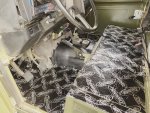
Next, I installed some Dynamat XXXTreme insulation and finally, a new set of black Exmoor insulated floor mats and seat/tunnel covers. You'll notice that I'm still running the MoD green matting around the fuse panel. To change that would require me dismantling that panel and there's no way I'll open that Pandora's box again now that my electricals are solid.
I'm really happy with how everything came out. Truck is much less drafty and cabin noise is significantly reduced in the mid- and high-frequencies.
I bought a proper adapter plate from RN and painted it up with my new matched color rattlecans and riveted it in place. I re-sealed all of the seatbox cubby lids and floorboards where they meat the trans tunnel. I bought a new trans tunnel (my old one was a take-off and broken) and moved the foam insulation over to the new tunnel and mounted it up.
Next, I installed some Dynamat XXXTreme insulation and finally, a new set of black Exmoor insulated floor mats and seat/tunnel covers. You'll notice that I'm still running the MoD green matting around the fuse panel. To change that would require me dismantling that panel and there's no way I'll open that Pandora's box again now that my electricals are solid.
I'm really happy with how everything came out. Truck is much less drafty and cabin noise is significantly reduced in the mid- and high-frequencies.
Attachments
Napalm00
Technical Excellence Contributor
My truck has been drawing air through the seatbox, tunnel, and floorboards ever since the rebuild. The trans tunnel adapter that we made to convert the LT77 seatbox into a R380 seatbox was more of a quick-fix thing to get the truck back on the road than it was a solution. Nothing quite lined up and the air leaks made the cab hot in the summer and frigid in the winter.
I bought a proper adapter plate from RN and painted it up with my new matched color rattlecans and riveted it in place. I re-sealed all of the seatbox cubby lids and floorboards where they meat the trans tunnel. I bought a new trans tunnel (my old one was a take-off and broken) and moved the foam insulation over to the new tunnel and mounted it up.
Next, I installed some Dynamat XXXTreme insulation and finally, a new set of black Exmoor insulated floor mats and seat/tunnel covers. You'll notice that I'm still running the MoD green matting around the fuse panel. To change that would require me dismantling that panel and there's no way I'll open that Pandora's box again now that my electricals are solid.
I'm really happy with how everything came out. Truck is much less drafty and cabin noise is significantly reduced in the mid- and high-frequencies.
i want that rubber matting system but, i also want to keep my $500
broncoduecer
Technical Excellence Contributor
Yep that’s the one. I was going up the Pequops in NV on I80 on the way to SLC when my flew off. That was a bummer. Quick fix but a pain On the pass. You’ll be good now!Which hose are we referencing to be sure i swap it out? Are we talking about the hose that was depicted in my photo? I have replaced all the other hoses with silicone but still have this stock hose attached to the top of the turbo. Suitable replacement options? Cheers guys
Installed a ARB compressor under the passenger seat today.
Z.G
Well-known member
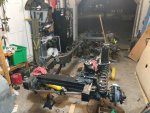
Today I installed some Rockware trailing arms and a Rockware drag link that I got off of Facebook marketplace a while ago. While I was in there I replaced the pitman arm ball joint and trailing arm bushings.
View attachment 11595
View attachment 11596
I cant stand that style steering damper adapter, I hate the way they rotate(have seen it too many times). RTE makes a nicer one that rarely has issues
I cant stand that style steering damper adapter, I hate the way they rotate(have seen it too many times). RTE makes a nicer one that rarely has issues
I totally agree. I'll have to post pics of what came off the truck. From the factory, the damper mount is on that tie rod end, negating the need for that damper mount. It isn't fully threaded, so it wouldn't work with the drag link. I think I might grind it down a little bit to make it thread on fully.
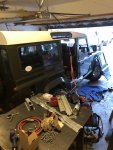
Today i decided to tackle minor corrosion in the middle row. the SD cage on a NAS is a tight fit. I have some corrosion on the feet and thankfully floors ok. This led to unhooking cage and laying down in the cabin as all my seats, tunnel etc are out. Grinding down the corrosion and will treat and paint in situ. Rear floors are now out. Ripped out all the factory carpet. Now I'm looking at the saggy headliner. shit it came out too. This led to deleting all the wiring prior owner placed for rack lights. Back to factory original and taped back up to roof. Dropped off the basket, ladder for powder coat and getting front floors media blasted to bare metal so i can respray. The headliner for 110 and 90 going to upholster tomorrow and thankfully already have all the factory material from prior group buy. Tomorrow working on painting footwells on bulkhead, sills and touch up on box in preparation to going back together. This really is ship fitters syndrome! Ha
Attachments
Drago.the.D110
Well-known member
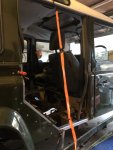
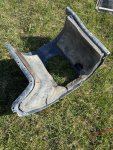
After 3 months of waiting, I pulled him off the truck today.

I’ll get a thread started for Drago over the weekend.
A couple of quick details, Drago is a 1991 200tdi with exactly 60,000 miles on the clock. He lived a good life on the southern coast of Spain before making his move to the PNW. Excited to get into my build this weekend!
I’ll get a thread started for Drago over the weekend.
A couple of quick details, Drago is a 1991 200tdi with exactly 60,000 miles on the clock. He lived a good life on the southern coast of Spain before making his move to the PNW. Excited to get into my build this weekend!
Last edited:
After 3 months of waiting, I pulled him off the truck today.
View attachment 11620
I’ll get a thread started for Drago over the weekend.
A couple of quick details, Drago is a 1991 200tdi with exactly 60,000 miles on the clock. He lived a good life on the southern coast of Spain before making his move to the PNW. Excited to get into my build this weekend!
Sweet congrats
broncoduecer
Technical Excellence Contributor
I installed a CKMTA12 there as well. I was able to find some Nice little bulkhead fittings that were also a 90 to exit the box for the lockers. I have a bundle of them if anyone needs a couple PM me.Installed a ARB compressor under the passenger seat today.
I installed a CKMTA12 there as well. I was able to find some Nice little bulkhead fittings that were also a 90 to exit the box for the lockers. I have a bundle of them if anyone needs a couple PM me.
Can you post a pic of what you're talking about? Are these for the small air lines that go to the locker?
Giftshopduane
Well-known member
I received my pieces from yrm, dug back into the sills and posts. Wrapped up lh, b post on rh was good, tore out c and sill, fitted up nicely.