What have you done today to your LAND ROVER (Non Defender)

JimC

Super Moderator
Staff member
Put the 110 on hold while I gather/wait for parts. I did drop the disco axles though. I moved onto my late 2a, I new a p.o. at some point fixed the tub, the bondo was cracking, so I decided to investigate. And spend the rest of the day banging on it..

i would love to know more about how you do this. My attempts are more “by feel” and certainly not grounded in any method. Are you using a force to heat the panels? A bullseye pick to raise the depressions? Just hammer and dolly? Inquiring minds want to know!
 

LiquidMoose

Well-known member
Well shit. Makes me want to have “them” do it. BUT I just have to give it one more shot. Did you gleam anything from them to add as a tip? Heat up seal, use soap or other lubricant... all that I got. I even got the glass in the seal all the way around, but it was as if the seal at top kept wanting to poke outward and the glass kept oooozing out. Sure would love someone to do it for me... I was pissed for hours...
Yeah, having experience makes the job easier is what I gleaned! Beyond that I was surprised how much forced he used while maneuvering the glass into place; I treated it as an eggshell while to him it was like sheet of aluminum. He told me WD40, which I used, was a no no, degrades the rubber.
 

MountainD

Technical Excellence Contributor
Yeah, having experience makes the job easier is what I gleaned! Beyond that I was surprised how much forced he used while maneuvering the glass into place; I treated it as an eggshell while to him it was like sheet of aluminum. He told me WD40, which I used, was a no no, degrades the rubber.
I just skipped the soap and went to Silicone spray as I know you can use that on Rubber. It worked too good. I caught the windows, was actually pinching it when it feel, but it slipped right out of my tight grip like it was nothing. I will definitely try silicone again. and put a giant pit of foam rubber and towels under me... (or find someone that has done them a million times)...
 

Angus

Well-known member
I just skipped the soap and went to Silicone spray as I know you can use that on Rubber. It worked too good. I caught the windows, was actually pinching it when it feel, but it slipped right out of my tight grip like it was nothing. I will definitely try silicone again. and put a giant pit of foam rubber and towels under me... (or find someone that has done them a million times)...
There was a good discussion on how to install the alpine windows over on the other site. I used Armor All as a lube. Once the window was in the rubber, warmed it with the heat gun, then used a screen door roller to push the lock strip in. Takes about 15 mins a window (now). Easier with the top on the truck since you have something to push against.
 

Giftshopduane

Well-known member
i would love to know more about how you do this. My attempts are more “by feel” and certainly not grounded in any method. Are you using a force to heat the panels? A bullseye pick to raise the depressions? Just hammer and dolly? Inquiring minds want to know!

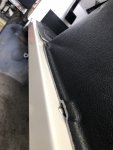
To be honest I just kind of "had at it" I picked up the cheap body hammer dolly set from HF no picks, I don't want tiny pock marks in the skin. I am resisting removing the whole side to get a better handle on things, it still has quite a bit of small craters, I'll knock them around a bit more and a skim coat should handle the rest or just leave it. I like series trucks with some character! I didn't anneal it, the aluminum moves so much with heat and I wasn't correcting any real kinks or creases. I tried a bit of heat down low, there are 3 spots of oil canning and I can get it fixed, that's frustrating. My solution may be to cut a "backer" piece of aluminum to mimic the lower dogleg and use a panel adhesive and sandwich the 2 together, it will be substantially thicker and should have tons of strength.

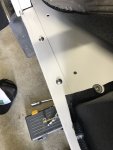
I found that by using the Cleco's or riveting it back together at least temporarily, adds strength to the panel therefore keeping it from just clanging around. Also, I used a long straight edge to check every now and then to make sure I was going in the right direction. As far as finding the contour again it's mostly by eye and feel, reinstalling the back panel occasionally to check the curvature of the hip.

The suck part is there are a couple of other spots that have a fair bit of filler in them, I know the right front wing has some issues, which will present its own issues in straightening, but certainly not like this section.

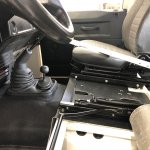
It's a long game of patience, if I keep at it long enough I can planish it smooth, but again the panel may have to come off to make my life easier. The tub seat base is smack in the middle of this damage and I have to keep levering it out of the way, it's tight to get effective and controlled swings of the hammer, but that tub side has some intimidating spot welds up front and I haven't figured out a clever solution to putting it back together without a spot welder.

All in all 1 billion percent better than the shite that was there prior to.

I'll add updates as I progress.
 

JimC

Super Moderator
Staff member
It’s really good work.

I’ve got a section I’m 75% happy with but I’m concerned about over-working the area, and I think the newer defender alloy is thinner and more brittle than the series birmabright. I‘ve also not gone with much heat, but it does a good job of getting the alloy to lose its “spring” and not pop in and out. At the same time, it easily distorts a nearby area.

like you I’ve been using the straightedge to check different directions. At least my affected area is getting smalet.

You’re emboldening me to go further, thanks!
 

Dan kemper

Founding Member
Callsign: KK6ECF
Almost all back together. Installed the stainless sills I painted, stainless fasteners with plenty of anti seize, redid all the wiring in the battery box and new grommets etc. Seats in, tapped the new shifter knobs etc.
 

Attachments

  • IMG_4363.JPG
    IMG_4363.JPG
    1.9 MB · Views: 179
  • VQ60%2NMRsWwH3XEKnDBJQ.jpg
    VQ60%2NMRsWwH3XEKnDBJQ.jpg
    1.8 MB · Views: 198
  • IMG_4371.JPG
    IMG_4371.JPG
    1.8 MB · Views: 174
  • %53qgcUlSP6CYOonn8yPlg.jpg
    %53qgcUlSP6CYOonn8yPlg.jpg
    1.4 MB · Views: 182
  • ollsO4D9TkiUpd8767NBzQ.jpg
    ollsO4D9TkiUpd8767NBzQ.jpg
    1.4 MB · Views: 172

brdhmltn

Well-known member
Driving to work this morning. Thwack, thump thump thump. Murdering D2... I'm still trying to fish out the body and can't find it as of yet. It's been a rover style couple of weeks here.
 

Attachments

  • MVIMG_20200513_174207.jpg
    MVIMG_20200513_174207.jpg
    1.5 MB · Views: 179
  • IMG_20200513_174420_01.jpg
    IMG_20200513_174420_01.jpg
    2.9 MB · Views: 181

pmatusov

Technical Excellence Contributor
Callsign: AK6PM
Packed most of my stuff for a trip - just in case - and replaced brushes in the spare starter.
 

xplorutah

Well-known member
Set the valves in my old Series. Runs a bit better now. And worked to bring the paint on my buddies back to life so he can sell it.
 

brdhmltn

Well-known member
The Disco whale opened it's blowhole at lunch today. Split the bleed screw in half. A temporary brass screw and 30 minutes later I'm back. Always have a temp gauge on a D2.
Looks like I did not catch it fast enough. Drivers side headgasket started chuffing shoftly after the mouse incident. Disco is parked until I can get to it. Bad part is previous owner had to put 2 helicoils in the driver's side block, so I may be in for some work on this one if the helicoils slipped. I had ironically ordered new hoses literally the day before the screw split. Have new headgaskets and bolts on the way now. I think this will be the first project in my new workshop after i get the epoxy floors down which means a month or so from now.
 

MountainD

Technical Excellence Contributor
Looks like I did not catch it fast enough. Drivers side headgasket started chuffing shoftly after the mouse incident. Disco is parked until I can get to it. Bad part is previous owner had to put 2 helicoils in the driver's side block, so I may be in for some work on this one if the helicoils slipped. I had ironically ordered new hoses literally the day before the screw split. Have new headgaskets and bolts on the way now. I think this will be the first project in my new workshop after i get the epoxy floors down which means a month or so from now.

Don't kick yourself. I pretty much guarantee that the head gasket was already blown leading up hose blowing. Regardless of noise (it just made it worse). And don't worry about the Helicoil. a helicoil in aluminum is stronger than the original tapped hole.
 

uc4me

Well-known member
Nice Frank, whatta using for crimpers with those Deutschs? Open or closed barrel leads/connectors?
 

MountainD

Technical Excellence Contributor
great idea—I use the weatherpacs in 2 or 3 conductor On both my trucks. The stock suck.
 
Top