You are using an out of date browser. It may not display this or other websites correctly.
You should upgrade or use an alternative browser.
You should upgrade or use an alternative browser.
What have you done to your DEFENDER today?
- Thread starter javelinadave
- Start date
Wow! I fixed the massive photo issue from above.
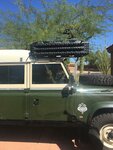
Today I relocated the propane bottle from the spare tire to the roof. I also added an almost 3' x 4' deck that is strong enough to stand on. I used Axia Alloy 1" clamps to mount it to the Safety Device roll cage.
Looks great.
What is the story with the solar panel? Watts? What do you run with it?
I have couple little ones and am wrestling with right size charge controller etc.
Thanks
Mark
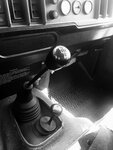
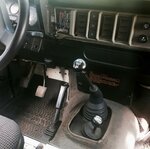
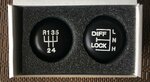
I installed some 4:11 gears (thanks to Lucky 8 for the setup on the front) with a Detroit in the rear and True Trac up front. I'm really mad at myself for mistakenly buying silver Right Stuff instead of black. I'm tempted to pull it all apart and redo it.
While installing the front diff I turned the wheel and then started getting a steady drip from my steering box. The new gears took up a noticeable amount of driveline slop, however, my transfer box grinding noise under light load is worse. Might just be out of fluid, but I've been meaning to buy a used LT230Q to reseal and replace mine with.
While installing the front diff I turned the wheel and then started getting a steady drip from my steering box. The new gears took up a noticeable amount of driveline slop, however, my transfer box grinding noise under light load is worse. Might just be out of fluid, but I've been meaning to buy a used LT230Q to reseal and replace mine with.
Jeff B
Well-known member
While installing the front diff I turned the wheel and then started getting a steady drip from my steering box. .
Blue Devil in your steering fluid.
What is your preferred method for front end disassembly to install the diff?
Do you pull the hubs/stubs apart or pull the whole outer swivel off the housing?
I have this coming up...again....
.
What is your preferred method for front end disassembly to install the diff?
Do you pull the hubs/stubs apart or pull the whole outer swivel off the housing?
I have this coming up...again....
.
I pulled the stub axle and hubs apart to pull the CV. I've had most of that apart before, so I knew it wouldn't be rusty. I don't like pulling the whole knuckle off with the swivel housing because it is too heavy for me.
Jeff B
Well-known member
I pulled the stub axle and hubs apart to pull the CV. I've had most of that apart before, so I knew it wouldn't be rusty. I don't like pulling the whole knuckle off with the swivel housing because it is too heavy for me.
yeah, the knuckles are too heavy for me, too...I'm old.
I had both knuckles off 9 months ago and I replaced the swivel/wiper gasket.
But, I also repacked the bearings, put in fresh one-shot, etc.
So I dont really wanna do it either way...
.
rovercolorado
Well-known member
Long over due heating system repair
Oil and filter change on Saturday then I pulled my dash apart and pulled my heater out to start the total heating system rebuild.
Dash is a real mess with nothing really holding it together. The heater was full of dirt and sand. Getting cold in CO now so I'm going to push through the next couple of nights and finish it up. Stuck cables be damned.
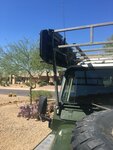
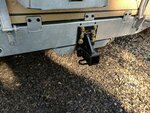
Not my truck but I made some MaxTrax holders for the Knightsbridge Overland truck this morning.
Attachments
MountainD
Technical Excellence Contributor
Not my truck but I made some MaxTrax holders for the Knightsbridge Overland truck this morning.
Interesting placement choice-- not sure I'd like it there with some of the switchbacks here in Colorado, though. I see the complexity of where else to place them...so I get why they are there... Would it be possible to make a rack extension to secure the rear of them so they could be slid backwards to not block that view?
Nope it was either there or as a giant air dam on the front.
Last edited:
LazyRabbit
Well-known member
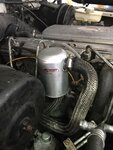
Installed a new crankcase breather P/N: ERR1471. Seems to have made a significant difference. I think it was partially clogged, the o-ring to the head had failed on it and slightly leaking/misting on the engine, but was hidden.
Seems like there is more power in the upper gears.
Seems like there is more power in the upper gears.
rovercolorado
Well-known member
Just in time for snow repairs almost done
Got my instrument cluster with greased and/or replaced heater control cables completed and all back together. I used the free used NAS cluster that I got from a forum member that was in way better shape than my old one held together by sheet metal and pop rivets. A little superglue and it looks 100% better than before. All my heater controls move smoothly now. Added bonus is my trip counter that didn't work before now works great. The bad news is my speedo is a little jumpy now. New fan installed in the heater box and now just waiting on the heater matrix to finish the job proper.
BTW I have a heater matrix and fan control switch listed in the for sale section if anyone needs a RHD setup.
DiscoDavis
Well-known member
T case rear seal is gone bad, parking drum spits a bit of oil now.
on the to do list...
Got a couple of the genuine 200tdi water pumps there was a thread about a while back. Nice folks, good price. You can immediately see a quality difference between a new britpart and theirs...
on the to do list...
Got a couple of the genuine 200tdi water pumps there was a thread about a while back. Nice folks, good price. You can immediately see a quality difference between a new britpart and theirs...
Installed a new crankcase breather P/N: ERR1471. Seems to have made a significant difference. I think it was partially clogged, the o-ring to the head had failed on it and slightly leaking/misting on the engine, but was hidden.
Seems like there is more power in the upper gears.
I replaced mine with some Allisport bling. I too feel more power but I'm sure it is a placebo effect.
Attachments
Last edited:
Installed a new brake master cylinder. It's amazing how easy a project is when everything disassembles as it is supposed to. Using a power bleeder the whole project probably took 30 minutes.
rovercolorado
Well-known member
Finally finished the installation of my heater. New fan and heater matrix all cleaned up and rust spots sanded and painted. Found my metal bar that connects to the bottom vents has been cut through when speakers were installed  . I now have heat for winter! No more big projects for the rest of the year.
. I now have heat for winter! No more big projects for the rest of the year.