Francois1
Well-known member
R 2.8 build notes
Base powertrain LT230 1.4 Ratio, LT85 Gearbox (single casing), 3.5Lv8, LHD, 1986 110 station wagon
Upgrade to Winchester LT230 Stage 2 1.21 Ratio, Tremec 4050 Gearbox and R2.8 TD
I wanted to start a different thread to attempt documenting some of the odd details that you may encounter during the build. I am nearing completion on my build and there are quite a few details I wish I had known before starting. Many thanks to MountainD, Norton, dkemm, donb and many others for spending the time to write their threads. Those have been an invaluable wealth of information for anyone deciding to jump into a project like this.
Some of my comments may not apply to everyone with a Defender, this is based on my specific build/vehicle.
This is what I have so far:
-Budget: whatever you are estimating, add 10k…It’s the small things that add up quickly…
-Time: Lead times can be quite long. I ordered my LT230 late and this delayed my entire project by nearly 3 months…
-Consider other projects to complete while the engine is out. i.e. heater core, fuel lines, wiring etc.
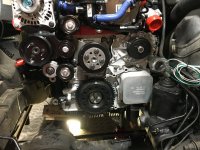
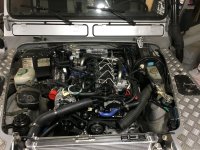
Engine package: I chose the bolt-in r2.8/Tremec from QD. The kit is quite good but has a few drawbacks:
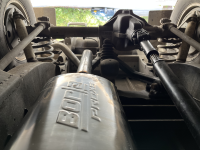
-Transfer case mounts were included but did not fit quite right. Had to modify the adjustment ranges of the slots in the mounts to get the powertrain to align properly. Diff lock linkage pivot screw was not threaded sufficiently and needed more thread to work properly (M8x1.25 die).
-The supplied engine mounts are way too big to fit in the frame (especially the left side) and quite frankly not a great QC. I purchased the Farm Strong engine mounts and that worked a lot better.
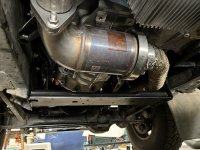
-Consider which extra accessories to purchase: the mechanical fan does not fit due to the power steering box, the fuel filter mount is not useful if you mount your filter on the firewall (bolt holes are already there right next to your heater box), DOC relocation kit? If you chose to use the DOC, you will need it unless you have access to quality welding and are able to modify it to fit around your driveshaft. This will save you about $700 in these 3 accessories.
-Remote throttle from QD: Reviews say it’s great improvement to drivability. It’s definitely the way to go is you want to save time and keep the footwell factory. I used the bracket from the cummins pedal to mount the remote throttle to the plate where the old ignition module used to be. Worked perfectly.
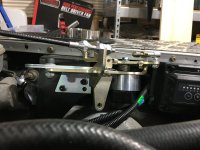
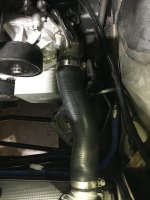
-Speaking of driveshafts, the QD kit and tremec 4050 require the powertrain to move further back in the frame to clear the power steering. It’s not far enough to be a concern for your handbrake and shift levers, but far enough to make my original driveshafts useless. Plan to order some new ones (tom woods is an option).
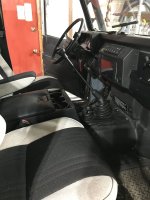
-Had to modify my floor and replace my LT85 gearbox tunnel with a R380 tunnel cover
-Tremec 4050 has a reverse switch but the pigtail to connect to your harness is not supplied because why would they? You can get it from Tremec for an extra 25. There is very little documentation on the maintenance and care of the gearbox. There is no neutral safety switch.
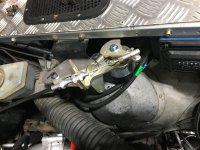
-Auxiliary coolant temp: M12x1.25 thread, I will post the part number once I receive mine and confirm it works properly with the factory gauge
-Auxiliary oil pressure switch: M10x1.0 thread. Some get a pressure sending unit, but I just got the switch to connect to my dash oil warning light. I will post the part number once I receive mine and confirm it works properly with the factory light.
Electrical:
-Plan on replacing some of your starter wiring. You will likely find the harness in poor shape after years of service
-If you have glass fuses, this is the perfect opportunity to switch to blade fuses while you have space/ access. two Hella H84960101 work great and require minimal trimming of the original location.
-I did not run the R2.8 cab wiring harness through my firewall. I only routed the murphy gauge and ignition wire in the cab. I did not want to have that oversized cannon plug going through my firewall. My extra wiring is neatly tucked in my fender. My and OBD and throttle connections are under the bonnet with the remote throttle kit from QD
Cooling:
-Quite a few options out there. Allisport is expensive but very nicely made, and includes the fan. Pigtail for the fan can be found on Amazon (SPALFR-PT jumper harness). Diesel Pump UK sells aluminum brackets to direct-mount the cooling package to older vehicles like mine, minor trimming is required. I also had to modify my original V8 radiator mounts to make room for the new stuff.
-Top radiator Hose: Dayco 71865 does the trick for the top hose.1.75in ID
-Bottom hose: still working on that one…2in ID
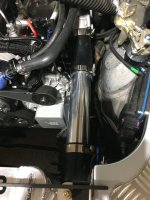
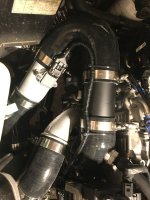
Intercooler and Intake plumbing: working on it. Planning to use a KN 54-5000 universal intake filter…4 inch input, 3 inch output, same as the cummins MAF tube
That’s it for now, I will post more as I go through my notes.
Base powertrain LT230 1.4 Ratio, LT85 Gearbox (single casing), 3.5Lv8, LHD, 1986 110 station wagon
Upgrade to Winchester LT230 Stage 2 1.21 Ratio, Tremec 4050 Gearbox and R2.8 TD
I wanted to start a different thread to attempt documenting some of the odd details that you may encounter during the build. I am nearing completion on my build and there are quite a few details I wish I had known before starting. Many thanks to MountainD, Norton, dkemm, donb and many others for spending the time to write their threads. Those have been an invaluable wealth of information for anyone deciding to jump into a project like this.
Some of my comments may not apply to everyone with a Defender, this is based on my specific build/vehicle.
This is what I have so far:
-Budget: whatever you are estimating, add 10k…It’s the small things that add up quickly…
-Time: Lead times can be quite long. I ordered my LT230 late and this delayed my entire project by nearly 3 months…
-Consider other projects to complete while the engine is out. i.e. heater core, fuel lines, wiring etc.
Engine package: I chose the bolt-in r2.8/Tremec from QD. The kit is quite good but has a few drawbacks:
-Transfer case mounts were included but did not fit quite right. Had to modify the adjustment ranges of the slots in the mounts to get the powertrain to align properly. Diff lock linkage pivot screw was not threaded sufficiently and needed more thread to work properly (M8x1.25 die).
-The supplied engine mounts are way too big to fit in the frame (especially the left side) and quite frankly not a great QC. I purchased the Farm Strong engine mounts and that worked a lot better.
-Consider which extra accessories to purchase: the mechanical fan does not fit due to the power steering box, the fuel filter mount is not useful if you mount your filter on the firewall (bolt holes are already there right next to your heater box), DOC relocation kit? If you chose to use the DOC, you will need it unless you have access to quality welding and are able to modify it to fit around your driveshaft. This will save you about $700 in these 3 accessories.
-Remote throttle from QD: Reviews say it’s great improvement to drivability. It’s definitely the way to go is you want to save time and keep the footwell factory. I used the bracket from the cummins pedal to mount the remote throttle to the plate where the old ignition module used to be. Worked perfectly.
-Speaking of driveshafts, the QD kit and tremec 4050 require the powertrain to move further back in the frame to clear the power steering. It’s not far enough to be a concern for your handbrake and shift levers, but far enough to make my original driveshafts useless. Plan to order some new ones (tom woods is an option).
-Had to modify my floor and replace my LT85 gearbox tunnel with a R380 tunnel cover
-Tremec 4050 has a reverse switch but the pigtail to connect to your harness is not supplied because why would they? You can get it from Tremec for an extra 25. There is very little documentation on the maintenance and care of the gearbox. There is no neutral safety switch.
-Auxiliary coolant temp: M12x1.25 thread, I will post the part number once I receive mine and confirm it works properly with the factory gauge
-Auxiliary oil pressure switch: M10x1.0 thread. Some get a pressure sending unit, but I just got the switch to connect to my dash oil warning light. I will post the part number once I receive mine and confirm it works properly with the factory light.
Electrical:
-Plan on replacing some of your starter wiring. You will likely find the harness in poor shape after years of service
-If you have glass fuses, this is the perfect opportunity to switch to blade fuses while you have space/ access. two Hella H84960101 work great and require minimal trimming of the original location.
-I did not run the R2.8 cab wiring harness through my firewall. I only routed the murphy gauge and ignition wire in the cab. I did not want to have that oversized cannon plug going through my firewall. My extra wiring is neatly tucked in my fender. My and OBD and throttle connections are under the bonnet with the remote throttle kit from QD
Cooling:
-Quite a few options out there. Allisport is expensive but very nicely made, and includes the fan. Pigtail for the fan can be found on Amazon (SPALFR-PT jumper harness). Diesel Pump UK sells aluminum brackets to direct-mount the cooling package to older vehicles like mine, minor trimming is required. I also had to modify my original V8 radiator mounts to make room for the new stuff.
-Top radiator Hose: Dayco 71865 does the trick for the top hose.1.75in ID
-Bottom hose: still working on that one…2in ID
Intercooler and Intake plumbing: working on it. Planning to use a KN 54-5000 universal intake filter…4 inch input, 3 inch output, same as the cummins MAF tube
That’s it for now, I will post more as I go through my notes.