You are using an out of date browser. It may not display this or other websites correctly.
You should upgrade or use an alternative browser.
You should upgrade or use an alternative browser.
LT230 Rebuild or Replace
- Thread starter Classic4X4
- Start date
Classic4X4
Well-known member
Trying to figure out what you mean here. I can’t think of any other way it could be mounted? I do have an empty bolt hole on the PS pump bracket -Agreed. Lower alternator ears are on the wrong side of the mount.
Attachments
Last edited:
Classic4X4
Well-known member
Everything looks to be in order based on the PS Bracket and Alternator parts diagrams, aside from that missing bolt, which I’ve now learn was sheared off at some pointId check the parts diagram

Either way, just 2 flat washers spaced everything nicely and the belt alignment looks superb - so with the spacer and long bolt everything’s in much better shape now. I think the alternator was at risk of swinging and slackening the belt while the bracket was flipped.
I was able to tension the belt without needing more clearance on that bolt as well so good looks.
Thanks for the great help - I owe many beers if our paths should ever cross.
Classic4X4
Well-known member
Things are finally arriving:
LOF clutch kit (wrong bearing)
Britrest Clutch Fork (fabulous)
SDO Master cylinder conversion kit
Still waiting on
R380 linkage kit
Gearbox and T-case (delivery end of next week)
A couple questions:
1 Should I be replacing my rear crank seal? While I’m in there (not leakingg
2 I bought new timing belt, tensioner (RN part) and front crank seal - there’s a slight oil drip in the timing case - should I be replacing anything else in there? It was rebuilt ~15k miles ago.
3 Winchester is supplying the correct clutch release bearing for $50 - should I spend the $100 for the OEM?
Thanks gents
Tdi rear main seals have been a real thorn in my side. If it isn’t leaking, I wouldn’t touch it.
Classic4X4
Well-known member
Kinda my thoughts here - feel like as soon as I replace it it’ll pi** oil!Tdi rear main seals have been a real thorn in my side. If it isn’t leaking, I wouldn’t touch it.
Classic4X4
Well-known member
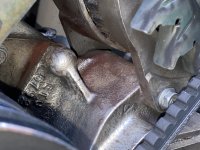
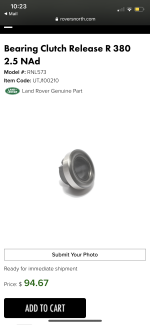
wanted to make sure I’m absolutely certain I’m installing the correct short clutch release bearing for the R380 Stumpy - sounds like this is the correct part. Can anyone confirm?
Also, is this a reasonable amount of play for a clutch alignment tool? Maybe 1mm of room in there

Also, is this a reasonable amount of play for a clutch alignment tool? Maybe 1mm of room in there
Attachments
Classic4X4
Well-known member
I preparation for delivery on Gear/Transfer box on Monday, I’ve gotten into the guts of everything.
First, I removed the hand brake assembly (which was working very poorly)
Clearly compromised from an LT230 oil leak, I striped it down, bought new shoes and springs and spent a couple days cleaning up the expanders.


These are nice simple mechanisms that are easy to understand - there are several step-by steps on servicing these. Mine showed wear, especially inside the aluminum housing, but certainly weren’t unusable. Because everything was coated in oil there was no corrosion


Fresh paint and they’re ready for brake shoes.
The little retaining clips on the lever-actuated expander can be annoying - especially when you’re trying not to scrape up fresh paint. But once on properly, they hold it nice and snug.
Seats, Seat box, tunnel covers and floor panels are out and prop shafts disconnected.
I’ll be using an engine crane to pull the assembly out through the drivers side door.

Thanks so much for all the help and advice thus far!
One question if anyone can offer advice:
Removing and installing the trans/transfer box while bolted together - do the frame mounts need to come off or loosen? Or can the assembly be fitted at a slight angle and dropped in?
Also assuming I will have to support the rear of the engine.
Cheers gentlemen!
First, I removed the hand brake assembly (which was working very poorly)
Clearly compromised from an LT230 oil leak, I striped it down, bought new shoes and springs and spent a couple days cleaning up the expanders.
These are nice simple mechanisms that are easy to understand - there are several step-by steps on servicing these. Mine showed wear, especially inside the aluminum housing, but certainly weren’t unusable. Because everything was coated in oil there was no corrosion
Fresh paint and they’re ready for brake shoes.
The little retaining clips on the lever-actuated expander can be annoying - especially when you’re trying not to scrape up fresh paint. But once on properly, they hold it nice and snug.
Seats, Seat box, tunnel covers and floor panels are out and prop shafts disconnected.
I’ll be using an engine crane to pull the assembly out through the drivers side door.
Thanks so much for all the help and advice thus far!
One question if anyone can offer advice:
Removing and installing the trans/transfer box while bolted together - do the frame mounts need to come off or loosen? Or can the assembly be fitted at a slight angle and dropped in?
Also assuming I will have to support the rear of the engine.
Cheers gentlemen!
Classic4X4
Well-known member
Transmission and transfer case out today in one big lump. Man that wasn’t fun - I’m sure it’ll be a lot less fun trying to get the new assembly in.
Basically jacked up the rear of the engine slightly to both support it, and give me a bit of an angle to slide the bell housing off the bolts and clear the chassis mounts.
I used an engine crane through the drivers side door - passenger would’ve been ideal but other projects are taking up space! I had to remove the lower sill rail to get enough clearance to pull it out of the doorway.
I think the trick is securing the trans/tcase really well on the crane so that it’s level and “in position” prior to removal and install. I had a leveler, but still found the whole assembly twisted and at an angle upon removal.
Basically wrapped a tow strap around the entire assembly and shackled it to the crane’s chain.
I think for install I’ll use two separate straps: one at the front and one at the rear connected to each side of the leveler.
The clutch and flywheel are in good shape. The 200tdi was installed ~8 years ago so as to be expected. New LOF clutch kit going in regardless.
I was surprised to find some oil in the bell housing and on the pressure plate. Nothing ever dripped from the wading plug hole. I think it was coming from the transmission, not the rear main seal. Looks like it leaked onto the transmission output shaft and was “flung” onto the teeth of the pressure plate. I don’t see oil behind the flywheel on the wall below the rear main.


Much more oil on the transmission side - a bit of a relief as I was dreading any potential of having to touch the rear main seal.
I have a week until the new gears arrive (provided everything goes well. In the meantime I’ll be installing the new master cylinder (thanks for the recommendation) and cleaning up the area.
Thanks again for all the help and advice! Wouldn’t have attempted all this without it.
Basically jacked up the rear of the engine slightly to both support it, and give me a bit of an angle to slide the bell housing off the bolts and clear the chassis mounts.
I used an engine crane through the drivers side door - passenger would’ve been ideal but other projects are taking up space! I had to remove the lower sill rail to get enough clearance to pull it out of the doorway.
I think the trick is securing the trans/tcase really well on the crane so that it’s level and “in position” prior to removal and install. I had a leveler, but still found the whole assembly twisted and at an angle upon removal.
Basically wrapped a tow strap around the entire assembly and shackled it to the crane’s chain.
I think for install I’ll use two separate straps: one at the front and one at the rear connected to each side of the leveler.
The clutch and flywheel are in good shape. The 200tdi was installed ~8 years ago so as to be expected. New LOF clutch kit going in regardless.
I was surprised to find some oil in the bell housing and on the pressure plate. Nothing ever dripped from the wading plug hole. I think it was coming from the transmission, not the rear main seal. Looks like it leaked onto the transmission output shaft and was “flung” onto the teeth of the pressure plate. I don’t see oil behind the flywheel on the wall below the rear main.
Much more oil on the transmission side - a bit of a relief as I was dreading any potential of having to touch the rear main seal.
I have a week until the new gears arrive (provided everything goes well. In the meantime I’ll be installing the new master cylinder (thanks for the recommendation) and cleaning up the area.
Thanks again for all the help and advice! Wouldn’t have attempted all this without it.
Drago.the.D110
Well-known member
@Classic4X4 looks like we are at the same phase of our rebuilds. Our gear and transfer boxes were just rebuilt by Dfenderland in TX and we’re waiting for them to arrive. I also replaced every part of the clutch system from a new TD5 pedal box, all the way to a new LOF clutch, flywheel and every part in between. I can’t wait to finally drive him again.
Best of luck on the getting it all back together.


Best of luck on the getting it all back together.
MountainD
Technical Excellence Contributor
I’ve probably removed a defender engine 15-20 times, twice through the cabin. Mine once, my buddies once. The other times I just pulled everything (engine/trans/transfer case). Particularly the 200 as so few wires…. Mating in particular is so much easier…but frankly with the radiator and grill out of the way, it’s a piece of cake. Just food for thought next time around.
great job on progress! This has been fun to watch.
great job on progress! This has been fun to watch.
Last edited:
Classic4X4
Well-known member
@Classic4X4 looks like we are at the same phase of our rebuilds. Our gear and transfer boxes were just rebuilt by Dfenderland in TX and we’re waiting for them to arrive. I also replaced every part of the clutch system from a new TD5 pedal box, all the way to a new LOF clutch, flywheel and every part in between. I can’t wait to finally drive him again.
Best of luck on the getting it all back together
Fantastic! I hope all is going well for you and glad to see you’ve been following along and sharing the struggle!
I’ve caught up to you, I was able to remove the pilot bearing/spigot bush - I tried white bread, of course that didn’t work, I then tried using grease - I even used cling wrap to seal up the socket but no luck.
I, as careful as I’ve ever been, ended up using a small saw to cut a notch in the bottom. I was able to remove it without scoring the crank.
I used a nice little jig to install the replacement. I had the bearing sitting in engine oil for several days and then placed it in the freezer for several hours prior to fitting. I gave it a preliminary wipe (still a bit oiled) and installed.
This 5/8” socket was perfect. Sat nice and snug inside the bearing.
Now, I’ve fitted and torqued the clutch/pressure plate to the flywheel at 28nm (LOF’s spec) and noticed my pressure plate teeth are not totally flat, slight angle outwards (looks like yours Drago)
Looking at Trailerfitter’s video, it seems that the teeth are totally flat. 28nm is roughly 20.6ft lbs (my torque wrench settings) I torqued to 20 and then a tad more.
I’m thinking, once the pressure plate is in contact with the flywheel and torqued, it’s not affecting the teeth angle anymore. Any advice on this?
Finally, I’m still killing myself trying to get confirmation on my 90mm LT77 slave push rod with the stumpy r380. Anyone able to confirm?
DHL shows shipment on hold but supposed to be arriving today still.
Thank you gentlemen!
Last edited:
Drago.the.D110
Well-known member
Luckily, my old spigot bushing fell right out. Does’t look fun to remove a pressed fit one.Fantastic! I hope all is going well for you and glad to see you’ve been following along and sharing the struggle!
I’ve caught up to you, I was able to remove the pilot bearing/spigot bush - I tried white bread, of course that didn’t work, I then tried using grease - I even used cling wrap to seal up the socket but no luck.
View attachment 24233
I, as careful as I’ve ever been, ended up using a small saw to cut a notch in the bottom. I was able to remove it without scoring the crank.
I used a nice little jig to install the replacement. I had the bearing sitting in engine oil for several days and then placed it in the freezer for several hours prior to fitting. I gave it a preliminary wipe (still a bit oiled) and installed.
View attachment 24234
This 5/8” socket was perfect. Sat nice and snug inside the bearing.
Now, I’ve fitted and torqued the clutch/pressure plate to the flywheel at 28nm (LOF’s spec) and noticed my pressure plate teeth are not totally flat, slight angle outwards (looks like yours Drago)
View attachment 24235
Looking at Trailerfitter’s video, it seems that the teeth are totally flat. 28nm is roughly 20.6ft lbs (my torque wrench settings) I torqued to 20 and then a tad more.
I’m thinking, once the pressure plate is in contact with the flywheel and torqued, it’s not affecting the teeth angle anymore. Any advice on this?
Finally, I’m still killing myself trying to get confirmation on my 90mm LT77 slave push rod with the stumpy r380. Anyone able to confirm?
DHL shows shipment on hold but supposed to be arriving today still.
Thank you gentlemen!
My image was pre-torque. I’ve since torqued per my workshop manual and the teeth are sitting flat now.
You must be excited to receive your shipment! Mine won’t be here until the beginning of next week.
Good luck on the reinstallation. Keep us posted.
Classic4X4
Well-known member
Alright - DHL dropped the ball big time. Long story short, I drove to the facility and muscled the assembly into the car and drove it home.
Regarding the teeth on the pressure plate, I spoke with LOF and sent photos of them slightly angled but torqued to spec and they said it looks perfect.

Hard part is over
It took 2 attempts - had to pull the assembly out to readjust straps and angles.
Using the balancer and really taking the time to get the angle right we got it in - I locked the diff and turned the transfer case to align the splines on the clutch friction plate during the process. The feeling of everything sliding into place is euphoric. The spigot bearing/output shaft tolerance is just enough to make this bearable.
I ended up having to loosen the passenger side frame bracket and move it forward maybe 1/4” to line up with the mount.

New Doorman master cylinder is installed and gravity bled (thanks Brittanica) and I have a solid clutch.
Now here’s the issue:
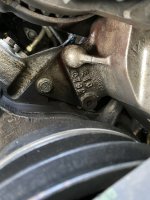
Upon setup, I noticed that installing the new slave cylinder with my existing 90mm push rod, the throw out bearing (at least to me) looked a bit too forward.

Can anyone eyeball whether or not the throwout bearing looks too far forward?
Playing with the pedals it feels like there may be no slack between push rod and slave - LR workshop manual suggests 6mm. I can’t really tell what feels right or not here.
Now considering shimming the slave cylinder or pulling it and trying to cut the push rod in-situ (probably impossible with the location)
Any advice anyone might have on this would be greatly appreciated.
Thanks gentlemen!
Regarding the teeth on the pressure plate, I spoke with LOF and sent photos of them slightly angled but torqued to spec and they said it looks perfect.
Hard part is over
It took 2 attempts - had to pull the assembly out to readjust straps and angles.
Using the balancer and really taking the time to get the angle right we got it in - I locked the diff and turned the transfer case to align the splines on the clutch friction plate during the process. The feeling of everything sliding into place is euphoric. The spigot bearing/output shaft tolerance is just enough to make this bearable.
I ended up having to loosen the passenger side frame bracket and move it forward maybe 1/4” to line up with the mount.
New Doorman master cylinder is installed and gravity bled (thanks Brittanica) and I have a solid clutch.
Now here’s the issue:
Upon setup, I noticed that installing the new slave cylinder with my existing 90mm push rod, the throw out bearing (at least to me) looked a bit too forward.
Can anyone eyeball whether or not the throwout bearing looks too far forward?
Playing with the pedals it feels like there may be no slack between push rod and slave - LR workshop manual suggests 6mm. I can’t really tell what feels right or not here.
Now considering shimming the slave cylinder or pulling it and trying to cut the push rod in-situ (probably impossible with the location)
Any advice anyone might have on this would be greatly appreciated.
Thanks gentlemen!
Last edited:
Classic4X4
Well-known member
Little thread revival here as I never posted a final update.
This was a wild experience but very satisfying to complete yourself. I wouldn't call it difficult in terms of mechanisms, etc, but lifting/moving/aligning such heavy equipment is quite tricky.
I think the key here is to really work to get everything straight/level before attempting to align and install. As with most projects, the key is the prep work.
Unfortunately, I noticed an issue with my new trans/t-case that's been quite bothersome.
It seems in 5th gear I have a low, reverberating droning noise. It seems to get worse climbing uphill. If I'm going 50 in 4th gear - nothing, 50 in 5th gear - bigtime droning noise.
Does anyone have any input on what this could be?