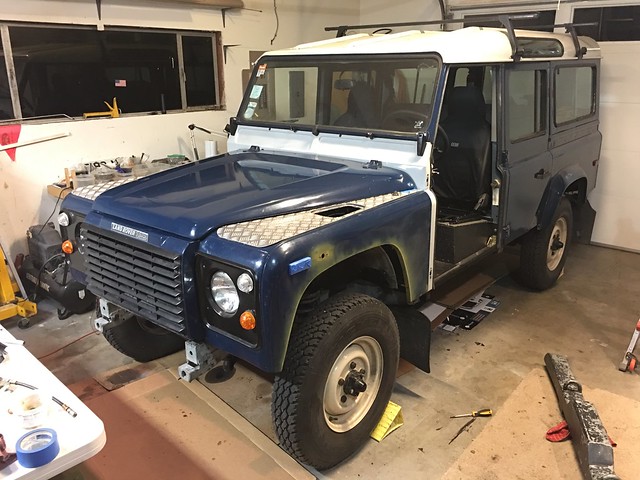
Build Thread: 1988 Saudi Spec 110

RBBailey

NAS-ROW Addict
Callsign: KF7KFZ
Here it goes.

If you happened to see my train wreck on that other site, you might be looking here for kicks and giggles, or because it's human nature to slow down and gawk at the accident scene. Or maybe you want to check in on the lowest common denominator to see what not to do with a build! Either way, the show must go on, and maybe starting a thread here will get my tail kicked into gear.

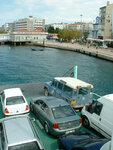
I bought the truck in BC Canada. A Brit ex-pat had it picked out for himself by some friends back home. So although it came from a known shady dealer in the UK, it was actually a nice find. It didn't work out for him, and ended up sitting on his property for nearly a year, before he decided to just stick with his exMoD 90, and sell this off to someone like me.

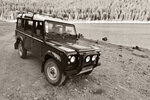
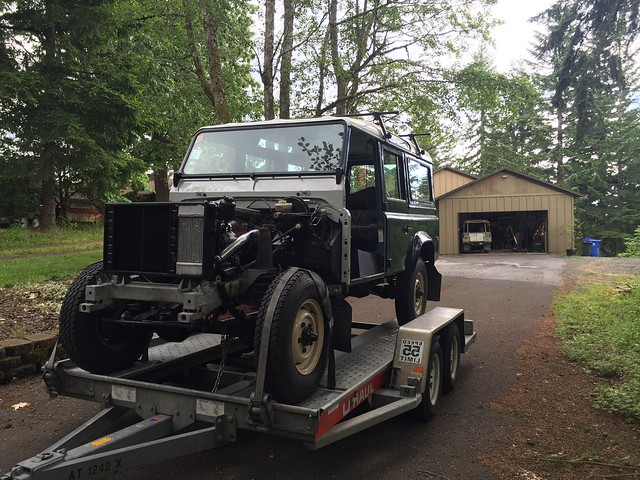
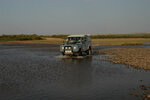
Lots more to tell about it. But I'll just leave it here for now, and post the history, and ongoing work as I get a chance. Here's a shot from the drive home on the first day, and another shot up in the foot hills near Mt. Hood.
 

Attachments

  • Def110a.jpg
    Def110a.jpg
    355 KB · Views: 303
  • Def110b.jpg
    Def110b.jpg
    603.9 KB · Views: 320

RBBailey

NAS-ROW Addict
Callsign: KF7KFZ
History:

1988 Saudi Spec 3.5l V8 5-door 110. Originally in Shire Blue with the big slashing 1980s style stripes.

The Saudi Spec 110 is the same as the 1993 NAS 110 vehicles. That is to say, the bulkhead has no vents, and a factory A/C system was installed. The NAS version had a few updates that included door lights/chimes, the 3.9, and blade type fuse panels. The vehicle was originally LHD, and originally exported to Dubai from the factory.

When I bought it, I got a thick binder full of records going back as far as 1991, and showing the original owner. It changed hands in Dubai, and was at one time fully outfitted with overlanding gear to go out into the desert for days at a time. It was used by a sort of summer camp type of organization that did adventure travel in the Mid-East.

At some point, the frame was repaired and galvanized. And before it was sold and imported back to the UK, it was stripped down to stock condition again.

In the UK, one of its owners was based in London. The insurance, repair receipts, and parking tickets confirm this. In this time frame, there are also a lot of repair, and other travel related receipts from places like Greece, Turkey, and other parts of Western and Eastern Europe. More on this later.

At some point, it was sold off, and ended up in the hands of a UK dealer who is known for sending iffy, resprayed Defenders to unsuspecting Americans.

Luckily, the owner before me knew Rovers, and he had contacts in the UK. These wonderful people hand-picked the vehicle for him to import to Canada. It was from this private owner that I got my hands on the vehicle.

So, what about all the records of travels through Europe and the Middle East? Out of curiosity, I Googled the name of the owner of the vehicle at that time, and he was not terribly difficult to find. It turns out that he is an expert on the ancient city of Ur, in Iraq. And he actually used this truck on a dig in Turkey. It was used to run artifacts from the dig to the lab at the end of every day. This included regular baths in the Euphrates River, and the collection of lots of dirt in the frame and nooks and crannies of the truck. The owner drove this truck from London to Turkey and back several times.
 

RBBailey

NAS-ROW Addict
Callsign: KF7KFZ
The Plan:

At first, my plan was to drive. And I did drive it every day, and took a few short camping trips and such during the first 9-10 months of ownership. I had very few problems.

At first, I was all about just cleaning it up, working out the wrinkles. I had planned on building my own rear cargo system, but then... The engine ran well, but... living here in the west, needing to climb anywhere from 4000-10,000 feet on any given weekend outing, the 3.5l really wasn't going to cut it in the long run. So when a local Rover nut put up a 300Tdi with the R380 and a good 95% of the rest of the kit needed for a swap, I jumped on his good price.

This set the stage, and got me running on the engine swap and partial restoration of this truck.

Here is my dump of photos from this project: https://www.flickr.com/gp/bhcmbailey/p1Z5N9

Restoration? Yeah, well, although the majority of the truck was in stock and usable to good condition, the dash was always a bit iffy. One of the previous owners had gutted the dash (think 1993 NAS style) and put it back together in a homemade way that was actually tougher than factory, but really looked.... homemade...

I'm pretty sure this work was done because the A/C system had either died completely at some point, or more likely the system had caused condensation and therefore rust in the bulkhead. So the A/C was removed and a homemade blower/heater system was put in its place. This leads to the bulkhead.

On a random chance, I ended up with a great deal on a very good condition bulkhead and dash from a 1993 NAS truck. This meant a lot more work was ahead, but it also meant that I got to see just how bad the rust in my current bulkhead really was -- you don't really know till you look under the windshield where it sits on top of the bulkhead.

With the engine, transmission, bulkhead, and a mostly complete dash sitting in the garage, it was time for the teardown to begin. That was a year and a half ago...
 

RBBailey

NAS-ROW Addict
Callsign: KF7KFZ
Here are a few pics of the tear down with a bit of the hacked up dash showing. One of the problems I'm running into now, is that although I have almost all the parts to rebuild a complete dash, the suction actuated HVAC system is going to be a bear to recreate without having it to look at during the tear down. Also, I'm not putting A/C in, so I ....hope... I can just duct fresh air. And the instrument binnacle is not the same as standard. There is a large hole on the left side, and a few other changes to allow for room for the air vent to the left driver's side. A standard RHD binnacle does not seem to fit correctly -- which is all anyone ever seems to have to sell!

19156292144_9d71d5160c_z.jpg

19156220374_c65164c783_z.jpg
 

RBBailey

NAS-ROW Addict
Callsign: KF7KFZ
Getting back at it may be a relative term. But I'm trying.

I spent a good half of the summer working on the truck when I could. But I'm very slow, and getting the wiring to come alive was the first task. The engine would run fine when hot-wired, but I'm replacing all the instruments, going toward a dual battery set up, and a few minor mods for lighting, an electric cooling fan, etc...

I'm trying to put back together a modified HVAC system as well. It is a hybrid of a standard LHD heater/blower core, and the in-dash vents of the A/C system without an A/C system. The wiring and suction for this system needs to be figured out without much to go on.

With some help from the local natives, I was able to get the electrical working again, so I'm stumbling my way through putting it all back together.

The goal was to have it on the road, but not complete by the end of August. My idea was that by actually driving it, I would be able to see in real time that the various instruments were working properly, and I'd have a better feel for how any of my interior mods on the dash/driving area were going to be done.

But... as the last few weeks of work time came up, I started really having troubles. I'm a teacher, so when school starts back up in the fall, all projects pretty much come to a halt for the rest of the year. Summers are great, but you have to get everything done then, or just leave it for 9 months!

First, various panels just didn't want to go back in properly, partly due to a new transmission tunnel, and partly due to new paint, and partly due to the minor shifting of all the nuts and bolts from here to there.

Secondly, the ignition switch broke. I happened to have an extra.... I broke it when I tried to install it. I can't think when this type of thing had ever happened to me before... This had the effect of basically bringing my wiring to a halt while I searched for the right part, then waited for a week for it to arrive.

Third, the new Mantec tire carrier was delivered with a flaw. Minor, but irritating.

Fourth, I finally got the truck running -- with no wings on it, or front doors! -- and took it out for a test drive on my street. It is a 700 foot elevation change in 1/2 mile. Half way back up the hill, smoke began pouring out of the top center of the engine, obscuring my view of the road. I got it back to the house, and along with the smoke, there was a quart of oil on the ground. The oil was annoying, but the smoke from the engine really alarmed me. I still don't know for sure what it was, but this put a halt to my work for a few days till I could have it looked at.

Fifth, the instrument binnacle I had was found to not be able to fit this dash. Still looking for a proper LHD binnacle!

Sixth, after working out the current issues, I wanted to run the truck in order to look for more leaks and problems. Also, to allow me to test the instruments as they got hooked up. I decided that it was time to put the wings back on, and attempt to run the truck in road-worthy condition. That's when I noticed that there is a crack in the head near the second injector. Coolant is leaking right out the side of the head.

Seventh, after working on it for several hours, I still can't get the first of two wings back on the truck. No matter what I do, I can't get any three or more bolts to line up, and the wing skin is 1.5 inches from lining up with the bulkhead. Baffled.

Eighth. Out of time. I had to put everything away, and as of now, it has been 5 months since I even attempted to work on the project.
 

javelinadave

Administrator
Staff member
VDO is absolutely the way to go. From personal experience ground each gauge to the bulkhead. Don't "daisychain" the grounds from one gauge to another.
 

FlyersFan76

Well-known member
Looking forward to rereading this build. Builds always provide me with motivation.

Are the VDO's and easy swap. I am more concerned with getting the correct gauges that will work with our trucks. I think I can figure out the holes sizes if there are great differences but wasn't sure how easy it is going to be to get the correct gauges for my 200Tdi et al.
 

RBBailey

NAS-ROW Addict
Callsign: KF7KFZ
Check out the VDO thread that is being built. I forwarded all the part numbers and even a little info on how to fit them. But yes, they are easy. I have not got through all of it, but they are standard size for the mounting holes, and once I started working the wiring, it all made sense real quick.

I'm using the stock harness for the lighting, but will need to splice each light in. Not a big deal. I am using my own ground. And I am using the stock 12v power source when I can. Which makes it easy to have the gauges properly fused, and they get power when they are supposed to.

I'll post more here about the wiring, but since I'm doing most of it in the vehicle as it sits, it is actually very difficult to get anything like a good photograph of it!
 

FlyersFan76

Well-known member
Check out the VDO thread that is being built. I forwarded all the part numbers and even a little info on how to fit them. But yes, they are easy. I have not got through all of it, but they are standard size for the mounting holes, and once I started working the wiring, it all made sense real quick.

I'm using the stock harness for the lighting, but will need to splice each light in. Not a big deal. I am using my own ground. And I am using the stock 12v power source when I can. Which makes it easy to have the gauges properly fused, and they get power when they are supposed to.

I'll post more here about the wiring, but since I'm doing most of it in the vehicle as it sits, it is actually very difficult to get anything like a good photograph of it!

Thanks. Already subscribed to that thread. Think it was started pretty close to time that I asked the question. All good.
 

RBBailey

NAS-ROW Addict
Callsign: KF7KFZ

Attachments

  • 28192984621_6f447af3c6_o.jpg
    28192984621_6f447af3c6_o.jpg
    270.4 KB · Views: 214
  • 27655744264_ecf01aabd3_o.jpg
    27655744264_ecf01aabd3_o.jpg
    268.6 KB · Views: 224

RBBailey

NAS-ROW Addict
Callsign: KF7KFZ
An update.

I painted my new front door hinges. They are stock, but they have been sitting in my garage since before I had a Defender, so they will work.

I'm prepping the truck and parts and the garage for a work party coming over here on Saturday. We say it's to help one another out in all things Rover, but really, it's charity for me and my train wrecked project.

If anyone here happens to want to attend, bring a project that you might need extra hands for. I'll have food and drinks from between 10-4. PM if interested.
 

Rivet

Founding Member
Check out the VDO thread that is being built. I forwarded all the part numbers and even a little info on how to fit them. But yes, they are easy. I have not got through all of it, but they are standard size for the mounting holes, and once I started working the wiring, it all made sense real quick.

I'm using the stock harness for the lighting, but will need to splice each light in. Not a big deal. I am using my own ground. And I am using the stock 12v power source when I can. Which makes it easy to have the gauges properly fused, and they get power when they are supposed to.

I'll post more here about the wiring, but since I'm doing most of it in the vehicle as it sits, it is actually very difficult to get anything like a good photograph of it!

Looking forward to any "how to's" on gauge wiring. I'm getting close to that stage in my rebuild where I'm about to put the dash back together. I have a Raptor dash and would like to put the essential's in there (egr, water, oil press). I'm not smart on electrics.
 

RBBailey

NAS-ROW Addict
Callsign: KF7KFZ
Six months of work.... Wings are finally on.

33005751611_5d1d56c230_z.jpg


Thanks to a few of the blokes from PCRC for coming out to give me a kick in the pants on this project. We really didn't get much work done, but by just getting the wings on, I have to say my motivation level has gone up, and I'm looking to get this thing on the road in the next few days. ...maybe.

Mainly though, as is always the case, I learned a whole lot. By having eyes on the project, by having another 300Tdi Defender there, and by having other experts pointing at things and telling me their own experience with those things, I've vastly expanded on my knowledge of my own project and on what needs to be done.
 

RBBailey

NAS-ROW Addict
Callsign: KF7KFZ
This here is not a tractor. This here is a Defender with a front end on it.

33109436626_3af7d6edd4_z.jpg


Last night I started the torture of trying to get the lights to work properly. The problem is that a previous owner installed extra side marker lights at the front of the wings. They are spliced into the harness in such a way that makes it difficult to match color for color now, and there aren't enough fittings to get all the wires properly connected. Not to mention, having one head light lamp burnt out without knowing it, makes for some stupid hunting for problems that aren't there.....

Waiting on the door hardware and a few other bits to make ready for test drives.
 

RiftRover

Well-known member
Looks great, getting the front clip on is a big step! Get it driving again and your whole perspective will change. If you're like I was with my 110 you'll leave a bunch of things unfinished until you go to sell it!
 

RBBailey

NAS-ROW Addict
Callsign: KF7KFZ
At this point, I'm purposefully leaving some things undone, especially interior, because I need to drive it and feel it out to know how the modifications will work and how they need to be done properly.
 

RBBailey

NAS-ROW Addict
Callsign: KF7KFZ
Duoh! I figured on taking a test drive by the end of this coming weekend. But my orders aren't coming through! Started with parts for my wife's Mercedes when they would not take any of our credit cards, and they still can't explain why. Then I ordered from two different Rover suppliers for this project, and I'm not getting any confirmation of the order after several days. No charge on the card, and no tracking information sent, and one place is showing that I still have not paid for parts I bought last year -- and have already on the truck! ???

Then Rovers North just emailed this morning, and said they can't fill the order till mid-March! It's September 2016 all over again!
 
Top