You are using an out of date browser. It may not display this or other websites correctly.
You should upgrade or use an alternative browser.
You should upgrade or use an alternative browser.
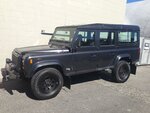
2000 Land Rover Defender 110 Td5
- Thread starter CDN38
- Start date
Roverman2010
Well-known member
Trump will fix it.
The Dro
Illustrious
According to these idiots... You can go to Califormia, Oregon or Washington. BAWHAHAHADamn you Canadians with your 15 year rule!
http://www.oregonlive.com/today/index.ssf/2016/11/after_donald_trump_victory_som.html
Daddymow
Well-known member
Trump will fix it.
Let's hope!
According to these idiots... You can go to Califormia, Oregon or Washington. BAWHAHAHA
http://www.oregonlive.com/today/index.ssf/2016/11/after_donald_trump_victory_som.html
They would also take their 55 electoral votes and their House minority leader with them. I wish them well.
The Dro
Illustrious
That would be a trifecta...They would also take their 55 electoral votes and their House minority leader with them. I wish them well.

CDN38
Well-known member
Td5 Build Thread
Thought I would drop my build (renovation) thread here on my member truck page.
I purchased the truck in September 2014, it twas straight off the boat from Germany, bone stock with aftermarket wheels, a bumper & winch along with some ugly lights.. Having owned a NAS 90 for 12 years, I had a good idea where I was wanting to go.
Here's a link to an article that was written by a local writer on my truck. There's some really good photos of my trip to Utah earlier in 2015.
http://www.autos.ca/motoring-memories/fina...110/?all=1
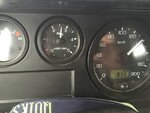
First of the upgrades were OME suspension, poly bushings with graded stainless fasteners, Hannibal rack, overdrive, Td5 tach, heated windscreen. (oddly enough, I still have yet to see a TD5 that comes with a tach)
The Roamer drive is a great addition, being able to do 75mph on the highway without blowing your brains out is a good thing. 28% reduction in final drive when engaged, no brainer.
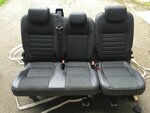
So I had been accumulating parts for close to a year, brought a few goodies from the UK. Puma seats, 5 Puma doors, YRM bits, (galv. rear seat crossmember, upstand, various galv upgrades brackets) Dinitrol for the underside. By September of 2015, it was time to stop collecting, and start working.
Thought I would drop my build (renovation) thread here on my member truck page.
I purchased the truck in September 2014, it twas straight off the boat from Germany, bone stock with aftermarket wheels, a bumper & winch along with some ugly lights.. Having owned a NAS 90 for 12 years, I had a good idea where I was wanting to go.
Here's a link to an article that was written by a local writer on my truck. There's some really good photos of my trip to Utah earlier in 2015.
http://www.autos.ca/motoring-memories/fina...110/?all=1
First of the upgrades were OME suspension, poly bushings with graded stainless fasteners, Hannibal rack, overdrive, Td5 tach, heated windscreen. (oddly enough, I still have yet to see a TD5 that comes with a tach)
The Roamer drive is a great addition, being able to do 75mph on the highway without blowing your brains out is a good thing. 28% reduction in final drive when engaged, no brainer.
So I had been accumulating parts for close to a year, brought a few goodies from the UK. Puma seats, 5 Puma doors, YRM bits, (galv. rear seat crossmember, upstand, various galv upgrades brackets) Dinitrol for the underside. By September of 2015, it was time to stop collecting, and start working.
Attachments

CDN38
Well-known member
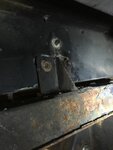
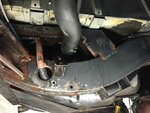
Removed the rear seats and carpet, it has about the level of galvanic corrosion I figured on, which is one reason why I planned on replacing the rear upstand. The other is being able to remove he old seat frame cross member, and install the new Puma one, which is very different from the standard Td5 version. With the upstand gone, it would allow for access that would otherwise not be possible without lifting the tub.
You can't intstall Puma rear seats by bolting them to the upstand, they are solid and heavy, and the aluminum upstand would just tear with the weight. It's a 100% MUST for safety to have them anchored.
I'll speak my mind.... jack asses like this.. https://youtu.be/1TSPWf0s3is installing seats with spacers and plywood is WHAT NOT TO DO. (I'm sure he's serving time in prison somewhere for killing his rear seat passengers due to a small fender bender with the rear seat braking loose, crushing everyone). Notice when he sits in the seat his head is stuck in the roof too? Again, not how things are supposed to be.
Attachments
CDN38
Well-known member
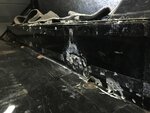
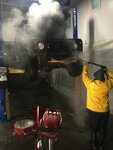
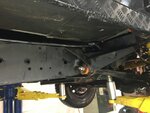
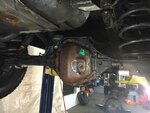
Next up, get the underside completely clean.
It's not too bad of a job when you can use a hoist and a diesel powered pressure wash / steam cleaner. Surprisingly the task was not as messy as I had anticipated, and the result was impressive.
Leading up to this over the previous months I attacked the easy to get to areas with my small pressure washer (the truck on the ground) and flushed the inside of the frame rails over and over. Most of the areas that usually are packed with mud have been cleared. Once in the air, it was easy to see there was lots of grease and road grime to get rid of on the underside. I covered the underside with a healthy spray of Superclean and gave it a good while to soak in. Accessing all those hidden areas was much easier with it up, flushed the frame rails again and went over everything. The Superclean worked well at removing the grime and road film, but I think it's the hot water that works the magic. All the undercoat type things that were applied by the previous owners are gone, all the surface rust is clearly exposed, areas of more aggressive rust and corrosion are now much easier to see, and work on.
Attachments

CDN38
Well-known member
Here's a link to an article that was written by a local writer on my truck. There's some really good photos of my trip to Utah earlier in 2015.
http://www.autos.ca/motoring-memories/fina...110/?all=1
Had the wrong link to he article about the truck, here's the correct link
http://www.autos.ca/motoring-memories/final-drive-land-rover-defender-110/
globallandrovers
Well-known member
Shes looking lovely Scott