1991 200TDI to R2.8--couple remaining questions

MountainD

Technical Excellence Contributor
Next time I'm doing the sals a frame just use a standard height 12pt chrome socket on the ball joint big nut. It will fit and save you time. That being said I have a set of Astro ultra low profile impact rated sockets just for stuff like this to make it even easier.


I may have had to buy a separate socket just for this I can't remember tho
Those are really cool sockets. I have some impact swivel Snap On sockets that are very useful too that I typically use...but nothing that is 30mm.... https://shop.snapon.com/product/Sha...rive-Shallow-Impact-Swivel-Socket-Set/207IPFM
 

MountainD

Technical Excellence Contributor
a lot of my work lately has been on the exhaust and, in particular, getting the DOC to fit, clear the front drive shaft, miss the frame, avoid the footbox, be high enough to not stick down too far for both obstacles and the crossmember (that it needs to be above). I have a load of parts, elbows, Quick Draws DOC Relocation kit… and extra stainless 2.5” exhaust…and after countless hours welding, mock ups, 100,000 times putting on and taking off, I’ve scrapped it all. It’s like watching money and time evaporate… but I’ve owned many rovers so…I’m used to that.
105971DA-581D-4CA1-BC94-32F9258B6FA6.jpeg

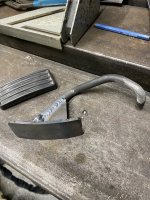
Had a late night thought so I got up, went out the the garage and got out the band saw, MAP torch, cold chisel, and proceeded to set off our fire alarm. I ripped it off the wall and stomped on it until it shut up so I didn’t disturb the wife. Too late. Need to replace that today (the smoke alarm…not the wife). But I can report she is coming along nicely (the wife, not the truck 😜). Finally got my scenario to work I believe but had to drop it off to a pro welder that has Nickel rods and more skill than I, so more on that soon!

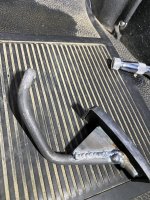
Onward to Steering. With axles installed, needed Drag link and tie rod. Went over to my buddies house who had some DOM stock from his ‘Tracks days of making LR axles parts and finished the other bits on his big machinery while slurping down some wonderful Lafroaig. Never go to a skilled craftsman home empty handed. I walked out with all the components I’d need plus more learned knowledge (he always teaches us proper old school machining techniques) as well as getting to spend time with a close friend. Honestly, those are my favorite days. The difficulty is really just the left hand threaded jam nuts and rod ends. One on each rod so you can adjust them in/out. Beveled the edges of rod and end for weld penetration/surface area.
AA1D7E3A-87D8-496B-AF90-1492E0E4852D.jpeg

found a small clamp for roll cages that would fit for the damper (running Disco1 high bar set up) which I’ll weld a tab to today.

4D1043E5-EAEA-4390-A1F2-457ED79E5F10.jpeg

then I cranked up the mig, laid some beads and shot some paint.
1326861D-5BB0-4139-992B-FFECBD8715BF.jpeg
88BA973F-6810-477F-9243-C4C9E1998FB3.jpeg

All installed! (Except the damper attachment… soon enough…)
EE170417-E819-44BB-98A4-23DF9EDA1845.jpeg


After 5 months, I finally got aluminum oil pan. Hell, I am going so slow, it didn’t really matter. Sort of the world right now…order early…. I believe it’s worth it. When you take off the plastic one you really see how thin it is with just the BS plastic fins adding illusion of rigidity/stoutness. God forbid something happens, I can always tig aluminum… but hey, I guess I have a spare plastic one if needed…
AC8CB744-B866-400A-9A77-B1CC31AC1155.jpeg

5CCB2160-AB68-4358-9504-4C9FC35F33B7.jpeg

you’ll need the new dipstick and an additional plug as there is a dip stick hole on both side. there is a third hole next to one of the dipstick holes that I plugged with a o-ringed oil plug from original front cover.
713B8CE7-5A4C-431E-88E2-78E4BABD2C99.jpeg

You can see the hole on the right side just to the right of the larger dip stick hole. Cover came with gasket installed. Added some Right stuff to rear t-seal per manual but not front as I had installed a new front cover gasket (also per manual).

Back to garage! More soon enough!
 
Last edited:

dkemm

Well-known member
Every time I get under mine, I think about that oilpan… I still have the link bookmarked - I am curious about the plugging of the extra holes…
So, are you reshaping the DOC from its cylindrical shape to get it to fit?

You need to catch up, I already have 1300mi on mine!
 

MountainD

Technical Excellence Contributor
I know I’m lagging. I did my LS lickedy split but it came at cost of wife feeling she was, and I quote, “a Land Rover Widow”. I took it to heart as one does having been married 25+ years. So really trying to balance that PLUS this is way more than an engine swap this time around. But I hear you! your truck looks GREAT on those 35’s, btw.
 

MountainD

Technical Excellence Contributor
In regards to the DOC, my goal is to leave the canister unmolested to avoid future issues. I’ve just removed the flange from exit end in order to weld on/use a v-band clamp. Just way better clamp.

i took the tie-rod clamp and milled a small flat on it and welded a tab for the damp
63DBBF8E-DE5E-4C69-A2BF-BF4C693EDD86.jpeg
er. Turned out good.
8C0075F5-5545-4D41-B5AE-20C48A28511C.jpeg

D9F8A8EF-4650-439B-9899-DD043E856B84.jpeg


Still have to turn a spacer but pretty much done with steering set up. I still need to first set up front suspension and alignment before final install. But mock up was successful.
7416CF98-4D5B-44B3-9574-5F1422C81140.jpeg

013D612D-EE15-42FB-ADC8-8D12D185768F.jpeg
 

Napalm00

Technical Excellence Contributor
As often as I see people requesting those exact clamps to add something onto their roll cage You could probably make a quick buck milling them flat drilling two holes and tapping it. Leave it up to whoever to figure out how they want to mount it.
 

MountainD

Technical Excellence Contributor
As often as I see people requesting those exact clamps to add something onto their roll cage You could probably make a quick buck milling them flat drilling two holes and tapping it. Leave it up to whoever to figure out how they want to mount it.
I'd be more than happy just finishing this swap, lol. Please, by all means, go make that buck! :)

Next up for me: Tonight I'll center steering box, adjust drag link to center wheels, go to full lock (one way or the other), put on clamp, mill spacer for damper, put on damper. Little steps.
 

donb

Well-known member
I also installed the remote throttle position kit so I can use my stock pedal. I had to remove the heater hose, but frankly, I didn't like all the joints that they were doing--I found a more graceful routing. It is all the blue silicone tubes you see. I also don't like the blue so I got some 5/8" HPS Silicone heater hose to redo it. Once I finish the hose routing, I will show that a little more clearly. What I like about the Quickdraw TPS kit is that there are different holes in the cam so technically I can reduce or expand the rate of throttle to tps depending on the throw of the pedal...which is nice.
View attachment 22422

I know you have some more time before driving but overall how do you like the relocation kit? (and if someone has driven with one I'd love to know their experience)

The reason I ask is I've modified the Cummins spindle to put the pedal in the same spot of the stock LR one and it drives very touchy. If I go over bumps the slight movement in my foot will raise and lower the throttle which amplifies as it happens. The original pivot setup felt even more strange and was the reason I changed it.
 

Attachments

  • IMG_5218.JPEG
    IMG_5218.JPEG
    301.6 KB · Views: 90
  • IMG_5219.JPEG
    IMG_5219.JPEG
    283.9 KB · Views: 91
  • IMG_5222.JPEG
    IMG_5222.JPEG
    223.6 KB · Views: 92

MountainD

Technical Excellence Contributor
I know you have some more time before driving but overall how do you like the relocation kit? (and if someone has driven with one I'd love to know their experience)

The reason I ask is I've modified the Cummins spindle to put the pedal in the same spot of the stock LR one and it drives very touchy. If I go over bumps the slight movement in my foot will raise and lower the throttle which amplifies as it happens. The original pivot setup felt even more strange and was the reason I changed it.
Funny you mention "twitchy" as this is EXACTLY why I didn't use the stock pedal. I had the same exact experience with the LS engine (still need to reprogram that to correct it) and it is super twitchy---amplified ever more by having double the output (or more) of the Cummins.

Unfortunately I just don't know how it responds yet. If it is more twitchy than I like, I will reshape the cam so that it has less response down low--which is exactly the reason I got it. But, as of yet, I am just not sure :-(.
 

donb

Well-known member
Funny you mention "twitchy" as this is EXACTLY why I didn't use the stock pedal. I had the same exact experience with the LS engine (still need to reprogram that to correct it) and it is super twitchy---amplified ever more by having double the output (or more) of the Cummins.

Unfortunately I just don't know how it responds yet. If it is more twitchy than I like, I will reshape the cam so that it has less response down low--which is exactly the reason I got it. But, as of yet, I am just not sure :-(.

Thanks for that info.

I drove a buddy's LS conversion months ago and it was very hard to drive with a big twitchy/touchy pedal. At least mine feels like a LR Defender underfoot now. Under WOT it feels great but I want to mimic the 200tdi throttle response/feel while going slow.

I'll call QD tomorrow and see if they have any kits. Maybe between a couple of us we can dial in the cam if need be.
 

dkemm

Well-known member
Don, I too experience the twitch of the factory Cummins pedal (modified to fit).
I find myself bracing my foot against the footwell for stability.

Chris, I am curious about the TPS… and if it would work for RHD pedals
 

MountainD

Technical Excellence Contributor
Don, I too experience the twitch of the factory Cummins pedal (modified to fit).
I find myself bracing my foot against the footwell for stability.

Chris, I am curious about the TPS… and if it would work for RHD pedals
I'm sure it would although you would need a longer cable to reach the "passenger"side of the engine where the TPS kit goes. Otherwise, all it is is cable actuation of a cam--super simple. The 200TDI cable may work--that did a similar reach around.
 

MountainD

Technical Excellence Contributor
Finished setting up the steering tonight. Added one more coat of paint before final assembly. Had to remove drag link and grind end welds--the clamp really comes near the end of the bar. That may change a little as I drive and readjust. It is really nice to deal with components that spin for adjustment and you don't have to fight :).

Cut the spacer for the Steering damper. Just way better (for my personality) than using a stack of washers...
5DCA9B70-0F82-40F5-A8AB-349084C4A869.jpeg

Mini lathes get no love…. Lol.
 

rherl

Active member
I had the original pedal for several months and welded up several different pedal configurations and nothing worked. I bought the TPS relocation kit from Chad and put a 300tdi pedal in and there is no going back. I will say the pedal is super soft, and I have talked with Chad about adding a second spring to the TPS kit to give the pedal a bit more feel under foot but evan as is it is there was is a night and day difference. You can modulate the pedal so much better. The other thing that I had to fix, which is the same whatever engine you are running with that pedal setup is the adjustment bolt on the pedal catching on the rubber floor mats an the pedal sticking. Easy to fix though. I have since sold that truck but I just ordered another TPS relocation bracket from Chad for my current build, There is no going back to the stock Cummins pedal for me.
 

donb

Well-known member
I had the original pedal for several months and welded up several different pedal configurations and nothing worked. I bought the TPS relocation kit from Chad and put a 300tdi pedal in and there is no going back. I will say the pedal is super soft, and I have talked with Chad about adding a second spring to the TPS kit to give the pedal a bit more feel under foot but evan as is it is there was is a night and day difference. You can modulate the pedal so much better. The other thing that I had to fix, which is the same whatever engine you are running with that pedal setup is the adjustment bolt on the pedal catching on the rubber floor mats an the pedal sticking. Easy to fix though. I have since sold that truck but I just ordered another TPS relocation bracket from Chad for my current build, There is no going back to the stock Cummins pedal for me.

Thank you very much for that info!

Funny I had a TPD on order but there was a delay so I figured the part that came with the Cummins would be better and I would modify that to work. Good to know and maybe once a few more of us get it we can figure out a spring mod to it.
 

MountainD

Technical Excellence Contributor
Don't get too hung up on the spring---it is just a standard torsion spring, nothing rocket science.
1648594273551.png

Don't quote me on dimensions, but super quick measurement it is about .8" diameter, .7" thick and the legs (the long leg at least) sticks out about 2.25". They come in all sorts of rates. The thought that he is custom making them doesn't enter my mind. It shouldn't be hard to swap one out...
 

dkemm

Well-known member
Don't get too hung up on the spring---it is just a standard torsion spring, nothing rocket science.
View attachment 23461
Don't quote me on dimensions, but super quick measurement it is about .8" diameter, .7" thick and the legs (the long leg at least) sticks out about 2.25". They come in all sorts of rates. The thought that he is custom making them doesn't enter my mind. It shouldn't be hard to swap one out...
McMaster carr
 

Napalm00

Technical Excellence Contributor
you could just wrap it around one more time, did this on my truck. i also use a RHD 2.5 NA cable, same ends as the 200/300 but much shorter and plastic lined from the "factory"
 
Top