1991 200TDI to R2.8--couple remaining questions

MountainD

Technical Excellence Contributor
Reading up on torsion springs and turns out springs are built to be used until legs are rotated parallel to each other and not further. Not saying it won’t work nor that it didn’t work for you, but for the return spring for the accelerator pedal, I think I’ll find one with higher spring rate or add helper spring if I find pedal weight to be an issue. There are a couple reasons why, including reducing diameter of shaft hole resulting in binding or breakage and stretch resulting to deformation of material and spring rate. i love learning. Part of why I love building…
 

Napalm00

Technical Excellence Contributor
yep no prob. been like that now for about seven years. the LR spring arrangement does not even put the spring under tension until you are about 5% into the pedal.
 

KGH

Well-known member
Y’all are making me feel like I just got a big box of unanticipated problems. 🤔

EC2CEA95-5C59-4FCA-A6C5-B098FB28930F.jpeg
 

dkemm

Well-known member
Y’all are making me feel like I just got a big box of unanticipated problems. 🤔
Having completed my swap last year....there is some solution resolution that needs to happen, but not necessarily problems. This is a crate engine made for many vehicles...so there is customization and fabrication needed. In full transparency...I had never performed an engine swap prior to this - but I had a blast fabricating and making it mine! I love the new engine - new life of my Ninety. @MountainD is doing an incredible / meticulous job on his vehicle -- whereas my focus was to get back on the road relatively quickly, my swap took me 6 weeks - solo install.
 
Last edited by a moderator:

MountainD

Technical Excellence Contributor
Y’all are making me feel like I just got a big box of unanticipated problems. 🤔
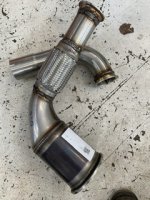
One reason why I have been trying to detail everything. Feel free to reach out any time. With the exhaust/DOC solution now completed, I think I have done all the heavy lifting on my truck and also think I have cataloged it all very well in this thread--but by all means, reach out along the way. Loads of assets on this board that have completed it now. But yeah...not lifting one out and putting it in... not quite that easy.

After completing the LS, I will say that the building is one of the favorite parts of the entire thing...
 

MountainD

Technical Excellence Contributor
Back to the DOC. On a stumpy conversion, there is no way I’ve found to do it without trimming your bulkhead corner imho. Not without serious rerouting that would potentially put it in such undesirable positions (like right next to engine mount with massive exhaust rerouting and I won’t do that to the mounts!). But it does move it enough that you can most likely use a stock shaft (I probably should have waited to sell my GBR shaft— Kenny you are getting a fantastic shaft— it’ll arrive today!). shown is not the solid bar shaft but a larger later tube shaft:
FB0A08E8-44F6-422F-9130-F6119CE99D63.jpeg

B112D27B-DA6A-4F59-9EA4-CC32676819A0.jpeg

i already trimmed my bulkhead once, but I need to take more off… but it fits and I’ll do that. May pull it in more, may just lop it off. Doesn’t need much, but has to happen:
12501A9E-668D-42F4-AB94-84EA02B3ECFF.jpg


so what was my solution? Keep it high. Highest way was stock adapter that comes with engine—if you use even the stubby QuickDraw 90 degree with the relocation kit it drops it over inch lower— no Bueno. I used my band saw and cut it from engine side but not all the way through— left about an inch of material uncut then bent it toward the frame rail to get the DOC about 1/4 from frame rail. Took it to my local welder who used nickel rods for cast iron to weld the gap.
7DD54CE4-9C1C-45BE-A189-DCAF9EE7D4D6.jpeg
C8F9ED5D-0889-47D5-9C3E-E290DE17B777.jpeg

sometimes simple is best. One more reason why, if done again, I’d do long bell housing. even With long, you have have to trim lower corner, but less so. I’ll probably cut out the lower corner and weld in patch with built in heat shield… we will see. I have a spare bulkhead for a rainy day that I’ll mark up for mod prior to galvanizing for future use…. So less concerned with this one at this time. I’ll trim this weekend and then the heater box and fenders can start going on— I’ve left them off to aid working in this area and glad I did!
 

MountainD

Technical Excellence Contributor
Got home late from work, ate and jumped in. Didn’t want to but had to mod the bulkhead more. Doing it with engine in situ was a royal pain in my ass. Cut out my sound insulation using a putty knife and heat gun…Ground out my previous welds, pounded with a hammer in a tiny space until sweaty, sanded and cleaned area to weld, blah blah blah.
71D402AA-DED3-4BA3-BB48-84B43B4D148A.jpeg

1Z87A45Y4395693461
CA742A21-9AAD-4FE3-A242-FD73DB63A644.jpeg
01F22B81-D934-4B91-907F-1938B2127FEB.jpeg

obviously need to refinish the inside, just more elbow grease. Super broheim Mr Damian is shooting me out a gasket for the DOC and I’ll get the engine bay all closed up. I’m starting to roll…. Tired as shit, going to bed.
 

MountainD

Technical Excellence Contributor
I’ve been putting off wiring cause I have a lot of accessories to wire. Step one was to get the LR wiring harness back to stock so I know what I’m working with. Today was step two— running all the wiring through the bulkhead that needs to be there and figure out the switch wiring. I’ll run all my accessories off two fuse relay boxes— a big one is under the passenger seat:
77E03EE2-605F-450A-8DE6-AB181900D6D5.jpeg

and a similar but smaller one under the bonnet. Made the wires up into minI-harnesses to keep it clean.
95168D2E-C089-4EAC-BBD4-49AD5ED79902.jpeg
DC1EB721-1708-4923-AE51-EA4F66854D34.jpeg
AE380536-1607-438C-B759-85653B4BA3C6.jpeg

i was able to get the lower dash in but the rivnuts spun and threads were crap So drilled them out and replaced them. startin* to take shape but I still need to terminate a lot of wires. But nice to see progress…
FA6DAE2E-6415-4D54-890C-EE0CD83E0A97.jpeg

I’ll be wiring for a bit I think 🤪
 
Last edited:

MountainD

Technical Excellence Contributor
Loads of little things that are also “big” things in moving forward. I had dual front shock holders that a PO had to cut the fender skirts. Already fixed one… fixed the other.
8415D05D-F7D5-4CDC-88E6-2F1E6B7092C9.jpeg

D873D8EE-444E-48D3-8A1F-BBF7D153F117.jpeg

did a lot of modding to the tunnel—have to make and lengthen shroud and redrill the holes as the don’t match the holes in bulkhead or seatbox flanges. Making relief shroud for where bell housing pokes through (wouldn’t with long BH R380)
FACCD62F-42F0-4E1D-8C6C-A1003C620B40.jpeg

And got heater box in.
7B7FC875-9A39-4DCC-8D03-AFD081ECC947.jpeg

and lastly got the TD5 trans cross member in along with last mock up of exhaust DOC to route first section of exhaust which I’ll work on today— so shots of that soon.

another thing, probably tonight, I have to rewarp the harnesses as the tape I bought wasn’t what i thought and isn’t for under bonnet—argh. I’ll redo all that with Tessa tape which is what I thought I got.

oh yeah! One more tiny thing. When you swap aluminum oil pan the dip stick moves but I’ve no clue where factory secures it. So made a little bracket, good for now (maybe permanent) that utilizes turbo intake flange. (And yes, I’ll heat shroud it).
FC949880-AE7C-4359-89D2-346B7A9D3E29.jpeg
 
Last edited:

MountainD

Technical Excellence Contributor
No. The LHS conflicts with the engine mount, so that side needs to be plugged off. I did try but the dipstick hole is larger as well, so you’d have to use the new dip stick and it would need to be totally different shape
 

MountainD

Technical Excellence Contributor
Yeah. I’m going with Borla 40364. we will see. Won’t know till it’s running on if I’ll like it. Exhaust note is important.
1649567882671.jpeg
 

MountainD

Technical Excellence Contributor
Wow, been a while. I have been busy--factory trips, product showcases, work, work, work. I try every night to do at least ONE thing. Tonight I put in 4 bolts, but they needed to go in too. This weekend will be huge. What have I been up to? From the exhaust, I moved on to the heat shield--had to protect the dip stick (plastic) and engine mounts (rubber) as well as the bulkhead. Just made sense. Very specular aluminum, bolted to chasses on the existing bulkhead to chassis mounting bracket. I may remake it a little more refined, but right now, its great.
1651813121652.png

1651813183061.png

That meant I could close up that fender and install the Webasto coolant heater! I made a bracket out of the coolant reservoir bracket--no new holes. Here is the bracket mock up--keep it simple, keep it functional and aethetic.
1651813339435.png


1651813570809.png


Jumped to the inside for a change of pace and started to button up the tunnel...
1651813490956.png

Then back to the engine bay... Argh. I really needed to rotate the power steering pump intake up a few more degrees. It rotated initially but started to get stuck/stiff to turn. Needed 10 more degrees or so. Then this.
1651813738627.png
1651813783293.png

Stay calm. If anyone knows that part, I'd love to know. I saved the pump and bought a new one. Installed. Rotated. Hey, for others that rotate: neither the bore nor the inlet pipe are perfectly round, at least not using a micrometer to measure. That caused the binding. Whatever--just be careful. Word of advise for those needing to rotate. I personally won't use the pipe over the tube method nor did I for the replacement. Remove your pump. Grab the throat with pipe wrench and do it on a bench. It is SOOO easy to remove, just do it this way---but mark with a sharpie where it needs to rotate too first.... Good now, back installed.
Decided to switch gears...made some fuel lines... mounted Uncle Doug's sedimenter except on opposite side from where I would have on the 200...realized I could not reverse it so I would need to wrap around the filter and that wouldn't work. Ditched idea. Don't worry about these lines--I did NOT leave them with big air-bubble trapping loops. I had a routing change that gave me more slack--I remade them...
1651814225552.png

Gotta sell the sedimenter since I can't/am not gonna use it... I needed a disconnect on the fuel line so you can install the tank while having the fuel line attached--hence the connector below by the shock mount. This is the new routing which is way more proper. I will install insulated clamps once I am sure everything is A-OK.
1651814420492.png


I've kept plugging away... Next is the cooling package. Then on to wiring. Putting that one off.... I need to have the time to be very thoughtful and cohesive... so that is a weekend project.
1651814559283.png
 
Last edited:

MountainD

Technical Excellence Contributor
About this time I get a call from the wife. Something REALLY heavy has arrived. I smile on the other end of the line... didn't need to wonder what it was. Since I could not get John's Psyoptic Design sliders, I opted to find something solid and decent and cost effective until I either design/make or find something more aethetic. I looked at a ton--all were either stupid expensive or didn't have the attributes---I wanted "real" sliders as I will be using them off road here in CO/Moab and it needed to have jack points and tree bars. Bearmach makes those. I got the galv/powder coated versions, under $400 to my door (UKAR) and I'm satisfied. Not a perfect fit, but not hard to mod to fit.
1651841587733.png
1651841677060.png

It was at this time that my buddy Erik, after finishing a trade show, asked if I wanted the monitor/stand that he was using. I absolutely did as I had always wanted to add a rolling "workshop" manual to aid in some of the endeavors! Plus I stream Netflix or sports when I want some background things going on...
1651842065313.png

You will also notice the piece of paper hanging on the brake master--I leave notes on any unfinished things so I don't move past and have to back track. I kept filling up on bourbon and wanting to put the fender on! But it is so much easier adjusting the clutch with it off...so I left the note. ALSO---notice the paper towel on the fender. This is the BEST use for those magnetic paper towel holders from Harbor Freight. Camping too. Just FYI :).

Then onto the Aux diesel tank under passenger rear quarter. It had a feed running out the side of the aux into the bottom of the main tank. The bottom. Sticking down. Historically, not a good idea for an off road rig--that had to go. Since I was going to replace the tank out of an abundance of caution (and they are relatively cheap) got a new one and welded in the tank equalization bung on the side for the gas equalization and one for the Webasto heater. 6AN lines abound on this build. It makes assembly/disassembly easier and leaks a thing of the past. Yeah, much more expensive. But I am a long hauler and my choice--YMMV. Braided stainless over teflon core. Did the same on my LS-D90 and couldn't be happier.
1651842501430.png

More lines made. Power steering cooler on front rail. Allisport reservoir.
1651842985959.png
1651842744781.png

On to cooling mock ups! Shoved the rad/intercooler in there to see in general where they would sit.
1651843130481.png
1651843183299.png

I don't want flash. Matter of fact, I like my used patina and the overall look of the stock defender under the hood so didn't want a giant "AXIS" or such that just didn't seem like it "fit" (my taste at least). I wanted to look "born there" sort of thing. Yeah, I am using -AN lines and a few blinging bits, but simple and fresh is more me. So I thought how to align all three cores (rule #1) with staggered height so they all get at least a little fresh air (cool spots on radiator) which was rule #2--which was all a little tricky with AC/Intercooler/Rad combo. I reused the stock radiator carrier to use with the full length intercooler and put radiator behind that. It took a lot of thought and mock ups but ended up with original mounting on chassis and no modifications to body. Just a few holes in top carrier for brace strap and a welded tray for the radiator to sit onto.
1651843581197.png

The Rad/intercooler needed a slight spacer to clear the bends in the intercooler inlet/outlet and I wanted to make sure I didn't have metal on metal. I had some aluminum flat stock for this that will just use a simple top brace to keep in place and closed-cell foam to seal/buffer the two cores:
1651843896829.png

ahhhhhh the nefarious (10) pic limit! Well, you can see the stack on instagram @mountaindavis for a spoiler or I'll continue this after work for the day is done. Feeding the family is my first priority.
 
Last edited:

MountainD

Technical Excellence Contributor
5091222C-98CB-40FD-9ECC-DD51ADBBD560.jpeg

Slider mounted (just one side for now). I should have put the grip tape on first but with new bolts, not hard to remove if need be.
5CDFFF21-841F-477B-9539-C9FCBC03541F.jpeg

R380 radiator is going in recess under the cubby above and over from parking brake. Upper bracket connects to chassis seat box bolts, lower mounting installs with rivnuts in chassis cross brace. Stacked plate with fan, in-line thermostat and gauge sender.
78F1A929-2F46-4D42-A3BA-5DFAAE9D223E.jpeg
0E6E50D1-DBD2-4A2F-9C8C-67EAE9D30DAC.jpeg

Cooling package assembled.
0D926E65-E165-42F9-858A-59686F85BCD2.jpeg
9B0B99E0-C91F-474B-B55B-053E06066201.jpeg

And installed
8F8C91C2-EEFF-4847-9578-5593A67B8814.jpeg

6C8849E8-8232-45E4-8F0B-AF42A30C571D.jpeg

Remade ac bracket to align cores and installed.
67C5135D-A856-4A64-B705-571A77419B2F.jpeg

Testing AN lines for rad cooler:
0556C97C-D639-4F97-AABF-F6ADA2AB071D.jpeg
 
Last edited:
Top