1984 110SW Cummins 6BT/NV4500/LT230

16kpsi

Member
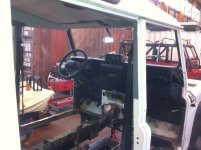
Well, this has been going on for a decade, finally to a point where I can start wrapping it up and posting some pics. When it started, there were only a handful of us doing the 6BT - Nick over in the UK. Oilburner in his 109 in Canada. A couple others. So it was a bit of a walk in the dark. Now, well....there are many....and I'd probably go with the R2.8. But the 6BT12V with a P7100 pump is something special.

It doesn't look like I can imbed pics sequentially, so I'll do this as a starter post and reply with the steps.

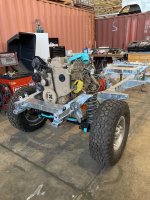
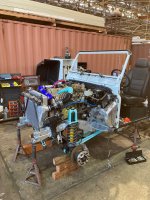
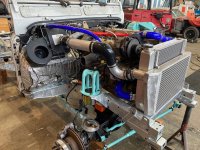
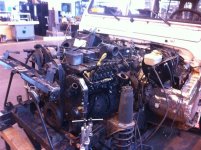
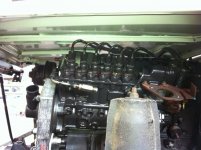
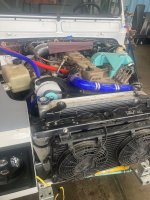
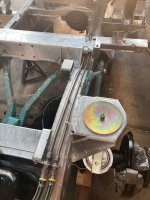
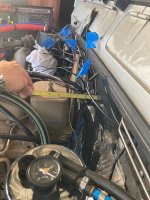
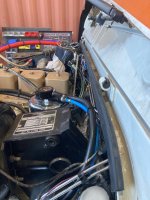
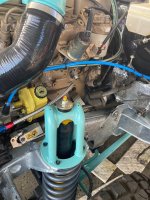
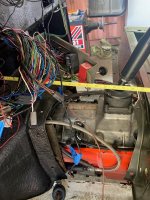
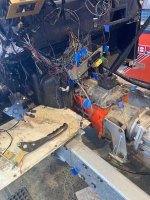
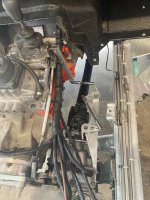
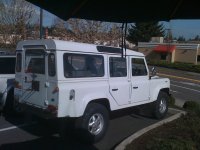
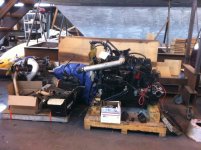
Started as a 200tdi. After being passed by semi's on East I80 grade in the sierras - this going to be one of its haunts - the need for more torque was mandated. I'm prone to overkill, so the 4bt just wouldn't do. I got a nice deal and choice on a 1997 6BT out of a Binks Armored car fleet being broken locally. The size of the 6bt compared to the 200tdi is remarkable.

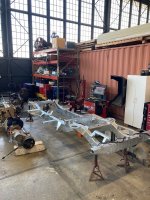
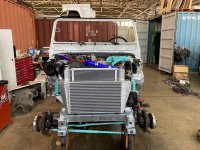
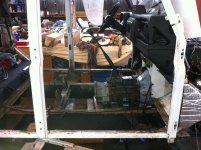
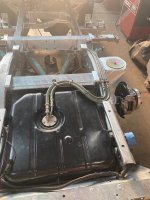
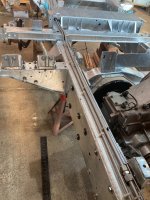
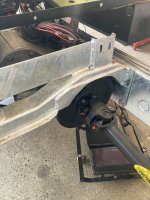
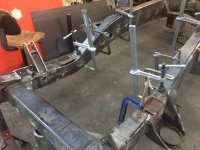
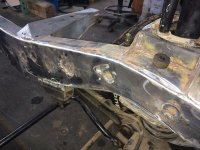
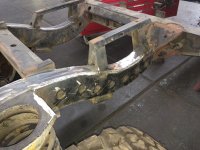
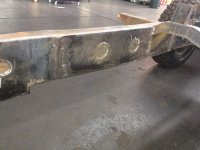
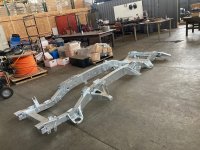
It seemed advisable to reinforce the frame as others had experienced some cracking after conversation. This created a start and a stop and a re-start on a 'new' used ex-mod frame as my original frame was found to be just too far gone when I got into reinforcing. I plated top and bottom with 3/16" through out. 1/8" to 3/6" on one side also. So "C" boxed the frame. Also reinforced the spring brackets - it was going to get heavier.

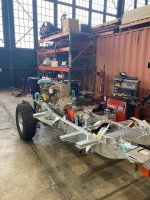
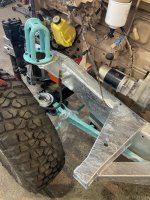
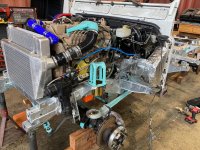
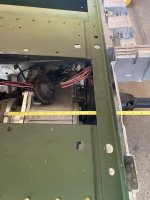
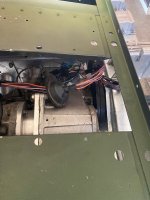
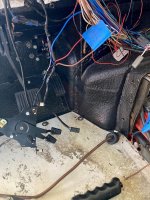
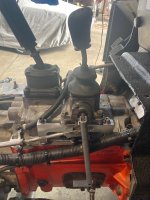
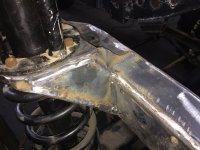
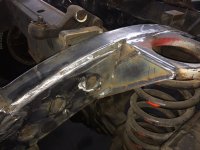
This conversion also requires changing to the p38 steering box and mounting it outside the frame. So at this time, I built the box mount and panhard rod brackett directly to the frame. Then off to galvanizing
 

Attachments

  • 086.jpg
    086.jpg
    162.7 KB · Views: 247
  • Engines.JPG
    Engines.JPG
    245.1 KB · Views: 262
  • Bottom Frame Plating.JPG
    Bottom Frame Plating.JPG
    198.7 KB · Views: 282
  • Front Spring Bracket.JPG
    Front Spring Bracket.JPG
    195.1 KB · Views: 264
  • New Front.JPG
    New Front.JPG
    212.1 KB · Views: 273
  • New Rear.JPG
    New Rear.JPG
    203.3 KB · Views: 230
  • New Side.JPG
    New Side.JPG
    184.7 KB · Views: 244
  • Panhard Bracket.JPG
    Panhard Bracket.JPG
    189.9 KB · Views: 254
  • Rear Spring Bracket.JPG
    Rear Spring Bracket.JPG
    183.5 KB · Views: 248
  • Frame 1.jpg
    Frame 1.jpg
    384.6 KB · Views: 249
Last edited:

16kpsi

Member
I snaked a 'new' 2002 300TDI harness through the frame while I could stand it on end. Then began fitting it to the frame.
I had obviously done a 'build up' to locate the motor relative to bulkhead and cut the bulkhead for the bigger bellhousing and starter interferences.
Location. Location. Location. It a game of 1/16 inches. The motor is tight between the forward cross member (and radiator group) and the bulkhead. Not just at the engine head, but the further back you go, the more you have to open up the hole in bulkhead. the brake drum is also up into the battery box support (which got modified too). Height is a fight too. The intake plenum and the hood are at war - even with a Puma hood. Underneath, after fitting the reversed oil pan, there is still a fight for travel. Left and right is the tightest game - the front drive shaft wants to hit the bellhousing (I ground off one bolt) and the brake drum wants to hit the left frame rail. On the other side, you're loosing space at the gas pedal.

In the end, I wish I were about 1" further back. It's too tight for me to get a normal socket on the harmonic balancer bolt to bar the motor over. I can get it on the alternator though and the belt has enough grab to bar the motor over that way.
 

Attachments

  • Frame 2.jpg
    Frame 2.jpg
    378.2 KB · Views: 307
  • Engine in New Frame 1.jpg
    Engine in New Frame 1.jpg
    241.7 KB · Views: 603
  • Engine in New Frame 2.jpg
    Engine in New Frame 2.jpg
    378.7 KB · Views: 327
  • Engine in New Frame 3.jpg
    Engine in New Frame 3.jpg
    399.3 KB · Views: 310
  • Engine in New Frame 4.jpg
    Engine in New Frame 4.jpg
    272.9 KB · Views: 303
  • Engine in New Frame 5.jpg
    Engine in New Frame 5.jpg
    387.7 KB · Views: 297
  • Engine in New Frame 6.jpg
    Engine in New Frame 6.jpg
    448 KB · Views: 509
  • Engine in New Frame 7.jpg
    Engine in New Frame 7.jpg
    419.6 KB · Views: 314
  • OF Dash.JPG
    OF Dash.JPG
    193 KB · Views: 291
  • OF dside.JPG
    OF dside.JPG
    257.5 KB · Views: 295

16kpsi

Member
a few more fixturing pics
 

Attachments

  • OF inside.JPG
    OF inside.JPG
    210 KB · Views: 208
  • OF pside.JPG
    OF pside.JPG
    237.8 KB · Views: 200
  • OF underhood.JPG
    OF underhood.JPG
    190.4 KB · Views: 220

16kpsi

Member
Some of the subtleties: I built an adapter for the NV4500 to LT230 connection(existing kits where too long). I used the Dodge 31tooth NV4500 main shaft and had a new spline (24/48 - 32tooth) ground onto it. The original spline is to big to fit into the lt230 input gear. Got a few new 1:1 input gears from Ashcroft (and a few other t-case goodies) and had the female spline EDM cut into that. I have CAD drawings and files of all of these if anyone is interested.

Clutch - Using the OEM defender master to an OEM dodge slave. Used a -04 Swage to -04 JIC adapter on the line running from the master. A -04 JIC flex line. And a -04 JIC to 'whatever the heck it is' fitting adapter in the slave (Jegs and Summit sell them). Works great. I put an up-rated clutch in it and its still not a beast to clutch.

Griffith radiator. Bought an inner cooler core that fit the area and welded up the end boxes. I plan on putting in AC (the compressor is on the motor), so I mounted a discovery condensor and twin pusher fan pack on the nose (using the desert extended nose). On relay at 180F for now and seems to be working well. Comes on and holds temp when idling and warming up, but shuts off as soon as I'm driving and getting air flow.

Fuel lines: Changed the pick up to the top of the tank to use larger lines. Ran stainless swage all the way and a big return. The stock lift pump is good to about 400hp flow, so I'm not adding an electric boost pump for now.
 

Attachments

  • Clutch 1.jpg
    Clutch 1.jpg
    318.3 KB · Views: 241
  • Clutch 2.jpg
    Clutch 2.jpg
    289.1 KB · Views: 233
  • Fans 1.jpg
    Fans 1.jpg
    232.4 KB · Views: 256
  • Fans 2.jpg
    Fans 2.jpg
    252.7 KB · Views: 315
  • Fuel Lines 1.jpg
    Fuel Lines 1.jpg
    180.1 KB · Views: 244
  • Fuel Lines 2.jpg
    Fuel Lines 2.jpg
    345.3 KB · Views: 233
  • Fuel Lines 3.jpg
    Fuel Lines 3.jpg
    309.2 KB · Views: 247
  • Fuel Lines 4.jpg
    Fuel Lines 4.jpg
    402.8 KB · Views: 231
Last edited:

16kpsi

Member
Various location pics here. While I say I wish it were an inch back, you can see the issue at the battery box with the shifter. So maybe not.
 

Attachments

  • Adapter.jpg
    Adapter.jpg
    297.4 KB · Views: 248
  • Brake.jpg
    Brake.jpg
    293.6 KB · Views: 233
  • Crossmember.jpg
    Crossmember.jpg
    363.2 KB · Views: 239
  • Front Bulkhead 1.jpg
    Front Bulkhead 1.jpg
    334.2 KB · Views: 243
  • Front bulkhead 2.jpg
    Front bulkhead 2.jpg
    301.7 KB · Views: 216
  • peddles.jpg
    peddles.jpg
    428.9 KB · Views: 213
  • pulley.jpg
    pulley.jpg
    289.9 KB · Views: 236
  • Starter.jpg
    Starter.jpg
    371.4 KB · Views: 233
  • Stick relative to bulkhead.jpg
    Stick relative to bulkhead.jpg
    398 KB · Views: 247
  • tunnel.jpg
    tunnel.jpg
    433.9 KB · Views: 252

16kpsi

Member
LT230 shift linkage is a bit Rube Goldberg, but it works quite well.

Custom tunnel layup in fiberglass using foam as a buck. Later used the foam as underside insulation as well. I'm good with layups. But I hate it with a passion. Rubber boots from various sources worked out. Had to bend the shifter output shaft a little to get it in the right place.
 

Attachments

  • Linkage 1.jpg
    Linkage 1.jpg
    389.2 KB · Views: 215
  • Linkage 2.jpg
    Linkage 2.jpg
    380.4 KB · Views: 228
  • Linkage 3.jpg
    Linkage 3.jpg
    299.2 KB · Views: 241
  • Tunnel Cover 0.jpg
    Tunnel Cover 0.jpg
    220.3 KB · Views: 230
  • Tunnel Cover 1.jpg
    Tunnel Cover 1.jpg
    174.9 KB · Views: 236
  • Tunnel Cover 2.jpg
    Tunnel Cover 2.jpg
    160.2 KB · Views: 240

16kpsi

Member
I did a custom SS exhaust I'll get some pics of up here shortly.

Oh - Power steering. Always fun. A game of 'name that fitting to 'what the hell is this?'. But got it sorted with several try's and mostly through Jegs and Summit. Was fighting a heavy wheel - until I tested the pressure. Dead pump. New pump. Pinky steering!. Awesome!
Steering rod has to be lengthened several inches due to the outboard fitting of the P38 box. And a custom mount for the steering damper of course.

OEM Vacuum pump to a vacuum reservoir (Jegs) for brake boost.

I just did the 3000rpm rev limiter increase and some fueling tweaks, so looking forward to seeing how it runs. It was awesome already, but very short in RPM: 800 to 2400 (really 2000).
Cant upload the movie of first run unfortunately
 
Last edited:

Napalm00

Technical Excellence Contributor
wow looks great ! upload the video to YT and just post the link here. how did you calculate the new suspension coils?
 

16kpsi

Member
wow looks great ! upload the video to YT and just post the link here. how did you calculate the new suspension coils?
I used RTE’s 3” RRC springs. Talking to them, we were confident it would settle to 2” lift. It’s pretty much spot on. Terrafirma +2” rears.

using OME +2” shocks. Rides very well.
 

JimC

Super Moderator
Staff member
Holy cow, the engine is so big. I’ve seen some of the 130s in the UK with the 6BT, but never appreciated just how much shoehorning was involved.

And you built a chassis around your chassis!
 

Mack

Well-known member
Awesome seeing these progress pics after all this time! So much good work on this truck, and it’s all so well thought out. Keep up the good work Tony, it will be worth the wait.
 

rocky

NAS-ROW Addict
Holy incredible smokes!!!

I am impressed, especially with your tenacity to make it through the project and come out the other side with a successful outcome. I’ve seen Nick’s conversions on YouTube and it’s so capable.

FWIW, your shifter arrangement is very similar to the Puma side by side layout.
 
Top